Motor bearings, Fan bearings, Motor services – COOK Propeller Upblast User Manual
Page 5: Changing shaft speed, Pulley and belt replacement, Bearing replacement, Maximum rpm
5
grades of grease should not be used unless the bearings
and lines have been flushed clean. If another grade of
grease is used, it should be lithium-based.
A NLGI grade 2 grease is a light viscosity, low-torque,
rust-inhibiting lubricant that is water resistant. Its tempera-
ture range is from -30
F to +200F and capable of intermit-
tent highs of +250
F.
Motor Bearings
Motor bearings are pre-lubricated and sealed. Under nor-
mal conditions they will not require further maintenance for
a period of ten years. However, it is advisable to have your
maintenance department remove and disassemble the
motor, and lubricate the bearings after three years of oper-
ation in excessive heat and or in a contaminated airstream
consisting of airborne abrasives.
Fan Bearings
Fan bearings are lubricated through a grease connector
and should be lubricated by the schedule, Conditions
Chart, on page 4.
For best results, lubricate the bearing while the fan is
rotating. Slowly pump grease into the bearing until a slight
bead forms around the bearing seals. Excessive grease
can burst seals thus reduce bearing life.
In the event the bearing cannot be seen, use no more
than three injections with a hand-operated grease gun.
Motor Services
Should the motor prove defective within a one-year
period, contact your local Loren Cook representative or
your nearest authorized electric motor service representa-
tive.
Changing Shaft Speed
All belt driven propeller roof fans with motors up to and
including 5HP are equipped with variable pitch pulleys. To
change the fan speed, perform the following:
a. Loosen setscrew on driver (motor) pulley and remove
key, if equipped.
b. Turn the pulley rim to open or close the groove facing.
If the pulley has multiple grooves, all must be adjusted
to the same width.
c. After adjustment, inspect for proper belt tension.
Speed Reduction
Open the pulley in order that the belt rides deeper in the
groove (smaller pitch diameter).
Speed Increase
Close the pulley in order that the belt rides higher in the
groove (larger pitch diameter). Ensure that the RPM limits
of the fan and the horsepower limits of the motor are main-
tained.
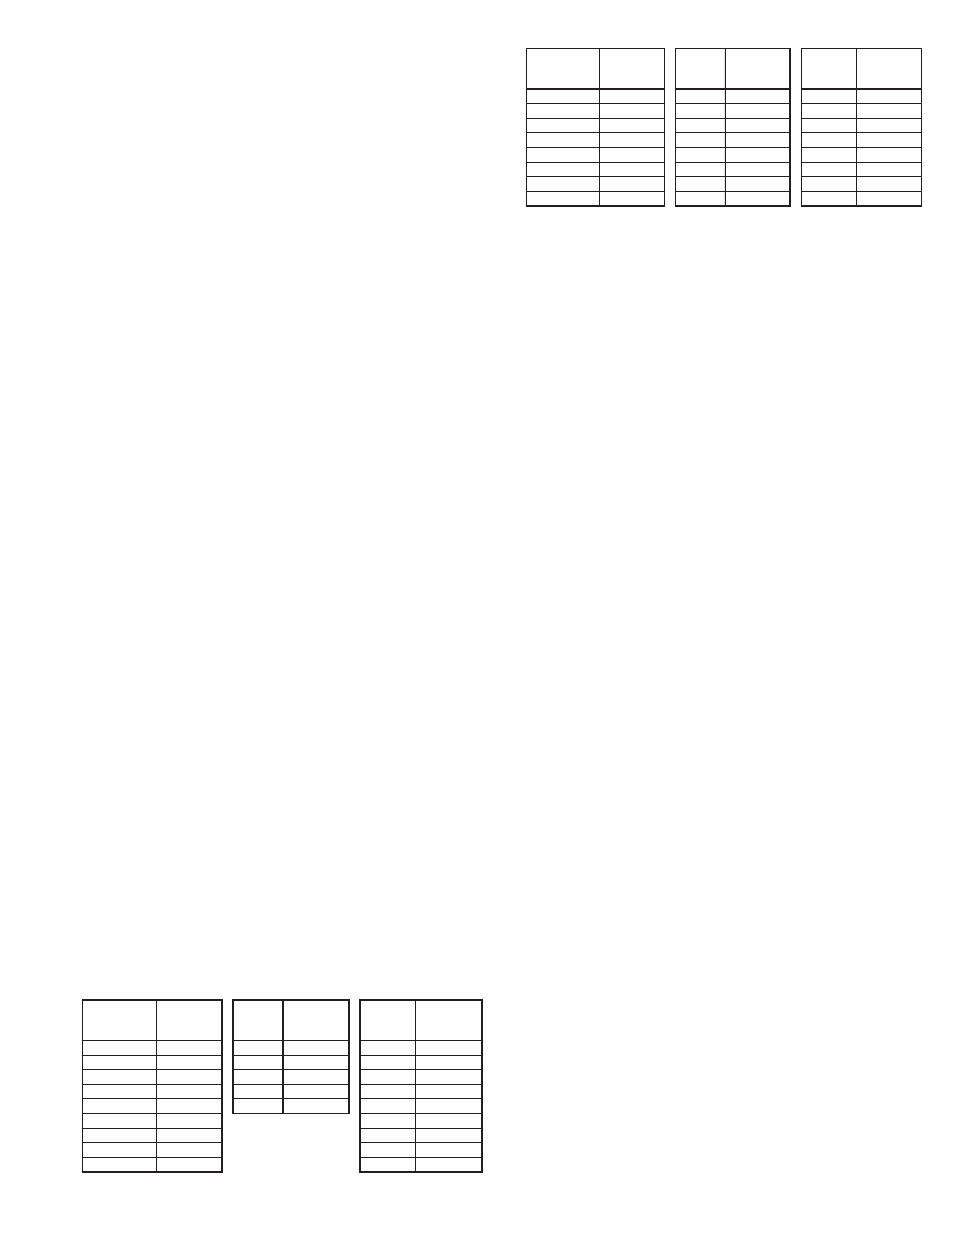
Maximum RPM
TUB, SUB,
SUBH
Size
Maximum
RPM
AUB
Maximum
RPM
EUB
Maximum
RPM
20
2633
24
1585
24
1650
24
1993
30
1180
30
1305
30
1605
36
1015
36
1305
36
1314
42
935
42
1200
42
1106
48
845
48
1150
48
973
54
900
54
888
60
870
60
783
72
688
72
616
Maximum RPM
TUB, SUB,
SUBH
Size
Maximum
RPM
AUB
Maximum
RPM
EUB
Maximum
RPM
20
2633
24
1585
24
1650
24
1993
30
1180
30
1305
30
1605
36
1015
36
1305
36
1314
42
935
42
1200
42
1106
48
845
48
1150
48
973
54
900
54
888
60
870
60
783
72
688
72
616
Maximum RPM
TUB, SUB,
SUBH
Size
Maximum
RPM
AUB
Maximum
RPM
EUB
Maximum
RPM
20
2633
24
1585
24
1650
24
1993
30
1180
30
1305
30
1605
36
1015
36
1305
36
1314
42
935
42
1200
42
1106
48
845
48
1150
48
973
54
900
54
888
60
870
60
783
72
688
72
616
Maximum RPM
LXUL
Size
Maximum
RPM
LXUM Maximum
RPM
LEU
Maximum
RPM
20
1270
20
1460
20
1675
24
1110
24
1400
24
1650
30
930
30
1170
30
1350
36
720
36
860
36
1310
42
600
42
718
42
1210
48
508
48
598
48
1214
54
478
54
522
54
946
60
450
60
476
60
854
Pulley and Belt Replacement
a. Clean the motor and fan shafts.
b. Loosen the motor plate mounting bolts to relieve the
belt tension. Remove the belt.
c. Loosen the pulley setscrews and remove the pulleys
from the shaft.
If excessive force is required to remove the pulleys, a
three-jaw puller can be used. This tool, however,
can easily warp a pulley. If the puller is used,
inspect the trueness of the pulley after it is
removed from the shaft. The pulley will need
replacement if it is more than 0.020 inch out of
true.
d. Clean the bores of the pulleys and place a light coat of
oil on the bores.
e. Remove grease, rust and burrs from the shaft.
f. Place fan pulley on the fan shaft and the motor pulley on
the motor shaft. Damage to the pulleys can occur when
excessive force is used in placing the pulleys on their
respective shafts.
g. After the pulleys have been correctly placed back onto
their shafts, tighten the pulley setscrews.
h. Install the belts on the pulleys. Align and adjust the
belts to the proper tension as described in Belt and Pul-
ley Installation, page 2.
Bearing Replacement
The fan bearings are pillow block ball bearings.
a. Remove the wind band and damper assembly to gain
access to the fan.
b. Loosen the motor plate mounting bolts and remove the
drive belts.
c. Remove the propeller from the shaft.
d. Remove the bearing cover. Remove the four (4) bear-
ing hold-down bolts and then remove the shaft, bear-
ings, and driven sheave from the unit as an assembly.
e. Measure and record the location of the bearings and
sheave on the shaft. This will aid the reassembly.
f. Remove the anti-corrosion coating from the shaft with a
suitable degreaser and then remove the pulley from the
shaft. An emery cloth or file may be needed to remove
imperfections in the shaft left by the setscrews.