Pulley and belt, Bearing, Wheel – COOK QMX User Manual
Page 7: Wheel replacement, Changing shaft speed, Pulley and belt replacement, Bearing replacement
7
k. Slide shaft through bearings until shaft protrudes the
same amount as measured above. Tapping the inner
race of each bearing with a soft driver may be
required. Do not hammer the end of the shaft or the
bearing housing.
l. Return setscrews to same location as marked above
and tighten one setscrew on each bearing to half its
specified torque.
m. Rotate the shaft to allow the bearings to align them
selves.
n. Replace wheel but do not tighten yet.
o. Replace inlet cone. Wheel may need to be moved to
allow proper alignment. Care should be taken to
insure that inlet cone is centered inside wheel before
and after tightening attaching bolts.
p. Slide wheel on shaft to achieve proper wheel/inlet
overlap and tighten wheel set screws. Refer to
Wheel-to-Inlet Clearance on page 3.
q. Tighten hold-down bolts to proper torque.
r. Turn the shaft by hand. resistance should be the
same as it was before hold-down bolts were fully tight-
ened.
s. Tighten all bearing setscrews to full specified torque.
t. Replace the sheave, align with motor sheave, and
adjust the belt tension.
u. Test run fan and retighten all setscrews and bolts, and
trim balance as necessary (.0785 in/sec max).
v. Replace discharge cover.
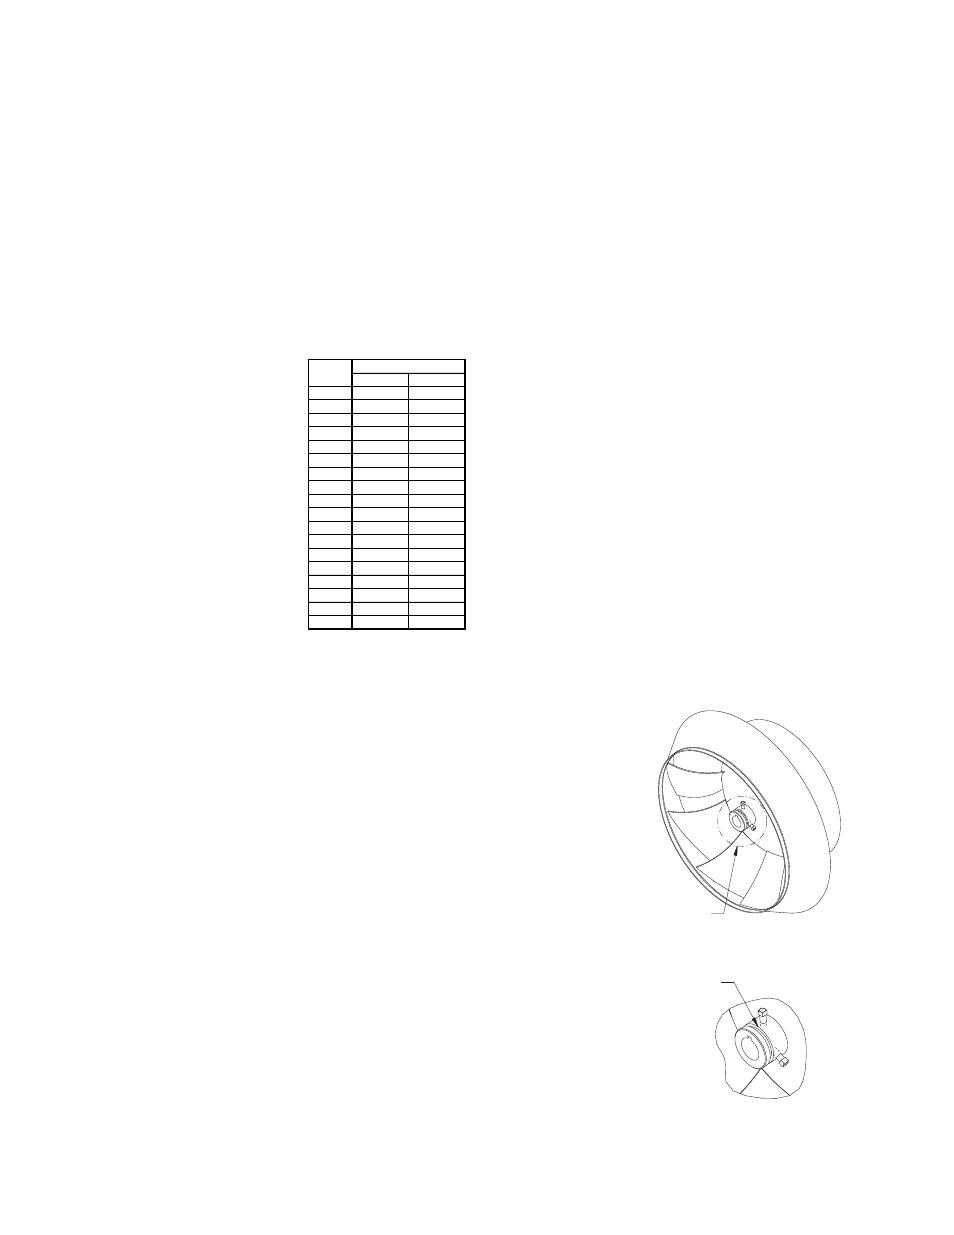
Wheel Replacement
The wheel has a pre-machined shoulder in the hub for
the use of most 2 and 3 jaw mechanical puller.
a. Align center of the puller with the center of the shaft.
b. Ensure all setscrews in the hub, normally two, are
fully removed.
c. Slowly remove wheel from the shaft.
Changing Shaft Speed
All belt driven fans with motors up to and including 5 HP
are equipped with variable pitch pulleys. To change the fan
speed, perform the following:
a. Loosen setscrew on driver (motor) pulley and remove
key, if equipped.
If the pulley has multiple grooves, all must be adjusted
to the same width.
c. After adjustment, inspect for proper belt tension.
Speed Reduction
Open the pulley in order that the belt rides deeper in
the groove (smaller pitch diameter).
Speed Increase
Close the pulley in order that the belt rides higher in
the groove (larger pitch diameter). Ensure that the
speed limits of the fan and the horsepower limits of the
motor are maintained.
Pulley and Belt
Replacement
a. Loosen and remove belts
by adjusting motor
mounting plate.
b. Remove pulleys from
their respective shafts.
c. Clean the motor and fan
shafts.
d. Clean bores of pulleys
and coat the bores with
heavy oil.
e. Remove grease, rust, or
burrs from the pulleys
and shafts.
f. Remove burrs from shaft by sanding.
g. Place fan pulley on fan shaft and motor pulley on its
shaft. Damage to the pulleys can occur when exces-
sive force is used in placing the pulleys on their
respective shafts.
h. Tighten in place.
i. Install belts on pulleys and align as described in the
Belt and Pulley Installation section.
Bearing Replacement
The fan bearings are pillow block ball bearings.
a. Loosen and remove belts by adjusting motor mounting
plate
b. Remove the bearing cover by removing the bolts
around the perimeter of the bearing cover. Do not
remove fan sheave yet.
c. Remove inlet cone by removing attaching bolts/nuts
around perimeter of the inlet plate.
d. Remove wheel by loosening setscrews and sliding off
shaft.
e. Record the location of the fan sheave from end of
shaft, and remove the sheave.
f. Record the distance from the bearing to the end of the
shaft.
g. Loosen setscrews on bearings and remove shaft.
j. Remove bearings from bearing base and replace with
new ones, noting the exact location of each; do not
fully tighten base bolts.
SEE DETAIL A
PRE-MACHINED SHOULDER
DETAIL A
Fan
Size
Max Catalog RPM
QMX
QMX-HP
90
4943
5987
120
3707
4490
135
3295
3991
150
2907
3510
165
2633
3191
180
2423
2925
202
2152
2600
225
1937
2340
245
1780
2149
270
1623
1866
300
1465
1679
330
1332
1527
365
1207
1381
402
1081
1252
445
988
1132
490
897
1028
540
813
933
600
732
-