Frost protection, Troubleshooting, Replace fuses – Karcher B 250 R I Bp User Manual
Page 26: Fault indication, Faults with display
-
10
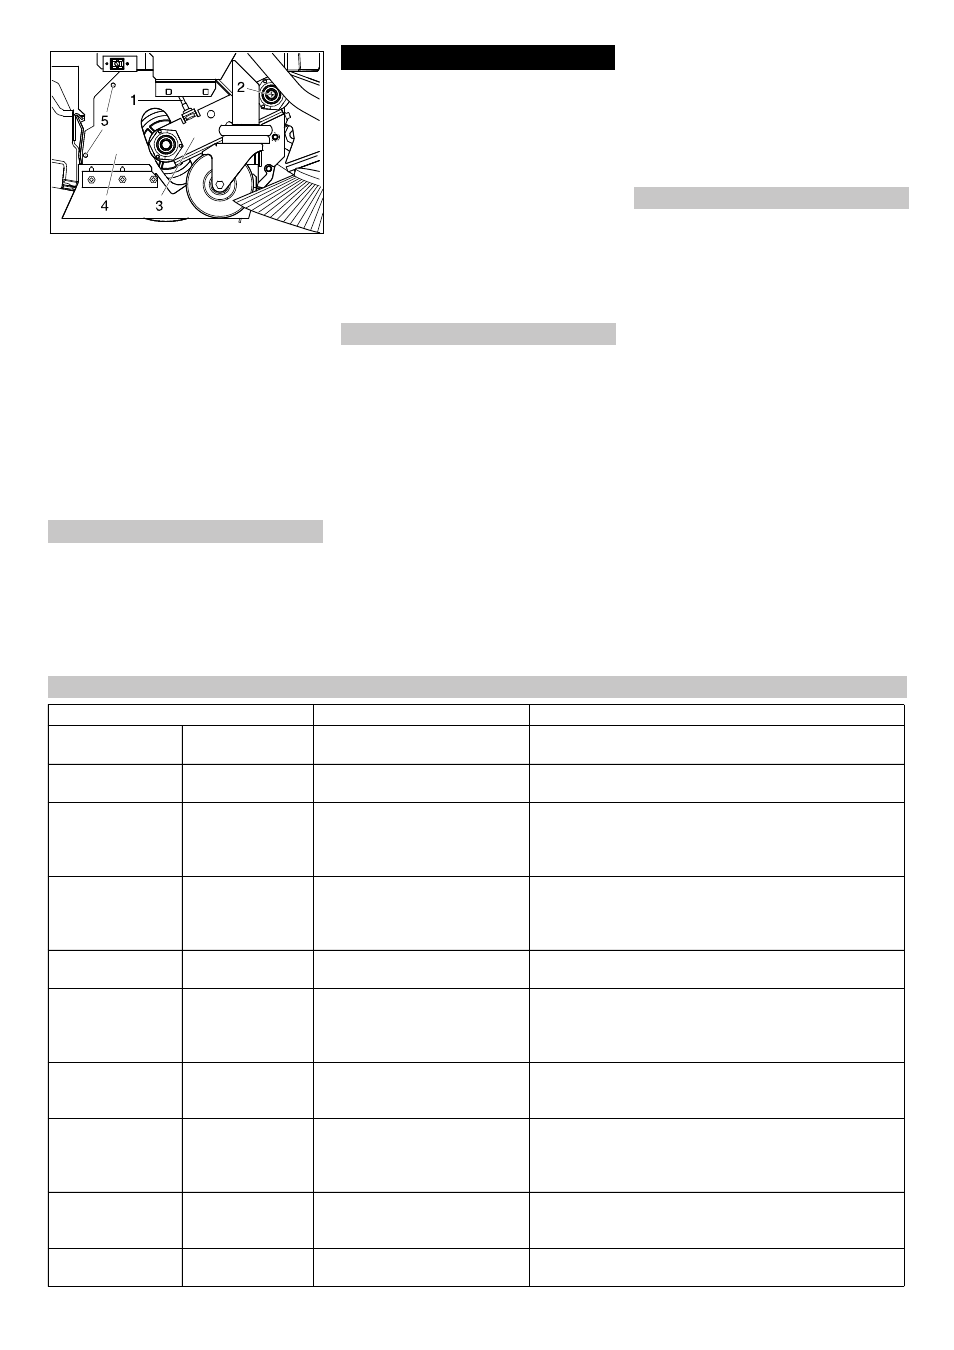
1 Bowden cable
2 Screw of the link bracket
3 Link
4 Cover
5 Lid screws
Hang out the Bowden cable.
Loosen and remove screws of the link
bracket.
Remove the crank.
Loosen and remove both screws of the
lid and open the cover.
Pull out roller brush.
Insert new roller brush and reassemble
the sweeper in the reverse sequence.
Readjust the Bowden cable.
In case of danger of frost:
Empty the fresh and dirt water reser-
voirs.
Store the appliance in a frost-protected
room.
ƽ DANGER
Risk of injury. Before carrying out any tasks
on the machine, set the main key to "0" and
remove it. Press emergency-stop button.
Suction turbine, side brushes and filter
cleaner continue to run for a while after
switching off. Carry out maintenance tasks
only after these components have come to
a halt.
Drain and dispose of the dirt water and
the residual fresh water.
In case of faults that cannot be remedied
using the table below please contact the
customer service.
The operator may only replace the follow-
ing vehicle flat fuses having the following
values:
– 7.5A (F1) – Control and emergency
power supply.
– 30A (F3) – Lift/accessories module sup-
ply.
– 80A (F6) – Lift/Clean module 2 (sweeper).
ATTENTION
Defective pole fuses should only be re-
placed by the service center. If these fuses
are defective, then customer service center
has to check the usage conditions and the
entire control system.
The control unit is located below the oper-
ating panel. To access the fuses the cover
on the left side of the foot compartment
must be removed in advance.
Turn out the fastening screws at the up-
per end of the cover.
Remove cover.
Replace fuse.
Replace cover.
Note:
The population of fuses is displayed on the
inner side of the cover.
The display shows the existing faults at in-
tervals of 4 seconds (example:
Fault scrubbing
funktion H1/022
If the faults continue to be displayed on the
console even after 4 seconds, then pro-
ceed as follows:
Bring the key switch to "0" (switch off
the machine).
Wait till the text on the display has dis-
appeared.
Bring the key switch back to "1" (switch
on the machine). Carry out the trouble-
shooting measures in the given se-
quence only if the fault occurs again. At
such times, always bring the main
switch to the "0" position and ensure
that the emergency-stop button is de-
pressed.
If the fault cannot be repaired, call cus-
tomer service and mention the fault
code(s) (H1/022 in the example).
Frost protection
Troubleshooting
Replace fuses
Fault indication
Faults with display
Display
Cause
Remedy
Seat switch broken seat switch open
Seat contact switch has not been
activated.
The machine only operates if the operator is seated on the
seat. Plug in the plug of the seat contact switch.
Release accelera-
tor!
release throttle?
The gas pedal is depressed when
the main switch is on.
Take your foot off the accelerator before switching on the
main switch. If the fault recurs, call customer service.
battery empty ->
charge!
battery empty ->
charge!
The discharge level of the battery
has been reached. Cleaning units
can no longer be operated. Drives
and lighting can be activated.
Drive the machine to the charging station and charge the
battery.
battery totally dis-
charged!
battery totally dis-
charged!
More than the permissible battery
capacity has been utilised. All
units will be switched off. Machine
is no longer ready for operations.
Manually unlock the front wheel brake. (Caution! The appli-
ance does not have any braking effect now!) If unlocking is
not possible, then call customer service. Move the machine
slowly to the charging station. Charge battery.
Dirt reservoir full,
cleaning stopped
sewage tank full
cleaning stops
Dirt water reservoir is full.
Empty the dirt water reservoir.
Operating hours set
to 0!
operating hours set
to 0!
Internal machine error while sav-
ing the number of operating
hours. During restart, the operat-
ing hours are always reset to 0.
None, for information.
Module tempera-
ture high! Let cool
down!
moduletemp. high
let cool down!
Controls are too hot.
Set the key switch to "0". Wait at least 15 minutes. Set the
key switch to "1".
Drive motor hot! Let
it cool down!
drive motor hot! let
cool down!
Drive motor has got overheated
due to a steep climb or locked
brake.
Set the key switch to "0". Wait at least 15 minutes. Set the
key switch to "1". If possible, drive the appliance on level
grounds only. If required, check the parking brake and the
accelerator pedal.
Contactor open!!
Emergency-stop
button??
contactor open!!
emergcy. button?
Press emergency-stop button.
Release emergency-stop button by turning. Set the key
switch to "0". Wait at least 10 minutes. Set the key switch
to "1".
Shut down, missing
bus supply
Shutdown, missing
bus supply
Inform Customer Service
26
EN