Insert batteries and connect, Charge the batteries, After charging – Karcher B 250 R I Bp User Manual
Page 20: Low maintenance batteries (wet batteries), Recommended batteries, chargers, Maximum battery dimensions, Unloading, With battery
-
4
The BAT package model contains built-in
batteries.
The steering position should point to-
wards the front.
Swivel the seat to the front.
Remove screw of seat stopper.
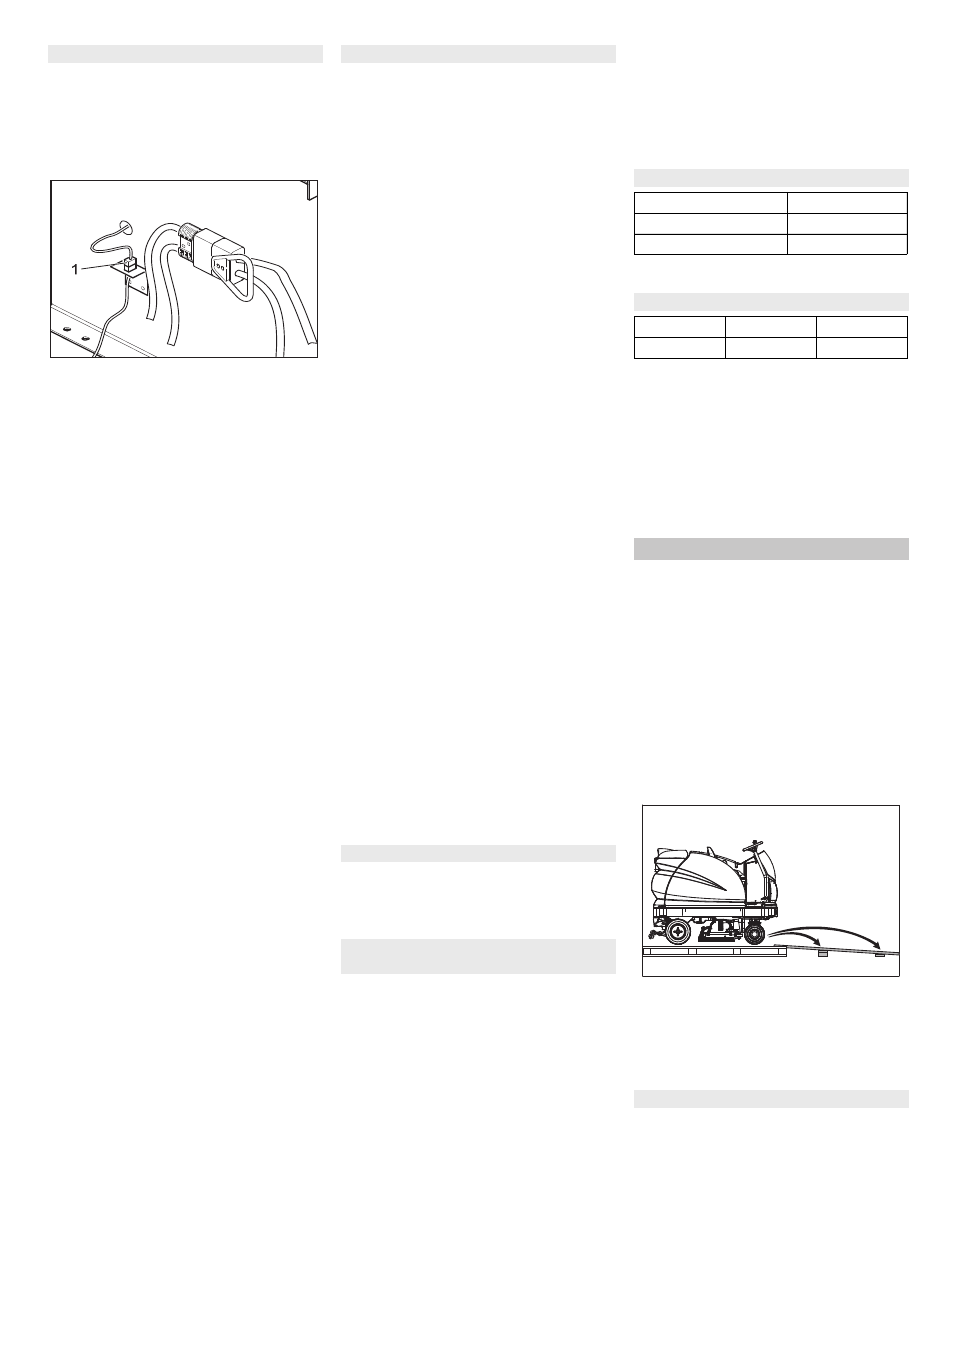
1 Plug for seat contact switch
Pull out the plug of the seat contact
switch and push it back through the
opening.
Unlock the driver seat and pull it up-
ward.
Dismount the plug of the seat contact
switch from the holder.
Unhook the support of the seat console
and close the seat console.
Unscrew the hinges of the seat console.
Place the seat console in the foot
space.
Lift battery cover.
Dismantle fresh water tank on the right
hand side.
Dismantle the side plate of the battery
box on the right hand side.
Insert battery. Battery connections in
front direction.
ATTENTION
Pay attention to correct poles.
Connect the connection cable to the
free battery poles (+) and (-). Lay the
cables in such a way that they do not
get clamped by the seat.
Install the side plate of the battery box
on the right hand side.
Install fresh water tank on the right hand
side.
Replace battery cover.
Insert battery plug.
Position the seat console.
Tighten down the hinges of the seat
console.
Open the seat console and secure the
support for the seat console.
Mount the plug of the seat contact
switch to the holder.
Insert the seat.
Reconnect the plug of the seat contact
switch.
Install screw of seat stopper.
Swivel the seat downward.
Adjust steering wheel.
ATTENTION
Charge the batteries before commissioning
the appliance.
Note:
The device is equipped with a safety mech-
anism to prevent total discharge, i.e. when
the permissible minimum capacity is
reached, then the machine can only be
driven and existing lamps can be switched
on. In such a case, the battery monitoring
symbol on the control console glows red.
Drive the machine directly to the charg-
ing station; avoid any steep gradients in
the process.
Note:
When using other batteries (e.g. batteries
from other manufacturers), the total dis-
charge protection level for the respective
battery must be reset by the Kärcher after-
sales service.
ƽ DANGER
Danger of injury due to electric shock. Ob-
serve supply network and fuse protection -
see "Charger".
Only use the charger in dry rooms with suf-
ficient ventilation!
Note:
Average charging time is approx. 10 -12
hours.
The recommended chargers (suitable for
the batteries used) are regulated electroni-
cally and will automatically terminate the
charging process.
ƽ DANGER
Danger of explosion. The room, where the
machine is kept to charge the battery, must
feature a minimum volume and an air ex-
change with a minimum flow rate, depend-
ing on the type of battery (see "Recom-
mended Batteries").
Danger of explosion. Wet batteries may
only be charged with the seat tilted up.
Tilt the seat upward.
Remove battery plug and join it to the
charging cable.
Connect the charger to the mains and
turn it on.
Switch off the charger and remove the
plug from the socket.
Pull the battery cable from the charger
cable and connect it to the machine.
Add distilled water one hour before the
charging process comes to an end; fol-
low the correct acid level. There are
corresponding indicators on the battery.
At the end of the charging process, all
cells must gas.
ṇ WARNING
Danger of causticization!
– Adding water to the battery in its dis-
charged state can cause the acid to
leak.
– Use safety glasses while handling bat-
tery acid and follow the safety instruc-
tions to avoid personal injury or damage
to clothes.
– Should the acid spray on to the skin or
clothes, rinse immediately with lots of
water.
ATTENTION
Risk of damage!
– Use only distilled or desalinated water
(EN 50272-T3) for filling the battery.
– Do not add any substances (so-called
performance improving agents), else
warranty claims will not be entertained.
Batteries and chargers are available in spe-
cialised stores.
If you use wet batteries in the BAT model,
then follow the following instructions:
– It is necessary to conform to the maxi-
mum battery dimensions.
– While charging wet (maintenance-free)
batteries, it is necessary to tilt the seat
upward.
– While charging wet batteries, follow the
specifications of the battery manufac-
turer.
Note:
Press the emergency-stop button to imme-
diately deactivate all functions and turn the
key switch to the "0" position.
Four floor boards of the pallet are fas-
tened with screws. Unscrew these
boards.
Place the boards on the edge of the pal-
let. Place the boards in such a way that
they lie in front of the four wheels of the
machine. Fasten the boards with
screws.
Slide the four support beams included
in the packaging under the ramp.
Only BR 120/250...: Remove front
transport eyelets from the palette.
Remove the wooden bars in front of the
wheels.
Release emergency-stop button by
turning.
Set main switch to “1”.
Press the drive direction switch and
slowly move the machine down from
the ramp.
Set main switch to “0”.
Insert batteries and connect
Charge the batteries
After charging
Low maintenance batteries (wet
batteries)
Recommended batteries, chargers
Order No.
Battery set
6.654-136.0
Charger
6.654-295.0
Maximum battery dimensions
Length
Width
Height
842 mm
627 mm
537 mm
Unloading
With battery
20
EN