Swiftech MCW60 User Manual
Page 3
Copyright Swiftech 2006 - All rights reserved - Last revision date: 1-17-06 - One or more Patents Pending
Rouchon Industries, Inc., dba Swiftech - 1703 E. 28th Street, Signal Hill, CA 90755 - Tel. 562-595-8009 - Fax 562-595-8769 -
E Mail: [email protected] - URL: http://www.swiftnets.com - Information subject to change without notice
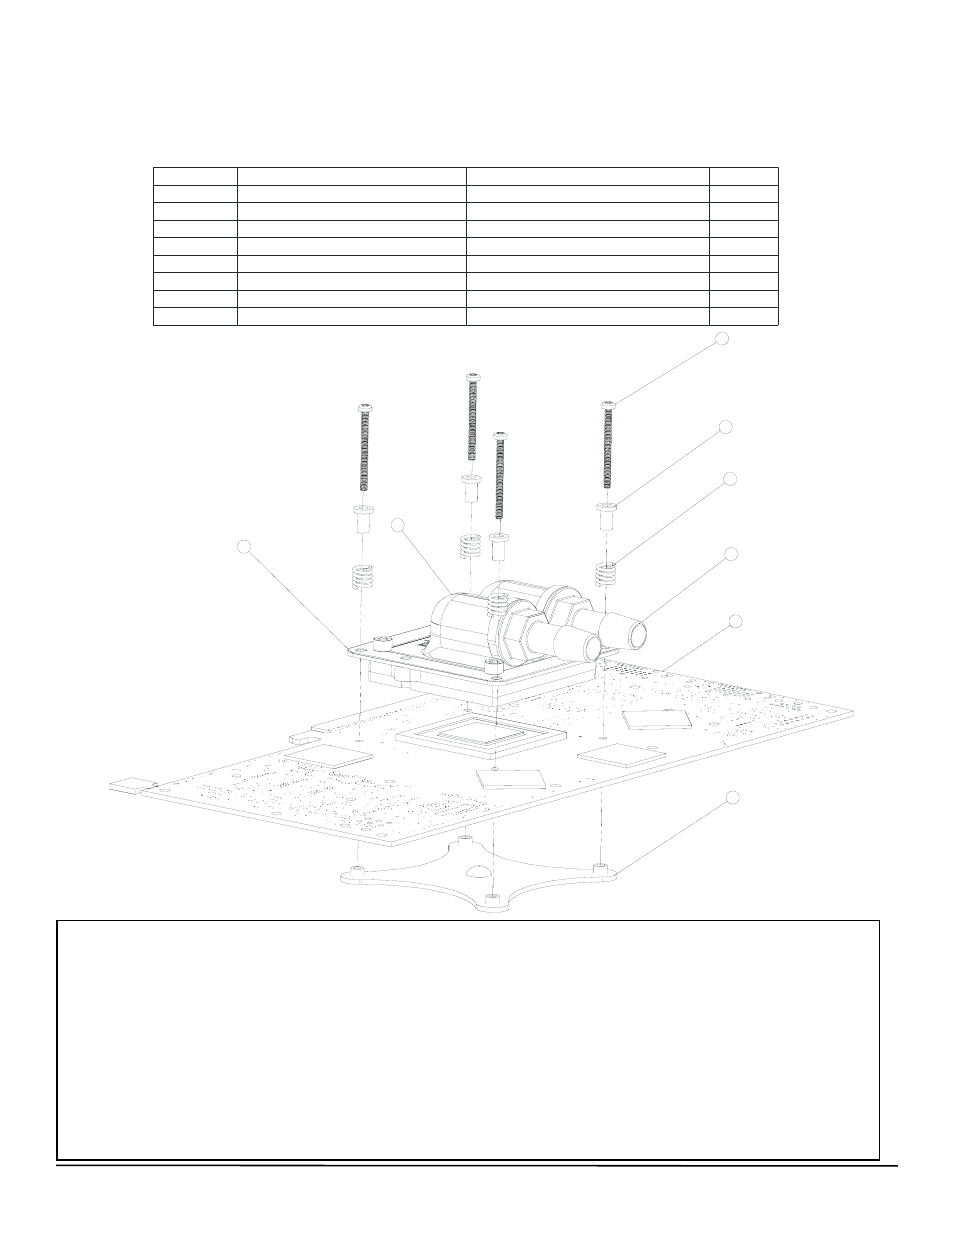
Installation with nVidia GeForce 6800 to 7800 series
& ATI X1300 and above
(four mounting holes)
ITEM NO.
PART NUMBER
DESCRIPTION
QTY
.
1
2-56x1-philips-91772A0861
2-56 x 1" philips screw
4
2
SCREW INSULATOR10SC004025
Nylon tension limiter
4
3
70700S
spring
4
4
MCW6
0
Water-block
1
5
1-4-NPSMx3-8-barb
1/4" NPSM X 3/8" Barb fitting
2
6
MCW60-HOLD-DOWN-PLATE
Hold-down plate
1
7
CROSS-bracket-NV40
Stiffening brace
1
8
VGA Adapter
1
1
2
3
5
8
7
6
4
•
Remove the existing heatsink
•
Clean off the GPU with a degreaser, and spread some of the included thermal compound over it.
•
Install the MCW60 onto the GPU
•
Temporarily fasten two screws #1 in diagonal without their springs and washer. This will conveniently align stiffening brace
#7 with hold-down plate #6.
•
Then Install the other two screws with their springs and washer as shown in this schematic, and tighten them half-way.
•
Remove the first two screws you used as guides, and re-install them with their springs and washer then tighten half-way.
•
Complete tightening of all four screw-spring assemblies in a cross pattern.
•
Installation of the water-block is now complete