Anode rod inspection, Pilot burner and main burner assembly inspection, Gas valve removal and replacement – American Water Heater DCG User Manual
Page 23
23
23
6. When replacing the gas valve, use an approved
Teflon® or pipe joint compound on the pipe threads.
7. Screw the new gas valve onto the burner assembly.
8. Reconnect the pilot tube to the gas valve.
9. Reconnect the main gas line to the gas valve.
10. Turn the gas supply on and check for leaks. Use a
chlorine-free soap and water solution (bubbles
forming indicate a leak) or other approved method.
11. Reconnect the 4 wires to their proper location and
restore electrical power to the unit.
11. Verify proper operation after servicing this water
heater.
12. If additional information is required, contact the
Product Service and Support Group at 1-800-456-
9805.
Anode Rod Inspection
Each water heater contains at least one anode rod,
which will slowly deplete while protecting the glass-lined
tank from corrosion and prolonging the life of the water
heater. Certain water conditions will cause a reaction
between the rods and the water. Once the anodes are
depleted, the tank will start to corrode, eventually
developing a leak. The most common complaint asso-
ciated with the anode rod is a "rotten egg smell" pro-
duced from the presence of hydrogen sulfide gas dis-
solved in the water. Do not remove this rod permanently
as it will void any warranties, stated or implied. A spe-
cial anode is available for this complaint. This rod may
reduce but not eliminate water odor problems. The
water supply system may require special filtration
equipment from a water conditioning company to suc-
cessfully eliminate all water odor problems.
Artificially softened water is exceedingly corrosive
because the process substitutes sodium ions for mag-
nesium and calcium ions. The use of a water softener
may decrease the life of the water heater tank.
The anode rods should be removed from the water
heater tank every 3 years for inspection. If the rods are
more than 50% depleted, the anode rods should be
replaced.
In replacing the anodes:
1. Turn off gas supply and electrical power to the
water heater.
2. Shut off the water supply and open a nearby
hot water faucet to depressurize the water tank.
3. Drain approximately 5 gallons (19 l) of water
from tank (Refer to “Draining and Flushing” for
proper procedures). Close drain valve.
4. Remove old anode rods.
5. Use Teflon® tape or approved pipe sealant on
threads and install new anode rods.
6. Turn on water supply and open nearby hot
water faucet to purge air from water system.
7. Restart the water heater as directed under
“Operating Your Water Heater.” See the "Repair
Parts Illustration" for anode rod location.
Pilot Burner and Main
Burner Assembly Inspection
To access the pilot burner and main burner for inspec-
tion:
1. Turn off gas at main shutoff valve and turn off
electrical power.
2. Disconnect the gas supply line from the gas valve.
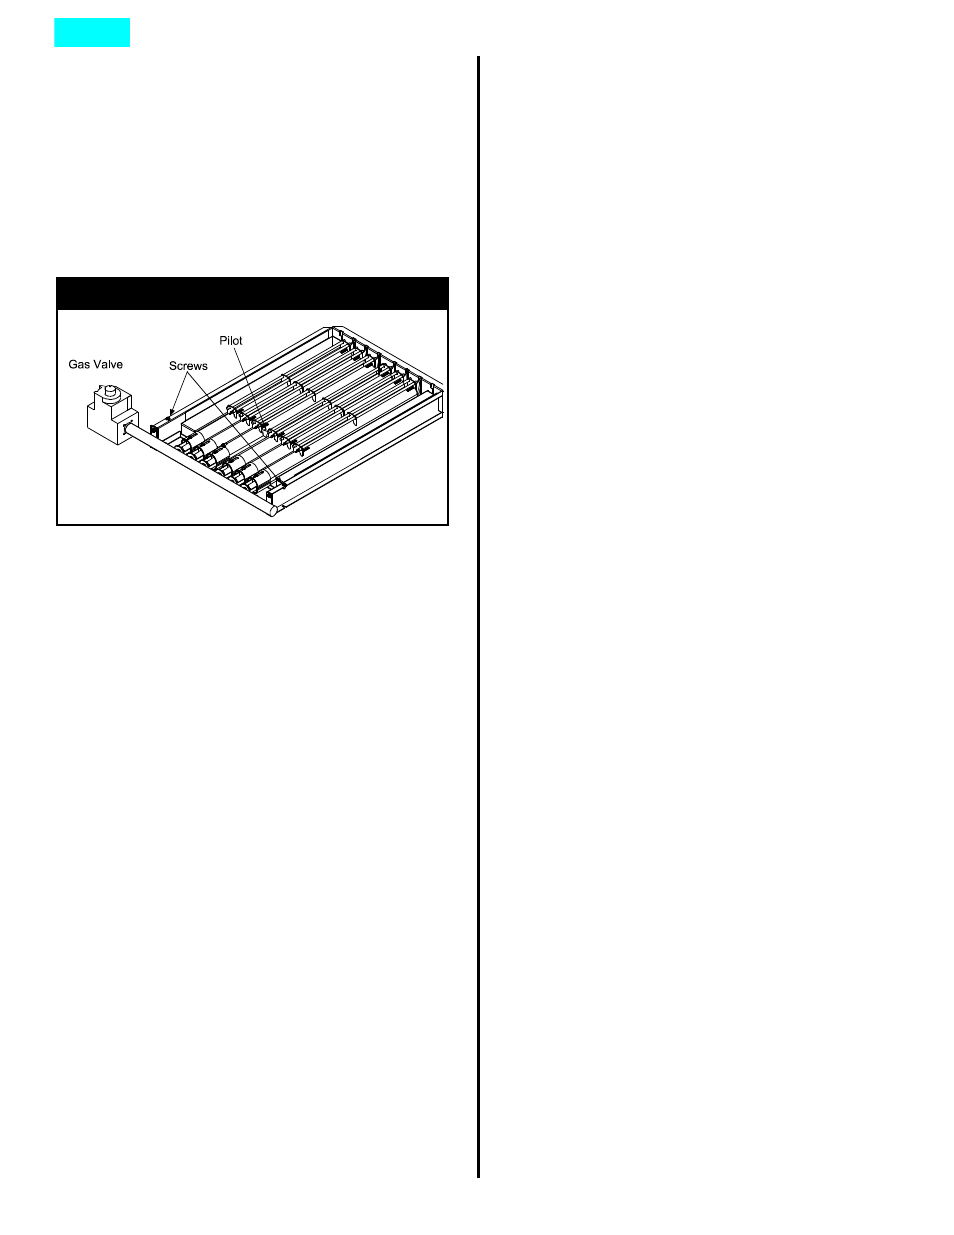
3. Remove the 2 screws holding the Pilot & Main
Burner Assembly in place. See Figure 17 for
location of screws.
4. Carefully slide the assembly out of the water heater.
5. If needed, use a brush or vacuum to clean any soot
or debris from the burners.
6. Check for correct alignment of burners before
sliding assembly back into the water heater.
7. Carefully slide Pilot/Burner Assembly back into the
water heater.
8. Replace and sufficiently tighten the two screws
holding the Pilot/Burner Assembly in place.
9. Reconnect the gas supply line to the gas valve.
10. Turn on gas at main shutoff valve.
11. Check for gas leaks and proper operation on the
unit after servicing.
Gas Valve Removal and
Replacement
It is recommended that this maintenance be performed
by a qualified service technician.
1. Turn the thermostat to its lowest setting.
2. Turn off gas at manual gas shut-off valve
(see figure 10 for reference) and disconnect
electrical power from water heater.
2. Unplug the 4 wires located on the gas valve. Label
wire position for correct reattachment.
3. Disconnect pilot tube from the gas valve.
4. Disconnect the main gas line from the gas valve.
Use care not to crack the gas valve housing.
5. Carefully unscrew the gas valve from the burner
assembly.
Important: When removing gas control valve do not
use a pipe wrench or vise to grip the body.
Figure 17: Pilot/Burner Assembly Removal
Index