Dsp settings – Kenwood KDC-U7056BT User Manual
Page 8
16
|
KDC-U7056DAB/ KDC-U7056BT/ KDC-U7056BTL
English
|
17
DSP settings
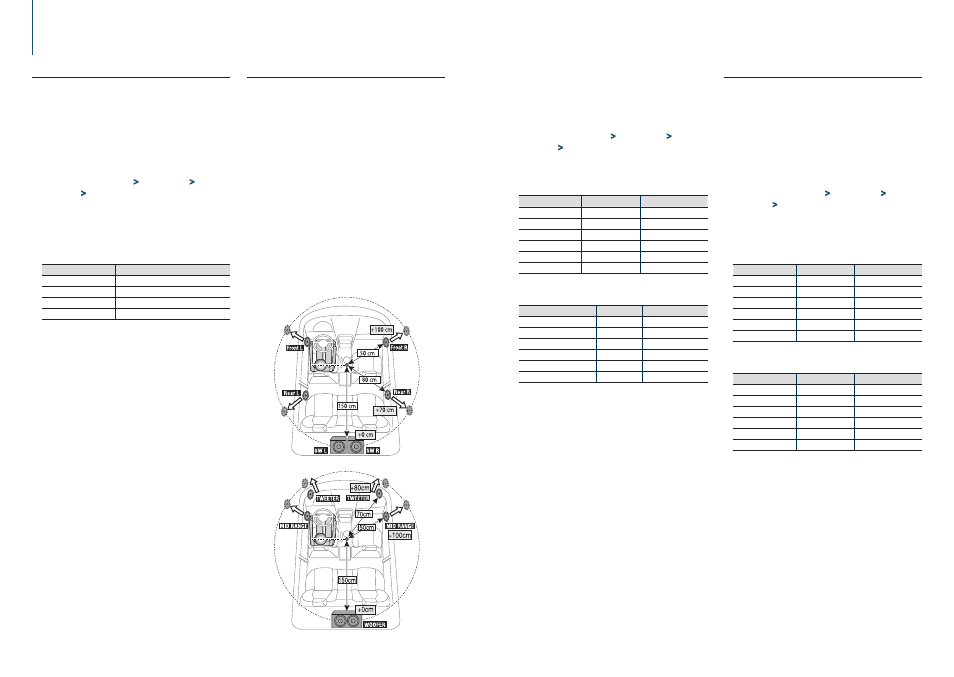
4-7. Delay time control
Adjusting fine tuning of the speaker position
compensation value specified at
<4-3. Car type
selection> (page 13)
.
Preparation for setting
• If you specify the distance from the center of the currently
set listening position to every speaker, the delay time will
be automatically computed and set.
1. Determine the center of the currently set listening
position as the reference point (• in the illustration shown
below).
2. Measure the distances from the reference point to the
speakers.
3. Calculate the differences between the distance of the
furthest speaker and other speakers.
4. Input the differences calculated in step 3 for individual
speakers.
5. Adjust gain for individual speakers. A sound image will be
shifted to the speaker with increased gain.
Example: When “Front” is selected as the listening position
(
<4-6. Listening position setting> (page 16)
).
When Speaker network is set to 3 way
1
Press [SRC] to select a source other than
Standby (“STANDBY”).
Refer to
.
2
Press [Control] knob.
Enters the Function setting mode.
3
Select “Audio Control”
>
“Pro Setup”
>
“DTA
Settings”
>
“DTA” using [Control] knob.
For how to use [Control] knob, refer to
<3-3. How
to select the item> (page 9)
.
4
Select a speaker using [Control] knob.
Speaker
Display
Range
Front Left speaker
“FrontL”
0
– 610 cm
Front Right speaker
“FrontR”
0
– 610 cm
Rear Left speaker
“RearL”
0
– 610 cm
Rear Right speaker
“RearR”
0
– 610 cm
Subwoofer Left
“SW L”
0
– 610 cm
Subwoofer Right
“SW R”
0
– 610 cm
(
Colored text
: Factory setting)
When Speaker network is set to 3 way
Speaker
Display
Range
Tweeter Left
“TWL”
0
– 610 cm
Tweeter Right
“TWR”
0
– 610 cm
Mid Range Left
“MIDL”
0
– 610 cm
Mid Range Right
“MIDR”
0
– 610 cm
Woofer Left
“WFL”
0
– 610 cm
Woofer Right
“WFR”
0
– 610 cm
(
Colored text
: Factory setting)
5
Select a value using [Control] knob.
Exiting from the Function setting mode
Press and hold [
1/6].
4-8. Channel level fine adjustments
After DTA compensation, you can finely adjust
the unsatisfactory speaker volume of respective
speaker.
1
Press [SRC] to select a source other than
Standby (“STANDBY”).
Refer to
.
2
Press [Control] knob.
Enters the Function setting mode.
3
Select “Audio Control”
>
“Pro Setup”
>
“DTA
Settings”
>
“Channel Level” using [Control]
knob.
For how to use [Control] knob, refer to
<3-3. How
to select the item> (page 9)
.
4
Select a speaker using [Control] knob.
Speaker
Display
Range
Front Left speaker
“Front” “L”
-8 –
0
dB
Front Right speaker
“Front” “R”
-8 –
0
dB
Rear Left speaker
“Rear” “L”
-8 –
0
dB
Rear Right speaker
“Rear” “R”
-8 –
0
dB
Subwoofer Left
“SW” “L”
-8 –
0
dB
Subwoofer Right
“SW” “R”
-8 –
0
dB
(
Colored text
: Factory setting)
When Speaker network is set to 3 way
Speaker
Display
Range
Tweeter Left
“TW” “L”
-8 –
0
dB
Tweeter Right
“TW” “R”
-8 –
0
dB
Mid Range Left
“MID” “L”
-8 –
0
dB
Mid Range Right
“MID” “R”
-8 –
0
dB
Woofer Left
“WF” “L”
-8 –
0
dB
Woofer Right
“WF” “R”
-8 –
0
dB
(
Colored text
: Factory setting)
5
Select a value using [Control] knob.
Exiting from the Function setting mode
Press and hold [
1/6].
4-6. Listening position setting
You can adjust sound localization according to the
listening position.
1
Press [SRC] to select a source other than
Standby (“STANDBY”).
Refer to
.
2
Press [Control] knob.
Enters the Function setting mode.
3
Select “Audio Control”
>
“Pro Setup”
>
“DTA
Settings”
>
“Preset Position” using [Control]
knob.
For how to use [Control] knob, refer to
<3-3. How
to select the item> (page 9)
.
4
Select a listening position using [Control]
knob.
Display
Compensation seat
“ALL”
Not compensating.
“Front R”
Front Right seat
“Front L”
Front Left seat
“Front All”
[1]
Front seat
[1]
Not displayed while using 3 way system.
Exiting from the Function setting mode
Press and hold [
1/6].