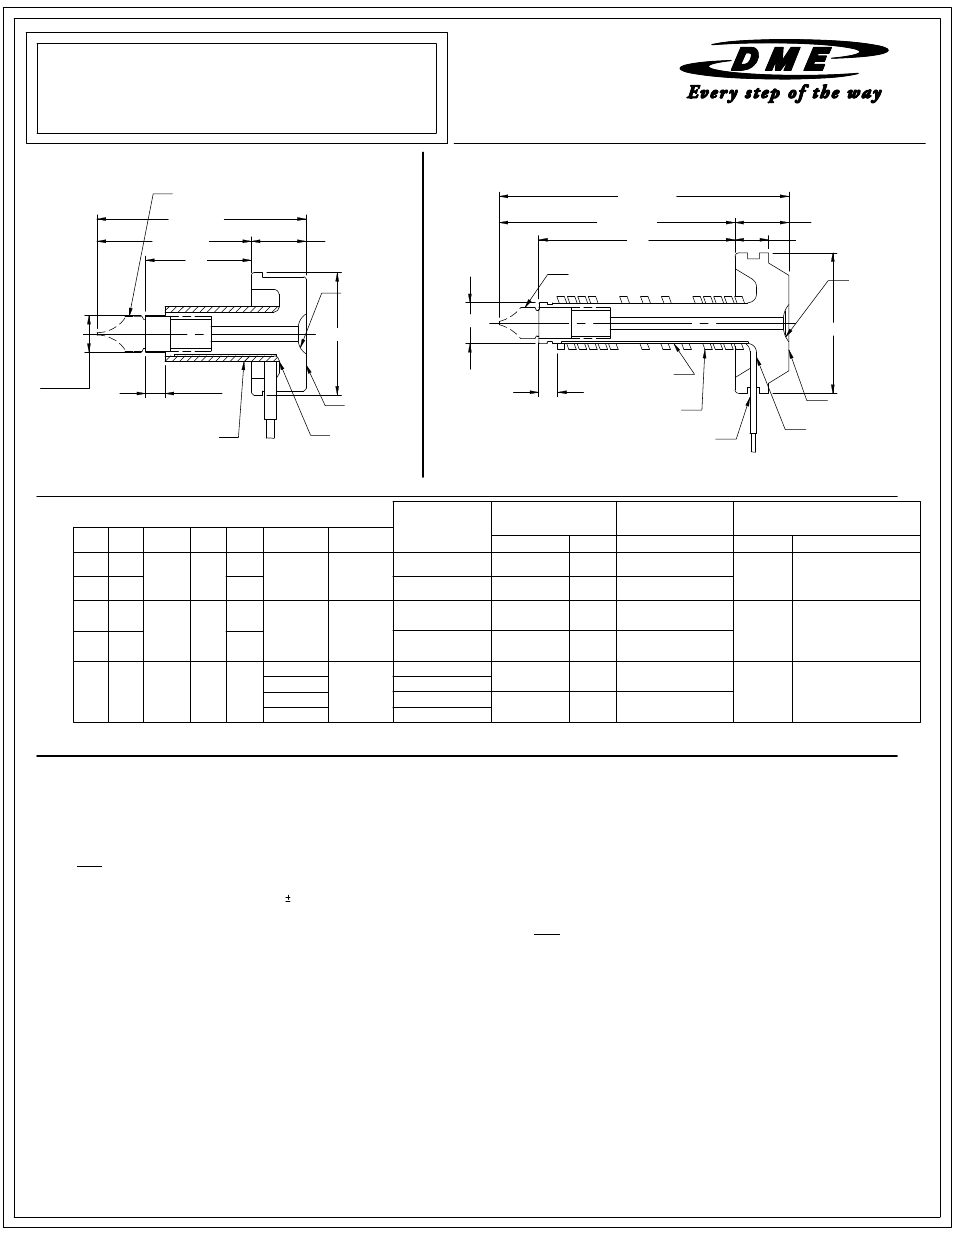
DME Gate-Mate Bushing Sub-Assemblies User Manual
Gate-mate bushing sub-assemblies, Installation data, Gmb9998

1.062
L (REF.)
B DIA.
0.250 *
D
A (REF.)
C DIA.
0.562 REF.
THERMOCOUPLE
SQ. COIL HEATER
HEATER AND THERMOCOUPLES LEADS
EXIT THRU SLOT IN BUSHING BODY
BOTTOM OUT COIL
HEATER ON NOZZLE
BODY
BUSHING
BODY
TIP SUB-ASSEMBLY
MEDIUM AND JUMBO GATE-MATE ASSEMBLY
* DIMENSION INDICATES CORRECT HEATER DISTANCE.
SPH. RAD
0.6250
C DIA.
L (REF)
A (REF)
D
B DIA.
0.200 *
TIP SUB ASSEMBLY
MINI GATE-MATE SUB-ASSEMBLY
* DIMENSION INDICATES CORRECT HEATER DISTANCE
CAST-IN HEATER WITH INTERNAL
THERMOCOUPLE (SHOWN) OR SQUARE
COIL HEATER AND THERMOCOUPLE.
SPH. RAD.
BUSHING
BODY
BOTTOM OUT
HEATER ON
BUSHING BODY
NO HOLE * * * *
GMB0020
SCH3142
315
TC-9600
GMB0116
SCH0004
Please read carefully before installing bushings.
INSTALLATION DATA
GATE-MATE BUSHING SUB-ASSEMBLIES
GMB9998
02-10
ME-0739-PS-311-E
GMB0112
225
TCG0100
GMT0100
GMT0101
STANDARD
WEAR RESISTANT *
GMB0117
GMB0111
CAST-IN
225
N/A
length to be a direct replacement for the standard and jumbo tips. Given an
using the GMT0007 thru hole tip. These tips are designed 0.040 shorter in
thru hole tip and use the GMT0004 jumbo tip machining dimensions when
10. Use the GMT-2 standard tip machining dimensions when using the GMT0302
diameter may result in a larger gate vestige.
the gate may have to be enlarged to achieve greater flow. This increase in
the best gate vestige.Depending on part configuration and plastic being used,
the cavity at processing temperature. The smallest gate diameter will yield
9. For best processing and lowest gate vestige, tip must be 0.000 to 0.005 into
SQ. COIL HEATERS INCLUDE INSTALLATION/REMOVAL WRENCH
* * SEE RECOMMENDATIONS AND GUIDELINES NOTE # 8
* WEAR RESISTANT TIP IS RECOMMENDED FOR ABRASIVE MATERIALS.
* * * SEE RECOMMENDATIONS AND GUIDELINES NOTE # 11
* * * SEE RECOMMENDATIONS AND GUIDELINES NOTE # 10
Sharp tip.
8. A 0.030 min dia. gate is recommended when using the GMT0301 Super
as this is a seal-off dimension to fit the bushing's seat.
seal-off area and threaded areas before reassembling.
7. Machine the "B" diameter + 0.0005 -0.0000 directly into the cavity carefully,
6. Machine the "C" diameter directly into the mold to fit the bushing's head.
damage could occur when working on bushing assembly.
5. Careful attention should be taken to the heater and thermocouple leads as
for the medium and 17 mm deep well 6 point socket for the jumbo.
well 6 point thin wall socket for the Mini, 11 mm deep well 6 point socket
when reassembling. For protection of the tip point, use a 9 mm deep
5 ft-lbs for all other tips
25 ft-lbs for the wear resistant tips, and 35
4. Tip must be torqued into the bushing body using a torque wrench at 20 to
lubricate or use anti-seize compound on the threads.
NOT
3. Do
dropped or strikes a rigid material. Treat tip like a glass or ceramic material.
2. Careful attention should be taken to the tip as damage could occur if tip is
heat to transfer into the tip before molding.
17. Wait a minimum of 5 minutes after set point has been achieved for sufficient
material flow.
14. When bushing must be recessed deeper than the "W" dimension, alter the
16. Provide a gate dimple on core/cavity opposite gate. This will allow for best
into the locating ring.
to suit application.
clamp plate and route wires through that plate. A wire slot may be machined
bushing would extend beyond the clamping plate, add another plate to the
15. Route wires through wire channel in clamping plate. In the event that the
"W" and the 0.219 dimension to suit the application.
Note: Dimensions shown in Inches.
ring. Locating rings are supplied with additional stock allowing for machining
13. Constrain bushing in the mold by clamping with the appropiate D-M-E locating
12. Provide maximum water cooling in the cavity insert around gate.
mold and wire heater and thermocouple into the terminal mounting box.
hole and clean all chips from tip and body. Reassembly body back into the
remove tip from body. Remove any burrs around 0.125 diameter
JUMBO
NOT
Do
tip at the marked location. See packing slip number GMT-PS for more details
Remove body from the mold and machine a 0.125 diameter hole into the
location of flow hole on the circumference of the tip and mark that position.
cavity insert should be removed to expose tip from parting line. Determine
The gate-mate body must be keyed into the nozzle plate. "A" plate and/or
11. Using the GMT0303 no hale tip allows for flow hole allignment in the cavity.
gate for the GMT0007 thru hole tip.
is recommended for the GMT0302 thru hole tip and a 0.080 to 0.125 diameter
best processing and lowest gate vestiage a 0.030 to 0.060 diameter gate
"A" dimension of 2.000 + BE (NOT 1.960 + BE) using a GMT0302 tip. For
1. Bushing (single-application) body must be cleaned of any material in the
RECOMMENDATIONS AND GUIDELINES
3.562 2.500
L
DIM.
A
DIM.
B
DIA.
C
DIA.
D
DIM.
SPH. RAD.
BUSHING
STYLE
4.562 3.500
1.2500
1.645
2.625
2.645
1/2 & 3/4
FLAT
1/2
FLAT
MINI
1/2
1.094
1.500
0.6250
1.375
2.000
1.645
2.375
3.437
MEDIUM
1/2 & 3/4
2.645
2.156
0.7500
3.375
4.437
SUB-ASSEMBLY
REFERENCE
SQ.COIL HEATERS
(240 VAC)
THERMOCOUPLES
(40" LEADS)
SUB-ASSEMBLY
TIPS
CAT. NO.
WATTS
CAT. NO.
CAT. NO.
STYLE
GMB0114
SCH0001
315
TC0001
GMT0004
GMT0006
GMT0007
STANDARD
WEAR RESISTANT *
THRU HOLE * * *
GMB0113
SCH0002
315
TC0002
GMB0030
SCH3242
315
TC-9700
GMT-2
GMT0300
GMT0301
GMT0302
GMT0303
STANDARD
WEAR RESISTANT *
SUPER SHARP * *
THRU HOLE * * *
