Lokar Throttle Cable Carbureted Applications and Ford EFI (1986-1993) User Manual
Page 2
INS0002 Rev. 11/16/12 RPD 06/03/14
Page 2
© 2005 Lokar, Inc.
Step 7: Reinstall the inner wire into the cable housing from inside the
passenger compartment. Connect the clevis on the new Lokar
throttle cable to the throttle pedal.
Fig. 4
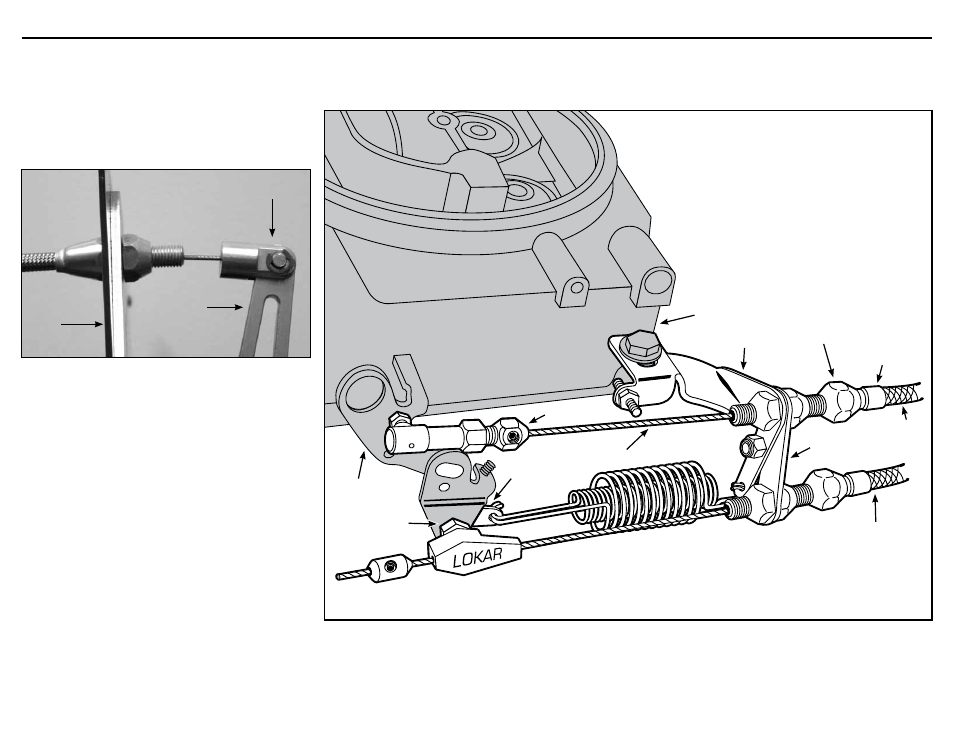
Step 8: Attach the carb end assembly to the carburetor throttle arm.
Adjust the carb end assembly so that approximately 3 or 4 of
the adjustment threads are exposed. Cut inner wire off so that
roughly 1" of the inner wire will remain inside the carb end
assembly.
Step 9: Insert the inner wire into the carb end assembly. Pull all the
slack out of the inner wire and tighten the set screw in the
carb end assembly.
Check for proper operation of the throttle (and kickdown cable
if equipped) and adjust as necessary. Make sure there is no
binding in the throttle linkage and that the throttle returns
to the closed position when the pedal is released. Your final
installation should look like
Fig. 5 (optional Lokar Carburetor
Bracket and Springs and Lokar Kickdown Kit also shown).
NOTE: Once the throttle cable is installed, make sure that the
throttle pedal is completely floored when the throttle is wide
open. If the throttle pedal is not completely floored at wide
open throttle, you will need to either adjust the pedal itself or
install a pedal stop.
Firewall
Clevis
Lokar Pedal
Upper Arm
(not included)
Fig. 4
Throttle Cable shown with Lokar Carburetor
Bracket and Springs (not included) and
Lokar Kickdown Kit (not included).
Kickdown
Cable Housing
Throttle Cable
Housing
Ferrule
Throttle Cable
Adjuster
Carburetor
Bracket
Carburetor Base
Carburetor
Throttle Arm
(not included)
Kickdown
Mounting Bracket
Tear Drop
(not included)
Throttle Cable
Hex Carb
Fitting
(not included)
Carb End
Assembly
Fig. 5
(not included)
(not included)
(not included)
(not included)
Throttle Cable Installation Instructions - Carbureted Applications and Ford EFI (1986-1993)