Lokar Competitor Series Throttle Assembly 1967-1969 Dart / Cuda User Manual
Lokar For the car
Building American Quality… With A Lifetime Warranty!
(Step 3 cont.)
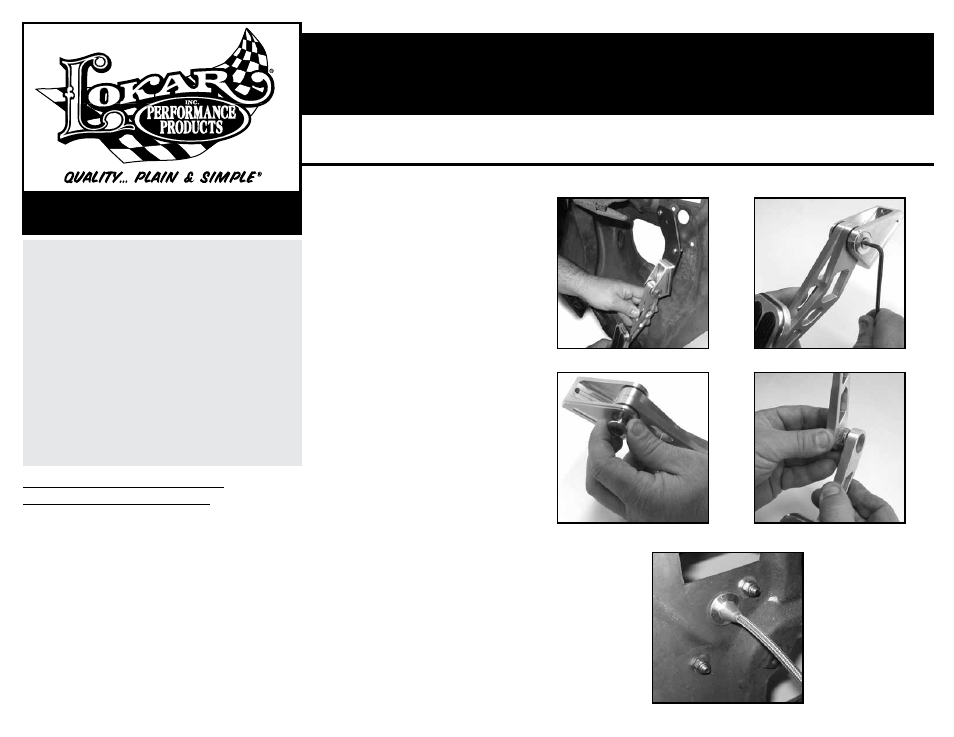
aluminum housing. This nut is to set
the side to side tension on the pedal
assembly. The tension is pre set from
Lokar and locked into place with a set-
screw and Loctite®. It is not necessary
to remove this tension nut. Pull the
pedal arms out of the cradle.
Step 4: Adjust the pedal arms to the desired
angles.
Photo 4 Reassemble the
throttle pedal. Install the axle through
the upper and lower arms and slide it
back into the tension nut. Screw the
flat head screw and trim washer on
the right side and tighten. Check the
throttle pedal and make sure that the
pedal is
NOT binding.
Step 5: There is a supplied trim washer that
will mount on the outside of the fire-
wall for the Lokar throttle cable fitting
to slide through. The Lokar Throttle
Cable will use the existing throttle
cable hole.
Photo 5
NOTe: Adjust the throttle pedal until the
pedal touches the floor at the same time
the throttle reaches wide open position.
This will assure that you will not over
pull the throttle.
Step 6: Install Lokar throttle cable assembly
per instructions supplied with
throttle cable.
Stop! Read all installation instructions before begin-
ning installation. Please call Lokar with any questions
or uncertainties that may arise during the installation.
WARNING: Disconnect the battery before beginning
installation. Make sure the vehicle is in Park and at
least one tire is scotched to prevent the vehicle from
moving.
IMpoRtANt AppLICAtIoN INFoRMAtIoN:
The Lokar pedal assembly is designed for Lokar
Throttle Cables. Stock style cables will not work. If
the application has an automatic transmission, please
purchase the appropriate kickdown kit to complete
the installation. The cables and mounting brackets
must be ordered for specific applications; i.e.,
carbureted, tuned-port, EFI, blower, etc.
Competitor Series Throttle Assembly
1967-1969 Dart / Cuda Installation
Step 1: Remove any existing throttle pedal and all throttle
linkage or cables.
Step 2: Mount the enclosed steel firewall plate to the fire-
wall in the factory throttle pedal location using the
supplied button head bolts with the throttle pedal
assembly mounted to the steel firewall plate.
Photo 1
Step 3: Disassemble the Lokar billet throttle pedal
assembly by removing the 10-32 x 1/2" stain-
less flat head cap screw on the right side of the
pedal assembly.
Photo 2 Pull the axle out of the
cradle and pedal assembly.
Photo 3 There is an
adjustable tension nut that is threaded into the
10924 Murdock Dr. • Knoxville, TN 37932
TOLL FREE 1-877-469-7440 • (865) 966-2269 • FAX (865) 671-1999 • [email protected] • www.lokar.com
Competitor Series Throttle Assembly 1967-1969 Dart / Cuda
Competitor Series Throttle Assembly 1967-1969 Dart / Cuda
Installation Instructions
Photos 1 - 5
Photo 1
Photo 2
Photo 3
Photo 4
Photo 5
®
Rev. 02/16/09
© 2009 Lokar, Inc.
™
™
Part # BAG-6145, XBAG-6145
Part # BAG-6145, XBAG-6145
™