Lokar shifter knob removal instructions – Lokar Shifter Knob User Manual
Page 2
Lokar Shifter Knob Removal Instructions
Lokar Shifter Knob Removal Instructions
Lokar Shifter Knob Removal Instructions
INS0113 Rev. 05/21/13 RPD 03/13/14
INS0113 Rev. 05/21/13 RPD 03/13/14
INS0113 Rev. 05/21/13 RPD 03/13/14
Page 2
Page 2
Page 2
© 2005 Lokar, Inc.
© 2005 Lokar, Inc.
© 2005 Lokar, Inc.
Release
Button
Release
Button
Release
Button
Release
Button
Release
Button
Release
Button
Shifter
Knob
Shifter
Knob
Shifter
Knob
Shifter Knob
Shifter Knob
Shifter Knob
Set Screw
Holes
Set Screw
Holes
Set Screw
Holes
#10-32
Set Screw
#10-32
Set Screw
#10-32
Set Screw
1/4"-20
Set Screw
1/4"-20
Set Screw
1/4"-20
Set Screw
Jam Nut
Jam Nut
Jam Nut
Shifter
Lever
Shifter
Lever
Shifter
Lever
1995 & Later
DO NOT REMOVE
Set Screw
1995 & Later
DO NOT REMOVE
Set Screw
1995 & Later
DO NOT REMOVE
Set Screw
Fig. 1
Fig. 1
Fig. 1
Fig. 2
Fig. 2
Fig. 2
Knobs Manufactured Before 1995
Knobs Manufactured Before 1995
Knobs Manufactured Before 1995
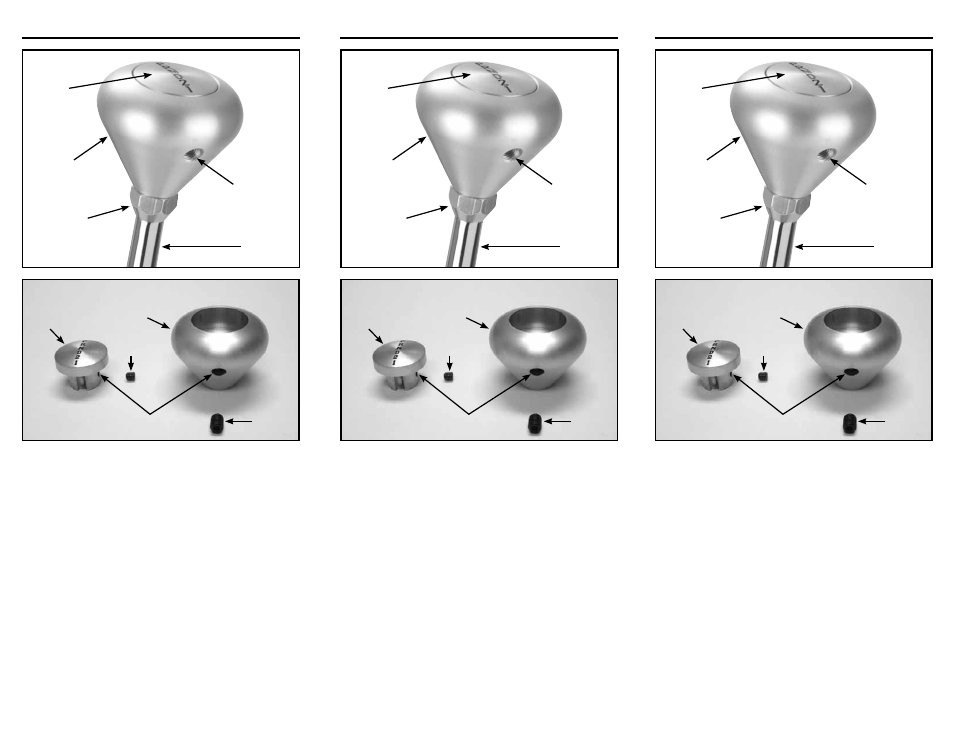
Step 2: (Continued) For shifter knobs manufactured before 1995, set the release
button into the shifter knob, and screw the shifter knob onto the lever.
When the release button gets close to being flush with the top of the
knob, hold the release button so that the shift pattern letters are in the
proper position. Continue to thread the shifter knob onto the shifter
lever until the release button is flush with the top of the knob.
Still holding the release button in the proper position, turn the shifter
knob so that the set screw hole is at the 3:00 position. Install the
#10-32 set screw through the hole and into the release button, and
tighten fully. Turn the shifter knob clockwise 90 degrees (1/4 turn) so
that the set screw hole is towards the back at the 6:00 position.
Now release the release button. Install the 1/4"-20 set screw into the
shifter knob. Tighten the set screw until the release button is not able
to be depressed. Then loosen the set screw just enough so that the
release button operates smoothly.
Step 3: Tighten the jam nut up against the bottom of the shifter knob.
Step 4: Check to make sure that depressing the release button allows the
shifter lever to be moved, and that the shifter lever still locks in Park
and Neutral. If the shifter will not come out of
“PARK” with the release
button fully depressed, tighten the knob one turn and check it again.
If the shifter does not lock in
“PARK”, loosen the knob one turn and
check it again.