Flex-a-Lite 59274 Ford 03-07 6.0L Super Duty Diesel Radiator/Fan Combo Without VSC User Manual
Flex-a-Lite For the car
1
#59074 Ford 03-07 6.0L Super Duty Diesel Radiator
#59274 Ford 03-07 6.0L Super Duty Diesel
Radiator/Fan Combo
#59274 Ford 03-07 6.0L Super Duty Diesel
Radiator/Fan Combo Without VSC
Fits MOST Ford 6.0L Super Duty Diesels, 2003-2007
(Note: Automatic transmissions may require auxiliary oil
cooler part # 41124RC. Vehicle models may vary; review the
instructions and components for compatibility with your
vehicle prior to installation.)
Remove Front Shroud Assembly and Radiator
1. Make sure engine is cool.
2. Disconnect negative (-) battery cable from battery.
3. Drain radiator coolant.
4. Undo 4 ea. 5/16” bolts from brackets holding top posts
of radiator and remove.
5. Remove 4 tree clips holding plastic panel around hood
latch to radiator.
6. Remove tree clips holding positive (+) battery cable to
front radiator support.
7. Remove clip straps holding positive (+) battery cable
to radiator on both sides. (Fig. 1)
8. Move positive (+) battery cable out of the way of
radiator.
9. Remove top radiator and overflow hoses.
10. Below vehicle, disconnect mounting strap tree clip
from radiator shroud. (Fig. 2)
11. Remove 2 ea. 5/16” bolts holding top of shroud to
top of radiator.
2
Remove Stock Fan and Rear Shroud Assembly
1. Remove 4 ea. 15MM bolts holding rear shroud to the
engine.
2. Pull rear shroud forward to access the nut attaching the
clutch fan.
3. Secure the clutch fan pulley with a pry bar and loosen
nut with a large adjustable wrench.
4. Remove the rear shroud and clutch fan assembly at the
same time from the engine compartment.
3
Install New Flex-a-Fit® Radiator
1. Lower radiator into engine bay. Align radiator posts
with lower radiator support mounts.
2. Place 2 t-bolts in the second t-channel from the
engine. Line t-bolt up with the fctory top mounting
bracket location.
3. Thread included aluminum posts onto T-Bolts and
tighten with a 9/16” wrench.
4. Place 3 t-bolts into topmost t-channel on front of
radiator facing grille. Attach top mounting brackets,
leaving a 1/8” gap between the radiator tank and the core
support.
98275 Rev. 01-22-14
5. Remove/cut the taped t-shaped push clips on the
positive (+) battery cable.
6. Use included insulated metal clamps to attach battery
cable to t-bolts. Secure with 1/4”-20 lock nuts.
7. Attach upper hose and overflow hose to radiator.
8. Attach lower radiator hose.
9. Rotate mounting strap 180° and push both tree clips
into mounting holes on Flex-a-Lite aluminum fan shroud.
10. Fill radiator through overflow bottle with factory
recommended coolant.
4
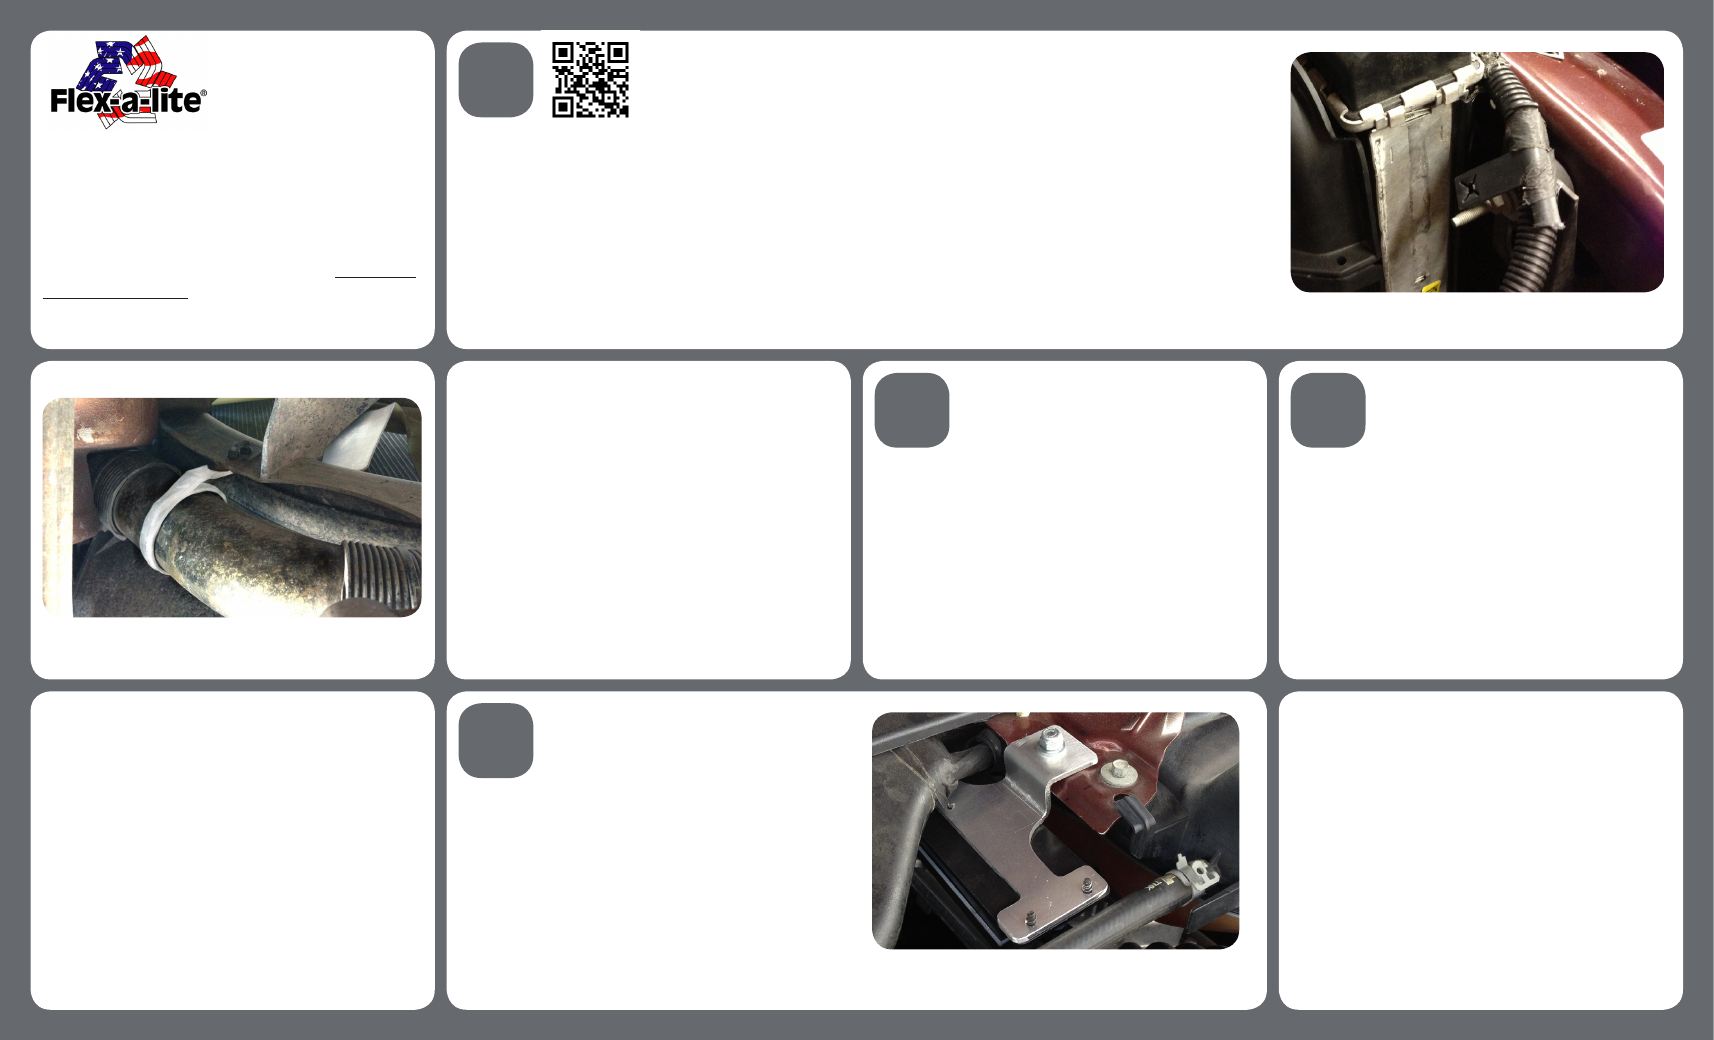
Mount and Install Clutch Fan Emulator
1. Mount emulator facing down on bracket #51313 with
supplied screws.
2. Bolt bracket to factory mounting location near
windshield. (Fig. 3)
3. Plug emulator directly into factory fan clutch socket.
Scan here with your smartphone to see a step-by-step install video
or type http://youtu.be/T3dsdh0CEfw into your favorite browser
12. Pull top of radiator toward grille and lift front
section of shroud.
NOTE: The bottom of this shroud piece has a
rubber flap that may need to be lifted out of the
way to move front section of shroud up and out.
13. Unplug clutch fan connector at the top of the rear
shroud section closest to engine.
14. Remove lower radiator hose and transmission lines
if applicable.
15. Remove radiator by lifting straight up and out of
the vehicle.
Fig. 2
Fig. 1
Fan Wiring Instructions
FOLLOW THESE INSTRUCTIONS CAREFULLY TO AVOID
DAMAGING THE CONTROL UNIT, FAN MOTORS AND
YOUR VEHICLE! WHEN CRIMPING WIRES, ALWAYS USE A
QUALITY CRIMPING TOOL (DO NOT USE PLIERS OR
OTHER DEVICES).
Fig. 3