Flex-a-Lite 56418 Camaro Radiator Only Kit Fits 2010-2011 Chevrolet Camaro User Manual
Page 2
Disconnect the upper radiator hose, on drivers’ side, from inlet tube of radiator and move out of the away.
10.
You could possibly hold it back with string or a large nylon strap.
Remove the ½” bolts (2ea) securing the fan shroud to top of radiator and carefully lift fan shroud assembly
11.
up and out.
Disconnect the lower radiator hose, on passengers’ side, from outlet tube of radiator and move it out of the
12.
way.
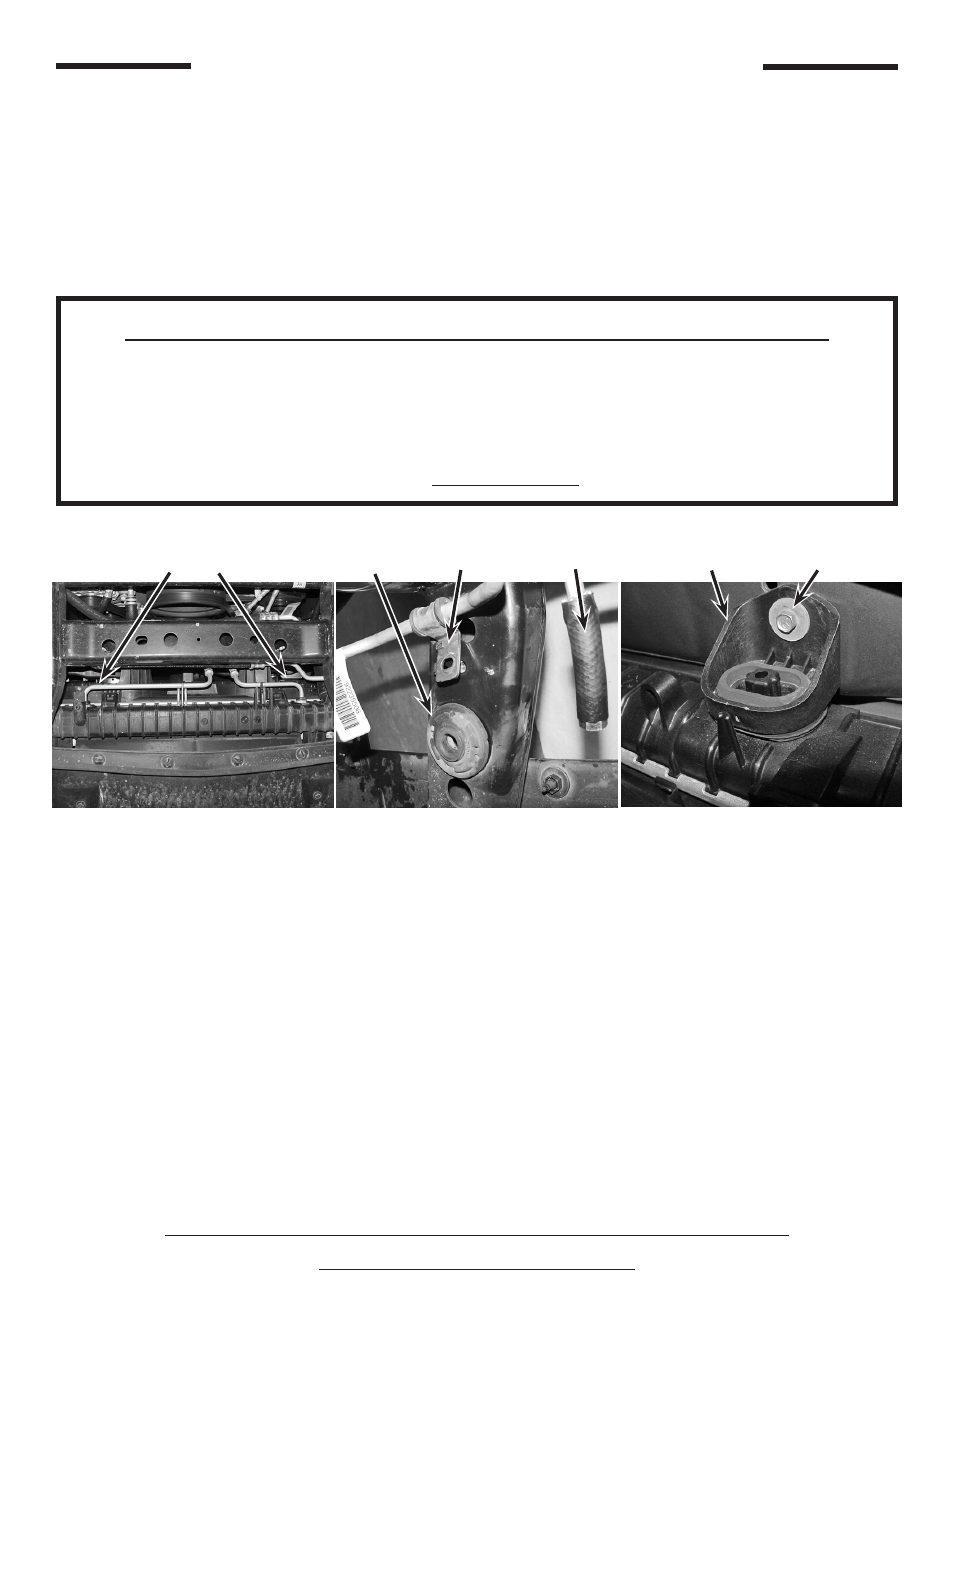
Disconnect both transmission coolant lines from radiator (if applicable). Cap / plug lines to prevent
13.
transmission fluid from draining out.
(see Detail D & E)
Remove 10mm bolts (2ea) loosening an A/C line from the frame and cross member located behind the
14.
passenger side radiator outlet tube. Remove 10mm bolt (1ea), loosening a power steering line, located
near drivers’ side frame / cross member merger point. Loosening the lines creates more room for ease of
stock radiator removal and Flex-a-lite® radiator insertion.
(see Detail E)
Remove ½” bolts (2ea) securing A/C condenser at top / front of radiator.
15.
Remove 10mm bolts (2ea) securing both “L”-brackets at top of the radiator to radiator support.
16.
Note: Save “L”-brackets and bolts for use during new radiator installation. (see Detail F)
The A/C condenser must be disengaged from the stock radiator for radiator removal. Tilt top of the radiator
17.
toward engine and lift A/C condenser off and out of plastic loop attachment points (2ea) located on front of
radiator bottom tank. This will now allow the stock radiator freedom to move upward.
Note: The idea is to remove the radiator without removing the A/C condenser or disturbing its connections.
Carefully lift radiator up and out. Be mindful not to force anything. Make sure lower radiator mounting
18.
grommets are still attached to frame of vehicle. If not, separate them from bottom of removed radiator and
re-attach them to original frame positions.
Note: Use caution while removing the radiator, it may still contain coolant which can spill out.
Note: If your vehicle is equipped with an automatic transmission, an aftermarket transmission
cooler kit should be installed during new radiator installation.
Installation of Radiator and Fan Combo #56488
or Radiator only #56418
Installation instructions continued from previous page
Note: For automatic transmission equipped vehicles.
We chose not to install a transmission cooler within our radiator’s side tank. This maximizes the cooling
efficiency of both your engine and transmission. If your vehicle is equipped with an automatic transmission,
you will need to install an aftermarket transmission cooler.
We have developed an auxiliary direct fit
transmission cooler kit for the Camaro ‘10-’11, part #4116C. Flex-a-lite makes a full line of transmission
coolers along with customized mounting options.
For more mounting options, call Technical Assistance at: 1-877-767-0554 or FAX: (253) 922-0226.
or visit www.flex-a-lite.com
(Detail E)
(Detail F)
(Detail D)
Transmission line attachment
points to radiator.
(shown from under vehicle)
Radiator
mounting
grommet
A/C line
“loosened”.
Transmission coolant
line “capped”.
”L”-bracket
10mm bolt
Radiator mounting requires utilizing two pre-mounted brackets on top of radiator and two lower
brackets that are pre-placed at the lower stock mounting points prior to lowering the radiator into
position.
Mount the top mounting brackets using supplied ¼-20 x 5/8” hex bolts (4ea), ¼-20 flat washers (4ea).
1.
Place brackets on top of radiator, along top cap, aligning holes of each bracket with pre-installed threaded
inserts. The bent 3/8” lip of both top brackets hangs over to the engine side. The drivers’ side bracket will
have the longer tab with an installed threaded insert.
(see Detail G on next page)
Rev. 02-02-12 98488 Page 2 of 5