Hoyles Multi function push button with LEDs and custom text User Manual
Installation instructions, Hoyles electronic developments ltd, Te xt
T. 01744 886600 F. 01744 886607 E. [email protected] W. www.hoyles.com
Hoyles Electronic Developments Ltd
www.hoyles.com
NC
PB1
C3
TR3
C4
0
2
1
-2
1
0
LED7
IS
S
U
E
1
LED5
D5
C6
Cl1
R4
D4
R5
REG1
LED3
LED1
TR1
R2
D1
D3
ZD1
R1
-
L
B
+
IC1
MADE IN UK
X
Y
C5
R9
R8
R7
R6
J1
J2
LED8
LED6
NO
TR2
C2
C1
D2
R3
COM NO
COM
NC
LED4
LED2
RELAY
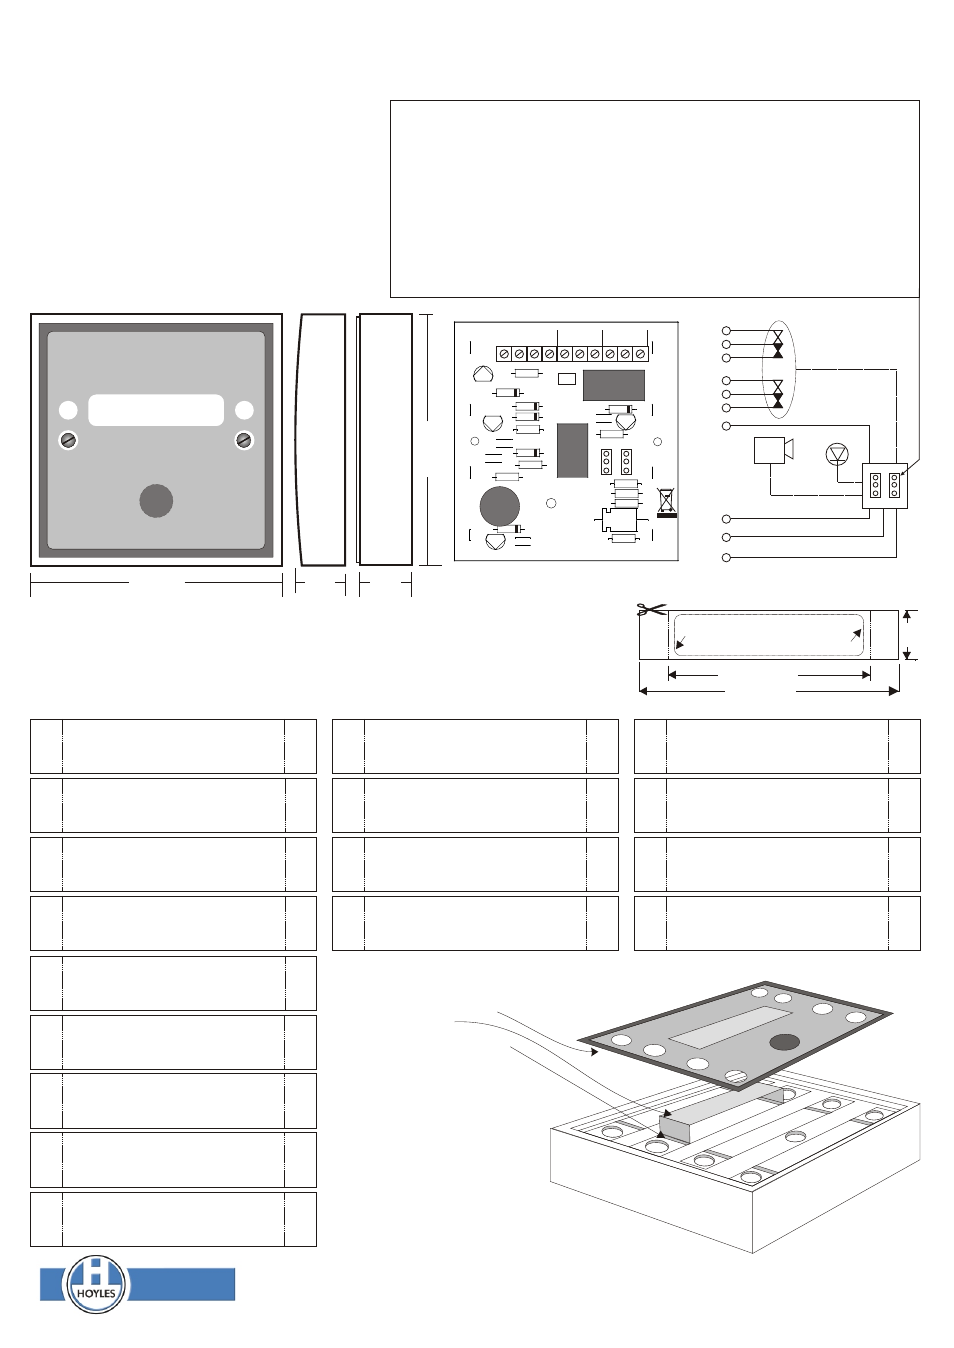
Installation Instructions
Single gang multi-function buttons with integral buzzer and LEDs
This instruction covers the following products:
S1760P(R,G,Y or B) Button with 2 x LEDs (Red, green, Yellow
or Blue), integral buzzer and engineer changeable label
S1706PG Press to Exit Button with green LEDs, and integral
buzzer
S1707PG Press to Enter Button with green LEDs, and integral
buzzer
These buttons can be programmed in a number of different
ways with on board jumpers.
All are supplied with a back box for surface mounting but
equally they can be fitted to standard single gang electrical
socket boxes for low profile mounting.
The contacts are configured by jumpers J1 and J2 as follows:
Momentary action mode. Contacts change when button is pressed and restore when button
is released.
J1at X, J2 at X
Dwell mode. Contacts change when button is pressed and restore 5 seconds after the button
is released.
J1at Y, J2 at X
Commutating mode. Contacts change when button is pressed and restore when the button is
pressed again.
J1at X, J2 at Y
Double press mode. Contacts only change if button is pressed twice within 1 sec or held
pressed for 2 secs. This helps prevent accidental operation. They restore 5 secs after the
button is released
J1at Y, J2 at Y
Link L to -ve to disable the LEDs
Link B to -ve to disable the buzzer
BZ1
87.0
18.0
18.0
8
7
.0
The S1760 is supplied un-labelled. The decal (included) has a clear window 10mm x 46mm.
The area under the decal is 12mm wide to take standard labelling machine tape. The window is
free from adhesive. Maintain cleanliness to avoid fingerprints on the inside of the window. A paper
label can be used and examples are given below complete with cutting and folding lines. If the text
you require is not shown here then it is a fairly simple matter to make one with a word processing or
graphics programme. The dimensions here are given to help you. For a small extra charge the
S1760 can be factory labelled to your requirements (subject to a character limit)
65.0
49.0
1
2
.0
F
o
ld
F
o
ld
F
o
ld
F
o
ld
F
o
ld
F
o
ld
F
o
ld
F
o
ld
F
o
ld
F
o
ld
F
o
ld
F
o
ld
F
o
ld
F
o
ld
F
o
ld
F
o
ld
F
o
ld
F
o
ld
F
o
ld
F
o
ld
F
o
ld
F
o
ld
F
o
ld
F
o
ld
F
o
ld
F
o
ld
F
o
ld
F
o
ld
F
o
ld
F
o
ld
F
o
ld
F
o
ld
F
o
ld
F
o
ld
F
o
ld
F
o
ld
Extent of Clear Window
Text in this 10mm x 46mm area
PRESS TO ENTER
PRESS TO START
PRESS TO EXIT
PRESS TO OPEN
Press for Assistance
EMERGENCY CALL
PRESS TO STOP
PRESS TO CLOSE
Press in Emergency
Press to Acknowledge
PRESS TO SET
PRESS TO RESET
PRESS TO CLEAR
PRESS FOR ALARM
EMERGENCY
ACKNOWLEDGE
PRESS FOR ALARM
TE
XT
Fo
ld
Before applying decal
fold paper label
and insert through slots
Ensure all surfaces are clean
and free from dust etc..
DWG: 60116.cdr iss1 Jan10
LEDs
+12vdc
L
0vdc
B
COM
N.C.
N.O.
COM
N.C.
N.O.
Contacts rated
at 30vdc 1A
Control
BZ
Equivalent circuit
X
Y
J1
J2