2 ph calibration, Alibration, Two point calibration – Thermo Fisher Scientific Alpha pH 2000D User Manual
Page 18: One point calibration
5.2 pH
Calibration
If the unit of measure is in pH (default), then the calibration is also carried out in pH. This transmitter
features a one-point or two-point calibration for pH with five preset buffer sets. Buffer values refer to 25
o
C. A standard pH buffer solution that matches one of these values is required to calibrate the
instrument
.
Two point calibration
SETUP
HOLD
P
H
CAL
HOLD
P
H
P
H
CAL
HOLD
P
H
P
H
CAL
MEAS
P
H
O
C
atc
CAL
CAL
One point calibration
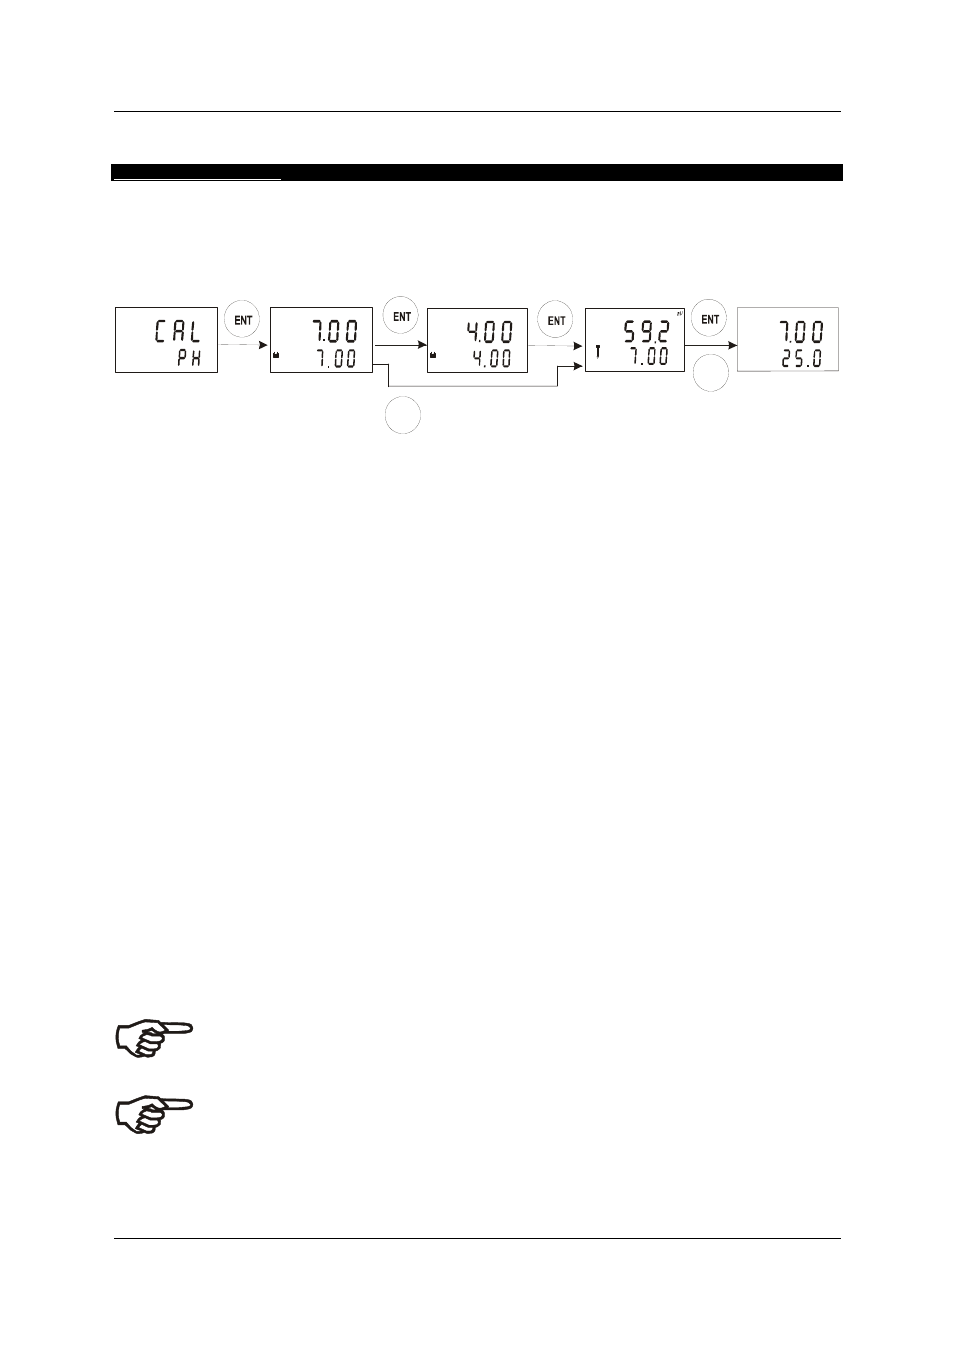
1. Enter Calibration mode as described in section 5.1. The display shows “CAL PH” (for pH calibration).
Note: If the display reads “CAL ORP”, see section 6.9 for procedures on how to switch from ORP to pH
readings.
2. Press the ENT key to start calibration. The “CAL” indicator appears at the top of display and the buffer
indicator appears in the bottom corner of the display. The display shows the actual pH reading (upper
value) and the buffer value for zero point (lower value). For the offset (zero point) calibration, there are
two values to choose from. They are pH 7.00 or pH 6.86. Using the
▲ and▼ keys, choose the value
that matches with the buffer used.
3. Place the electrode in the first buffer solution. In ATC mode, you must also immerse the temperature
probe in the buffer solution.
4. You can conduct either a one-point or a two-point calibration: Press the ENT for two point calibration or
the CAL key for one point calibration. The electrode indicator and CAL indicator both flash for a few
seconds. The controller automatically adjusts the reading to match the buffer value.
5. If one-point calibration was selected, the display will show the zero point in the lower section of the
display and the slope (default or using previous two-point calibration) in the upper section of the display.
Proceed to step 7 after zero point display. If two-point calibration was selected, the lower section of the
display will now show its next lower “pH” buffer. Use
▲ and ▼ keys to select the second buffer from one
of these preset value: - pH 1.68, pH 4.01, pH 9.00, pH 9.18 and pH 10.01. Remove the electrode from
the first buffer, wash and then immerse it into the second buffer. Press the ENT key, the electrode
indicator and CAL indicator will flash for a few seconds. The controller adjusts the reading to the second
buffer.
6. After calibrating the second buffer value, the controller will automatically display the slope in the upper
and the zero point in the lower section of the display.
Note: You can also view the values for zero point and slope without calibration (see section 5.5 for
instruction). The zero point and slope are pre-determined after each calibration.
7. Press the ENT key to return to the Measurement mode.
Note: If you entered the Calibration mode from the Setup mode, the controller will return to the setup menu.
Note: If there is a calibration error, the controller displays “CAL ERR”. If this happens, push
both
▲ and ▼ keys (escape) to restart the calibration beginning from Step 1.
Note: When calibrating with manual temperature compensation, the controller automatically
changes from the preset process temperature to the calibration temperature. After leaving the
Calibration mode, the controller switches back to process temperature (for setting the
calibration temperature and the process temperature, see Section 6.3)
- 13 -