User interface, Lv _ (1, 2, 5 or 6) _ _ _ _ _ _ _ _ _ _ a, Lv _ (a, b, c or d) _ _ _ _ _ _ _ _ _ _ a – Watlow Series L Temperature Limit User Manual
Page 12
Wa t l ow S e r i e s L
• 10 •
C h a p te r 4 : U s e r I n te r fa c e
User Interface
4
LIMIT LV
F
C
ALARM
RESET
SET
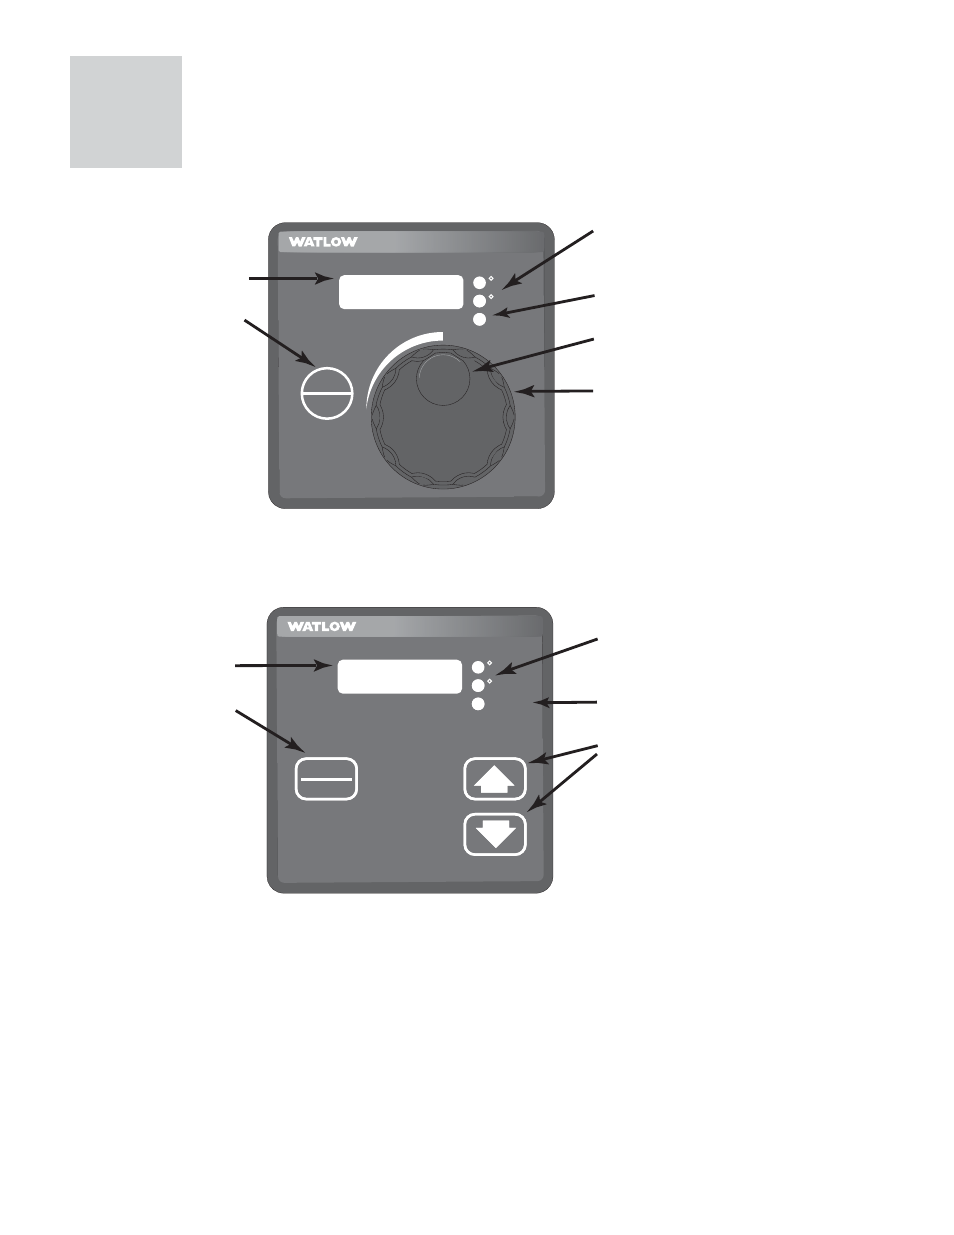
LED Display: Indicates
the limit set point.
SET/RESET Key: Press
and hold key to adjust the
limit set point temperature.
New limit set point is
entered 3 seconds after
the knob stops moving.
Press key to reset latched
limit output once
tempera-ture is back in
safe region. Can also be
reset through customer
supplied external reset
switch.
°F or °C Indicator Light: Lit to
indicate if unit is configured for
degrees Fahrenheit or degrees
Celsius.
ALARM Indicator Light: Lit
when limit is tripped.
Finger Tip Indent: Insert
finger tip into indent for quick
and easy set point changes.
Limit Set Point Knob: To
increase limit set point, turn
knob clockwise. To decrease
limit set point, turn knob
counter-clockwise. The new set
point is entered 3 seconds after
the knob stops moving. Limit
set point will not change unless
SET/RESET key is pressed.
LV _ (1, 2, 5 or 6) _ _ _ _ _ _ _ _ _ _ A
Figure 10 — Variable Limit Set Point, Standard Interface
LIMIT LV
F
C
ALARM
RESET
SET
LED Display: Indicates
the limit set point.
SET/RESET Key: Press
and hold key to adjust the
limit set point temperature.
New limit set point is
entered 3 seconds after
the last key press.
Press key to reset latched
limit output once
temperature is back in
safe region. Can also be
reset through customer
supplied external reset
switch.
°F or °C Indicator Light: Lit to
indicate if unit is configured for
degrees Fahrenheit or degrees
Celsius.
ALARM Indicator Light: Lit
when limit is tripped.
Increment and Decrement
Keys: Press the Up-Arrow key
to increase the limit set point.
Press the Down-Arrow key to
decrease the limit set point.
The new set point is entered 3
seconds after the last key
press.
The limit set point will not
change unless the SET/RESET
key is presses.
LV _ (A, B, C or D) _ _ _ _ _ _ _ _ _ _ A
ç
Caution: FM approval requires limit switches to be suitably enclosed to restrict casual user adjustment.
To adjust the Calibration Offset on models with tactile
keys, first hold down both the Increment and Decre-
ment keys for five seconds. The display will first show
[`CAL] for five seconds, then it will display the Cali-
bration Offset value. Adjust the value with the Incre-
ment and Decrement keys (range: -30 to 30°). The new
value will take effect three seconds after the last key
stroke. The display will blink, then return to the pri-
mary display after five seconds.
To change the temperature units on models with
tactile keys, first hold down both the Increment and
Decrement keys for ten seconds. The display will show
[F``C] for two seconds. Adjust the units with the In-
crement and Decrement keys. The new value will take
effect three seconds after the last key stroke. The dis-
play will blink, then return to the primary display after
five seconds. The set point value, process value and
offset will automatically adjust to the new temperature
scale.