Paasche Airbrush A-JU-PL User Manual
Page 4
Page 4
Paasche A-JU Spray Gun Accessories
Accessories for A-JU Automatic Spray Gun
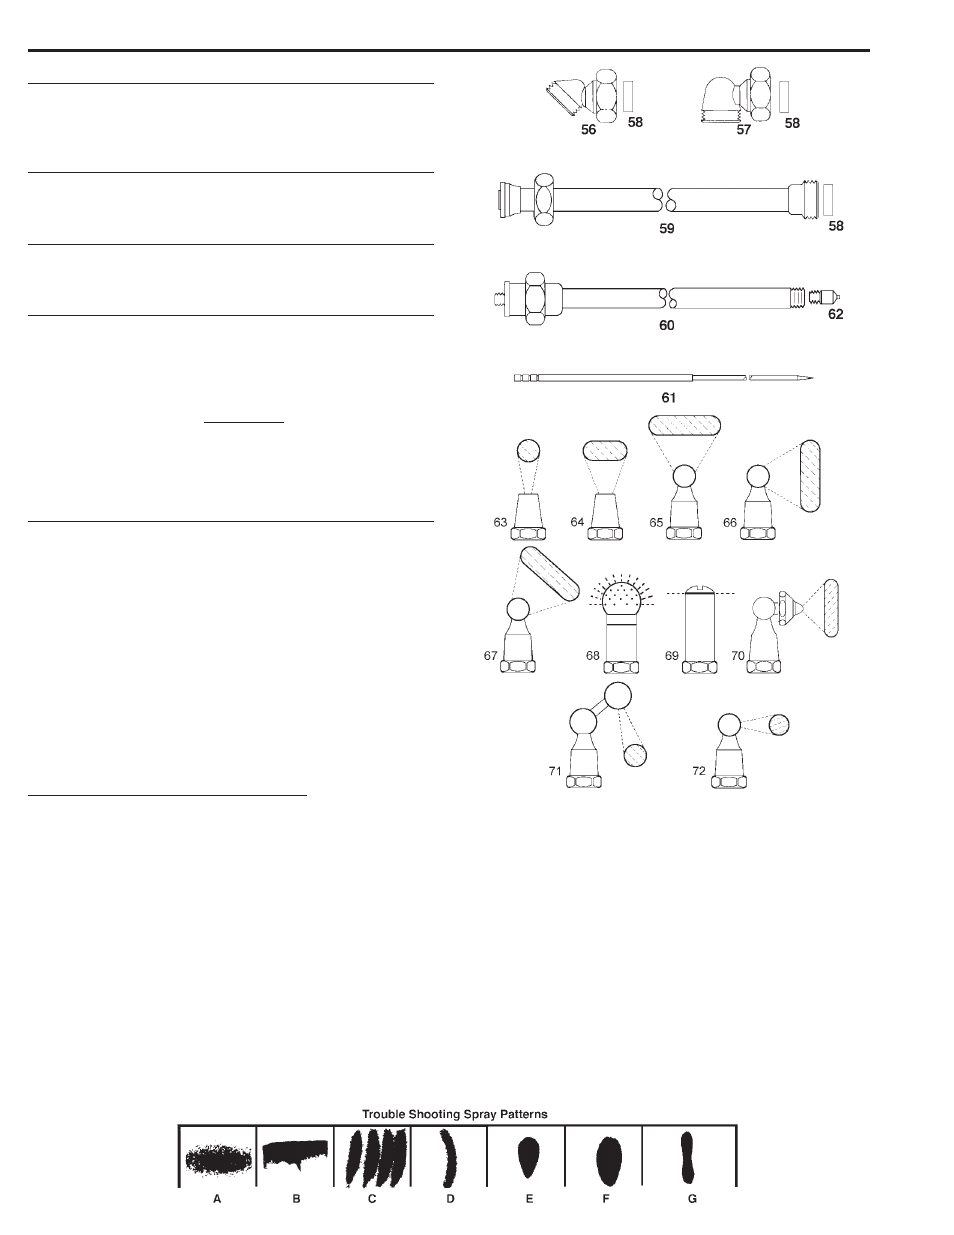
56. AEN-45
45° Elbow
57. AEN-90
90° Elbow
58. AN
Nylon Washer
AE- Extensions (ANF- and AR- Heads only)
• Length Sizes: -3, -6, -12, -18, -24
59. AE-
Extension L/Needle (Select Size)
Ax- Stainless Steel Extensions (Ax- Aircaps only)
• Length Sizes: -3, -6, -12, -18, -24, -36, -48
60. Ax-
St. St. Extension L/Needle (Select Size)
A-AJ- Extension Needles (AE- & Ax- Extensions)
• Length Sizes: -3, -6, -12, -18, -24, -36, -48
61. A-AJ-
St. St. Extension Needle (Select Size)
Q All Ax Aircaps must use a Pressure Feed
Cup or Pressure Tank to feed material being
sprayed. Always adjust atomizing air pressure
higher than fluid air pressure.
Ax- Style Tips and Aircaps (Ax- Extensions Only)
62. Ax-1
Tip
63. AxR
Aircap External Round Pattern
64. AxF
Aircap External Fan Pattern
65. AxIF
Aircap Internal Fan Pattern
66. AxIF-90
Aircap Internal Fan Pattern
67. AxIF-45
Aircap Internal Fan Pattern
68. AxIB
Aircap Spherical Pattern
69. AxI-360
Aircap Radial Pattern
70. AxIF-90A
Aircap Internal Fan Pattern
71. AxIR-15
Aircap Internal Round Pattern
72. AxIR-90
Aircap Internal Round Pattern
TROUBLE SHOOTING SPRAY PATTERNS:
(A) A ROUGH OR STIPPLE FINISH is due to low or restricted flow
of air pressure or too heavy materials being applied with spray
gun too close to surface.
(B) A WET OR SAGGING FINISH is due to low air pressure or
restricted flow of air, material being too thin, applied too close
to the surface.
(C) A SPUTTERING SPRAY is caused by air leaking into fluid line
or can be caused by a loose fluid tip, a broken or split tip,
lumpy material, a clogged vent hole in cover of material cup,
air leak at fluid pipe attached to inside of tank cover, or a
clogged paint strainer.
TO CORRECT: Tighten tip securely or replace. Strain
materials and clean strainer. Sputtering might also be caused
by worn packing washers, or worn or scored needle.
(D) AN ARCHED FAN SPRAY PATTERN is caused by dried
material accumulated in one fan port of the multiplehead
distorting the pattern.
TO CORRECT: Dissolve material inside fan port with suitable
solvent applied with a small brush.
NOTE: Never use wire or sharp instruments to clean fan
ports as permanent damage to the air ports will result in
destroying uniformity of the fan pattern.
(E) UNBALANCED FAN SPRAY PATTERN, heavy on one side,
may be caused by material collecting around outside of the
fluid tip and aircap, or by a loose aircap.
TO CORRECT: Remove aircap and clean fluid tip and aircap
with solvent, dry with air pressure. Always be sure fan aircap
and aircap body is tightened securely.
(F) A HEAVY CENTER in a fan pattern is caused by insufficient air
pressure at the fan port. Rough or shady edges are also
caused by low air pressure.
TO CORRECT: Increase air line pressure.
(G) A SPLIT FAN SPRAY PATTERN heavy on each end and light
in the center, is caused by excessive air pressure.
TO CORRECT: Reduce air pressure.