Warning, Caution – WEATHER GUARD 1345 User Manual
Page 2
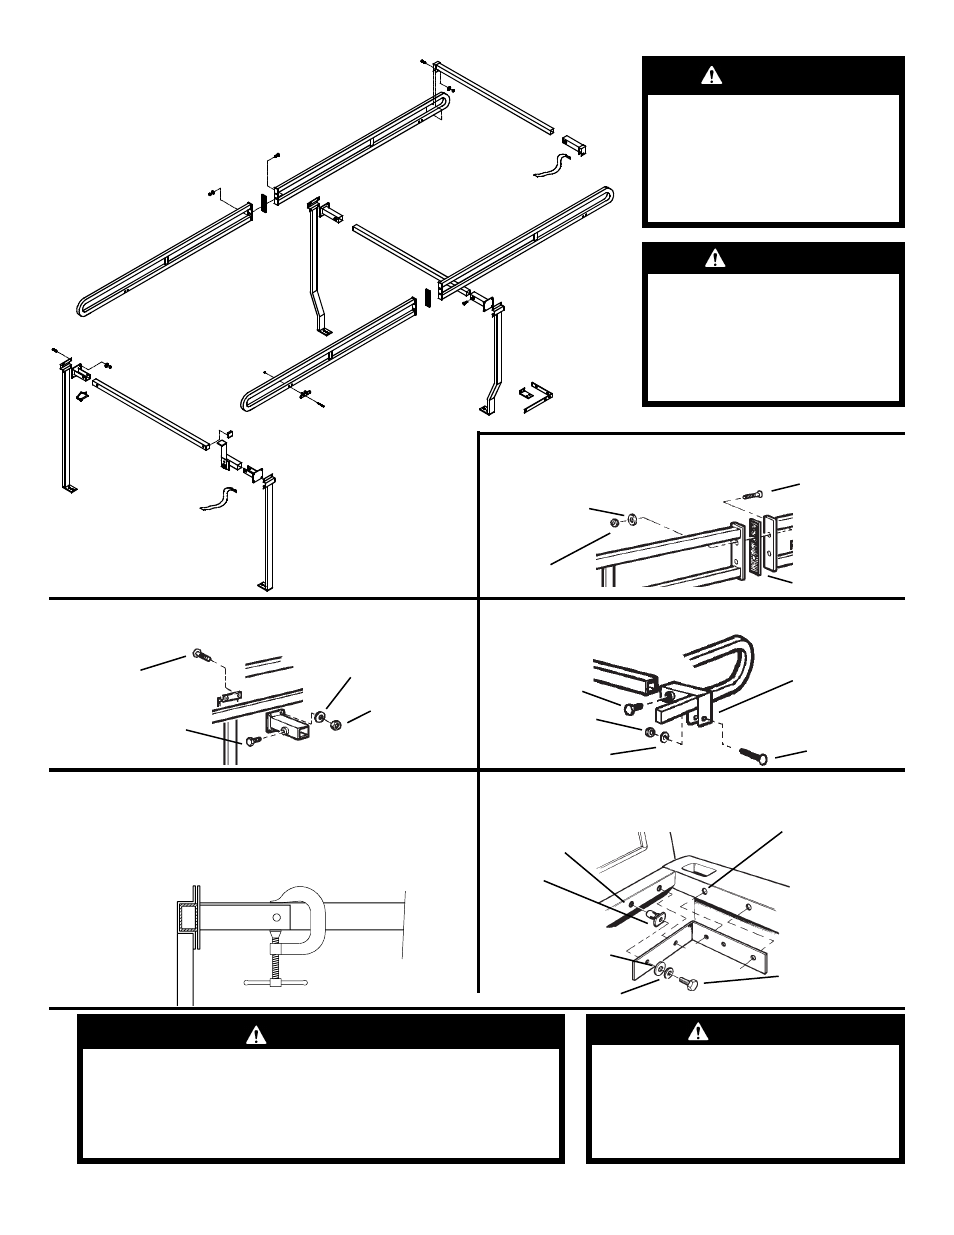
3/8-16 x 1-1/4"
Carriage Bolt
STEP 4.
Check the width of the rack and the truck bed. If the
rack is narrower, clamp the rear crossmember in the rear open
sockets temporarily, but DO NOT drill, then proceed to Step 5. If
the rack is too wide, remove the crossmembers and cut to fit.
NOTE: Double check all of your measurements before cutting.
STEP 5.
Install two Bed Reinforcing Brackets. See Blind Fas-
tener instructions for Blind Fastener installation.
STEP 2.
Attach all legs and sockets. Do not tighten. Insert cen-
ter crossmember. (Four bolts required per leg)
3/8-16 x 3/4"
Thread
Cutting Bolt
5/16-18 Nylon
Lock Nut
5/16" Flat Washer
Cushion Strip
3/8" Flat
Washer
STEP 1.
Bolt front and rear rail halves together.
(Two bolts per rail)
STEP 3.
Assemble front crossmember.
Turn
crossmember
upside down for
clearance on
king cabs.
5/16-18 x 2"
Carriage Bolt
1/2" Hole
5/16" Flat Washer
5/16" Lock Washer
5/16-18 x 1-1/4"
Hex Head Bolt
5/16-18
Blind
Fastener
Install this bolt on
Ranger & Dakota
only
5/16-18 x 3/4"
Carriage Bolt
3/8-16 x 3/4" Hex Head
Thread Cutting Bolt
5/16-18 Nylon
Lock Nut
5/16" Flat
Washer
3/8-16 Nylon
Lock Nut
WARNING
Prior to drilling, so as not to cut or
puncture fuel tanks, fuel lines, brake
lines, electric wires, etc., check under
vehicle for locations.
WARNING
All floor mounting bolts near the gas tank area should be
installed from the underside of the vehicle, to guard against
the gas tank being punctured in the event of a collision.
This would mean not using Blind Fasteners in this area.
2
CAUTION
To keep debris out of your
eyes when checking the
underside of the vehicle, or
when drilling, always wear
protective eyewear.
CAUTION
Never load your ladder rack to
exceed the safe rated capacity
of your vehicle. Heavy loads
carried high can seriously alter
the center of gravity.