Selecting computers (ip section), Using remote console to synchronise operation, 31 using remote console to synchronise operation – Adder Technology Switch User Manual
Page 32
31
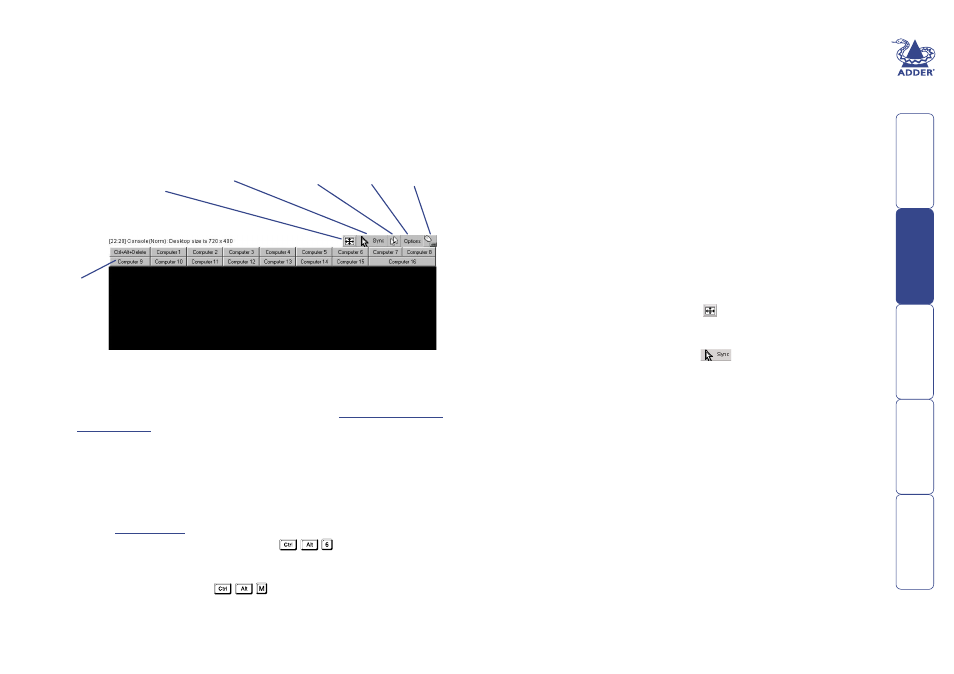
Click these
buttons
to select
computers.
Note: These
buttons are
displayed only
after they
have been
configured
Click to optimise
the video display
for the current
computer video
mode
Click to synchronise
the mouse pointer
of the computer
with your local
mouse pointer
Click to change between
single and double mouse
pointer mode (available
only if your browser uses
Java v1.3 or greater)
Indicates
keyboard
and mouse
connection
status
Click to
display
the
options
menu
Selecting computers (IP section)
This section covers the various ways that you can select a computer when using
the remote IP connection.
To select a computer
1 Click the ‘Show Remote Console’ option. If the login menu is displayed, log-
in first. Otherwise, the Remote Console window will be displayed:
This is where you select computer ports and view the resulting screen
images.
Note: If the security option has been set within the KVM section, you will
need to enter an additional Login and Password – see
2 Select the required computer port in one of three main ways:
• Click the required computer button from the selection at the top of the
Remote Control window. This is the preferable method because any
screen setup parameters that are set for a particular computer will be
invoked every time the same computer is re-selected in this manner. This
method of selection uses the switching codes that are configured within
the
panel discussed on the previous page.
• Use a KVM hotkey sequence, such as
(selects port 6). For
cascaded computers with lengthy addresses, one of the other two
methods is recommended.
• Display the KVM menu (
) and select a computer by name
from the list.
Whichever method is used, when a channel is selected, the resulting video
image will be shown within the Remote Console window.
Using Remote Console to synchronise operation
When the SmartView World first accesses a computer via IP connection it is likely
that the screen arrangement and mouse responses, from the remote machine,
are not as optimal as they can be. If this is the case then you need to carry out
two steps for each computer. These steps need only be carried out once for
each port as the SmartView World will store the optimal settings. The mouse
has two modes that are selectable from the Options menu within the Remote
Console window, under the ‘Mouse Handling’ option: Fast Sync and Intelligent
Sync. The former creates a quick synchronisation between the ‘local’ movement
of your mouse and the response of the remote mouse pointer of the computer.
The Intelligent Sync option takes a little more time than the fast mode, and
requires a fully optimised screen, but it gives a better correlation between your
movements and the response of the remote computer.
To synchronise screen and mouse operation
1 Within the SmartView World home page, select the ‘Show Remote Console’
option in the ‘Server’ section. The Remote Console window will be displayed
- see opposite.
2 Carry out the following two steps as necessary:
• To adjust the video display: Click the
button. The SmartView World
will determine the optimum display settings – while this process takes
place the Remote Console window will go blank for a few moments.
• To synchronise the mouse: Click the
button. The SmartView
World will match the response of the mouse pointer on the remote
computer to the movement of your mouse.
Note: To optionally change between the two mouse synchronisation
modes (‘Fast Sync’ and ‘Intelligent Sync’) click the ‘Options’ button
(within the Remote Console window), select the ‘Mouse Handling’
option and select the required mode from the resulting flyout.