Retract-lite: dc-remote lighting fixture, Testing the dc-remote fixture, Important – Emergi-Lite Revelation Remote Fixture Series User Manual
Page 3
Emergi-Lite
Tel: (888) 552-6467 ext. 547 or 255
Fax: (888) 867-1565
www.emergi-lite.com
Retract-Lite: DC-Remote Lighting Fixture
3/3
08/07 750.1297 Rev. A
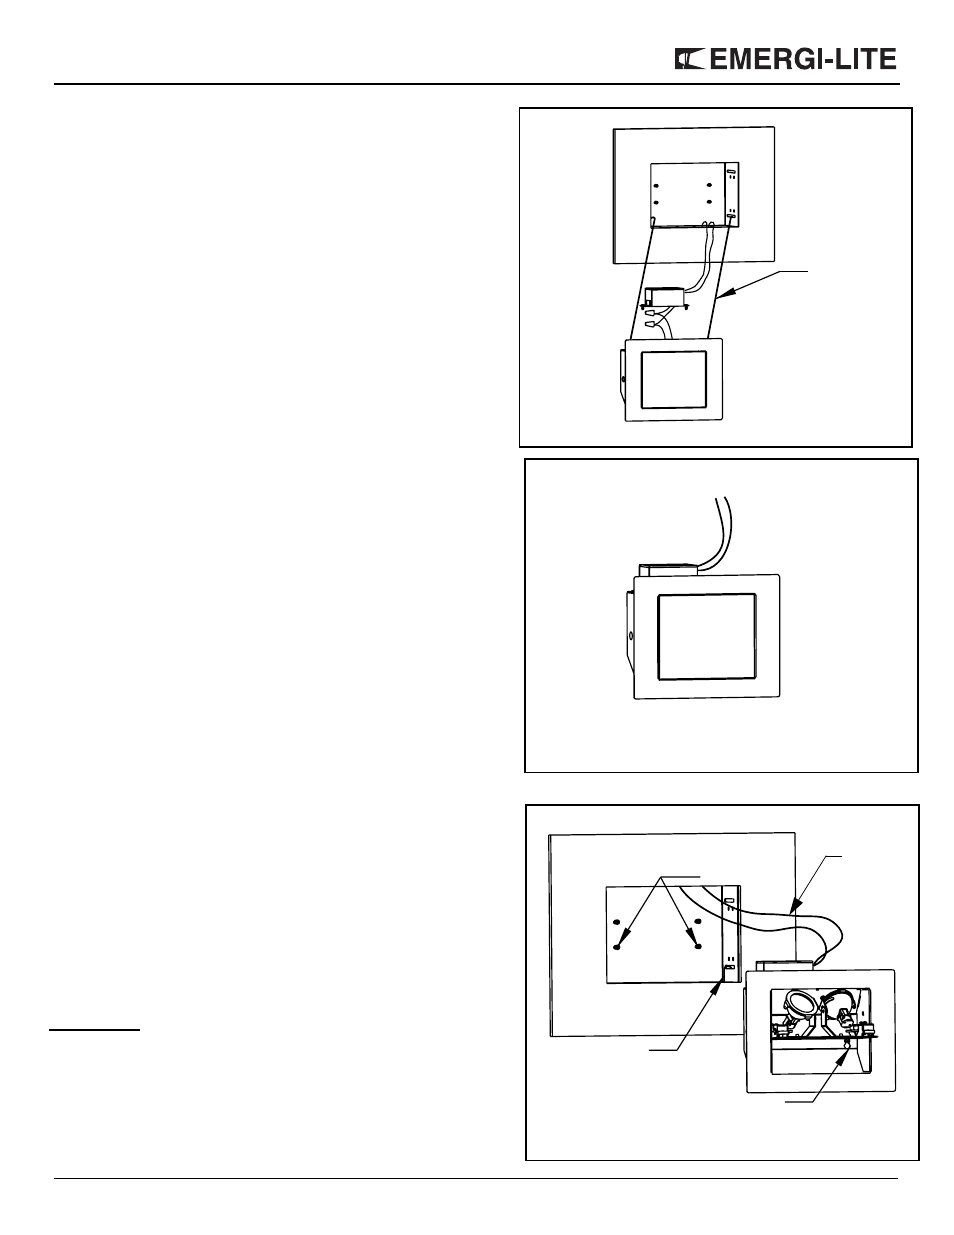
Lamp Module Installation (Figures 6 and 7)
1. Pass the DC cable about 2 inches through the junction box (pro-
vided).
2. Suspend the lamp module from the “U” bracket with the metal hooks
(provided).
3. Connect the two wires from the lamp module to the DC cable. The
connections don’t have a polarity. However, the emergency power
must supply low-voltage DC current: 12Vdc or 24Vdc, as specified on
the product label.
4. Cap the wire connections and install them in the junction box (see
Figure 6a).
5. Install the juction box on the lamp module with the two screws pro-
vided. Make sure the whole juction box installation follows the code
(see Figure 6b).
6. Force the door of the lamp module half-open and identify the four key
holes in its housing.
7. Hold the lamp module. Disengage the hooks and leave it hooked in
the wall, on the “U” bracket, for future utilization (see Figure 7).
8. Push the electical cable and the lamp module into the wall with the
cable and junction box oriented downwards and engage the key
holes in the four screws of the “U” bracket. Slide the lamp module so
that the head of the screws are in the slotted end of the key hole.
9. Align the lamp unit on the wall (ceiling) then tighten the four screws
until its trim is flush with the wall. For easy access to the screws, the
door can be rotated one full turn of 360 degrees.
10. Orient the two lamps in their swivels and check that they are plugged
into the sockets.
11. Close the door and make sure it is flush with the trim.
Testing the DC-Remote Fixture
1. Activate the DC emergency line. The door will open and the lamps
will illuminate.
2. Pivot the lamps in their swivels to illuminate the desired area.
3. Turn off the DC emergency power. The lamps will turn off and the
door will close flush with the trim.
4. The unit requires no maintenance, but should be tested regulary in
accordance with the codes.
Important!
When powered, the fixture must be supplied for minimun 5 seconds
in order to accumulate the energy required to close the door prop-
erly.
Figure 6a
Figure 6b
Figure 7
Screws
Hooks
Key
holes
DC power
cable
2 Hooks