Electronics International CGR-30P User Manual
Page 44
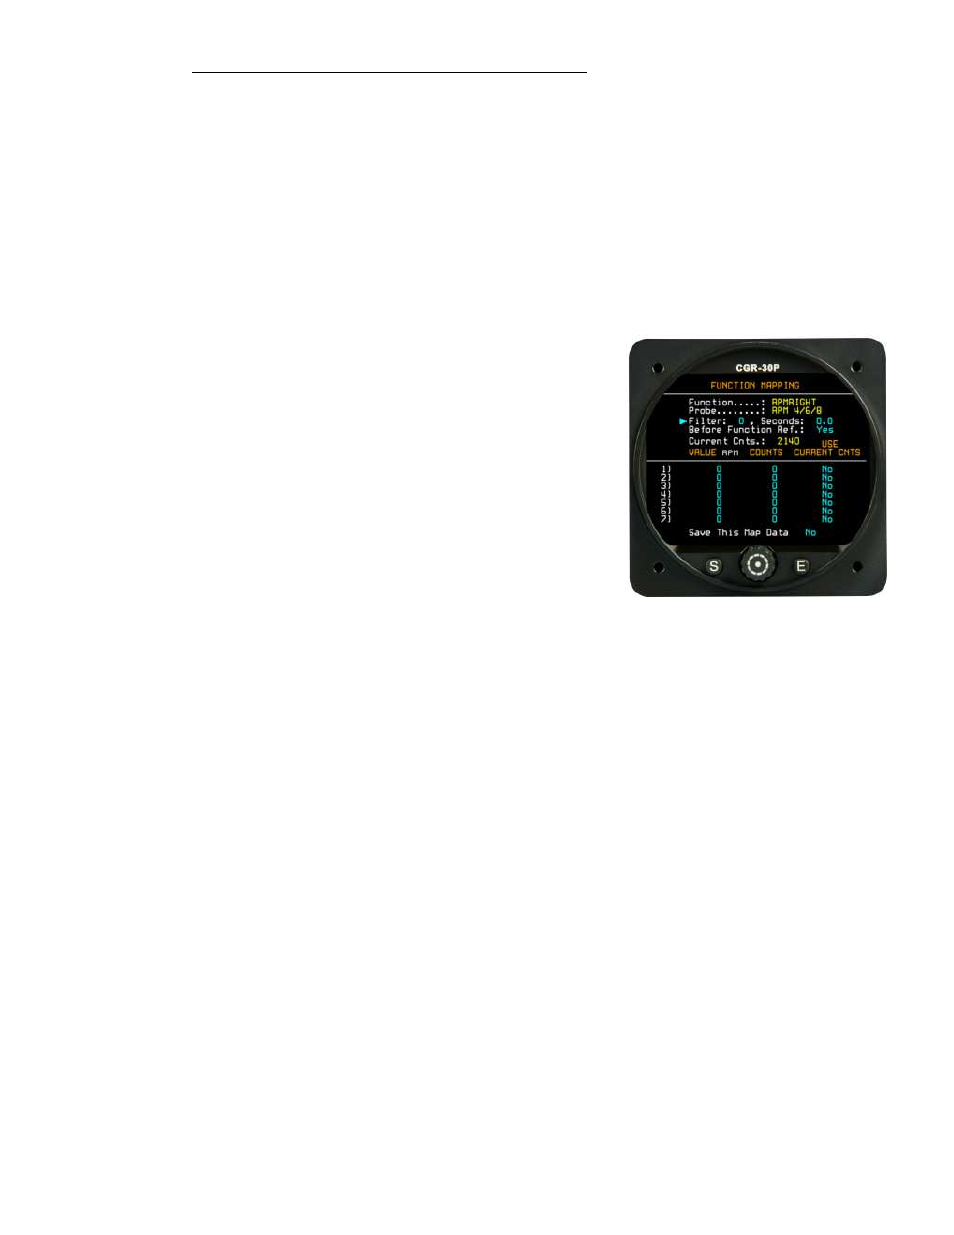
7.11.2 Function Mapping Screen (Fuel Tank Calibration):
A Map is a powerful tool that provides a method of
relating an input value from a sensor to a value dis-
played on the screen. For example, a fuel level sensor may report the value 500 when the tank is empty
and 2000 when the tank is full. A Map calibrates the fuel level sensor reported values to an actual fuel level.
The CGR-30P performs a linear calculation between the map points. If the tank and/or sensor output is
non-linear, adding more map points will correct for this problem. It is important the sensor is repeatable
(i.e.; the same output for the same fuel level). Data from non-repeatable sensors cannot be fixed. A Map is
most often used to calibrate a fuel tank but can also be used on any function.
The Function Mapping Screen provides the following fields:
Cal Filter – This field sets the filter that will be used to
generate a map. With a filter setting of “0” the “Current
Cnts” may be jumpy. If this is the case, increase the filter.
A Cal Filter setting of “6” (2.0 seconds) may work well
without slowing down the refueling and calibrating process.
Before Function Ref. – The Map may be implemented
before or after the Function Reference. The Function
Reference is described above. Normally this field is set to
“Yes.”
Current Cnts – The “Current Cnts” is the current output
of the fuel sensor (also called Sensor Counts).
An aircraft’s Fuel Tank can be calibrated using a fuel truck. Fuel will be added to the tank in set amounts.
Normally it only takes about 20 seconds to allow the “Current Cnts” to stabilize and set a map point. You
should practice setting mapped points before calling for the fuel truck.
Rows 1 to 7 are the mapped calibration points. The steps below are for calibrating the fuel level for a Fuel
Tank, but any function can be mapped. The Map is built as follows:
1. Empty the fuel tank and add fuel so only the unusable fuel remains in the tank. Wait for the
“Current Cnts” field to stabilize. Use the Cal Filter to stop jumpy readings.
2. Put the aircraft in level flight attitude.
3. If the “Current Cnts” increase as you add fuel, start with row #1. If the Current Cnts decrease as
you add fuel, start with row #7 and work up.
4. Call for the fuel truck.
5. Set row #1 (or #7) “Value” to 0. Use the “Use Current Cnts” field to transfer the “Current Cnts”
to the “Counts” field for row #1. You have now associated the sensor position and output to a fuel
level.
46