Xx=16mm x=19mm, Preparing the wall cupboard, Installation inside the wall cupboard – Bosch DHI645H grau-metallic Flachschirmhaube 60 cm User Manual
Page 15
15
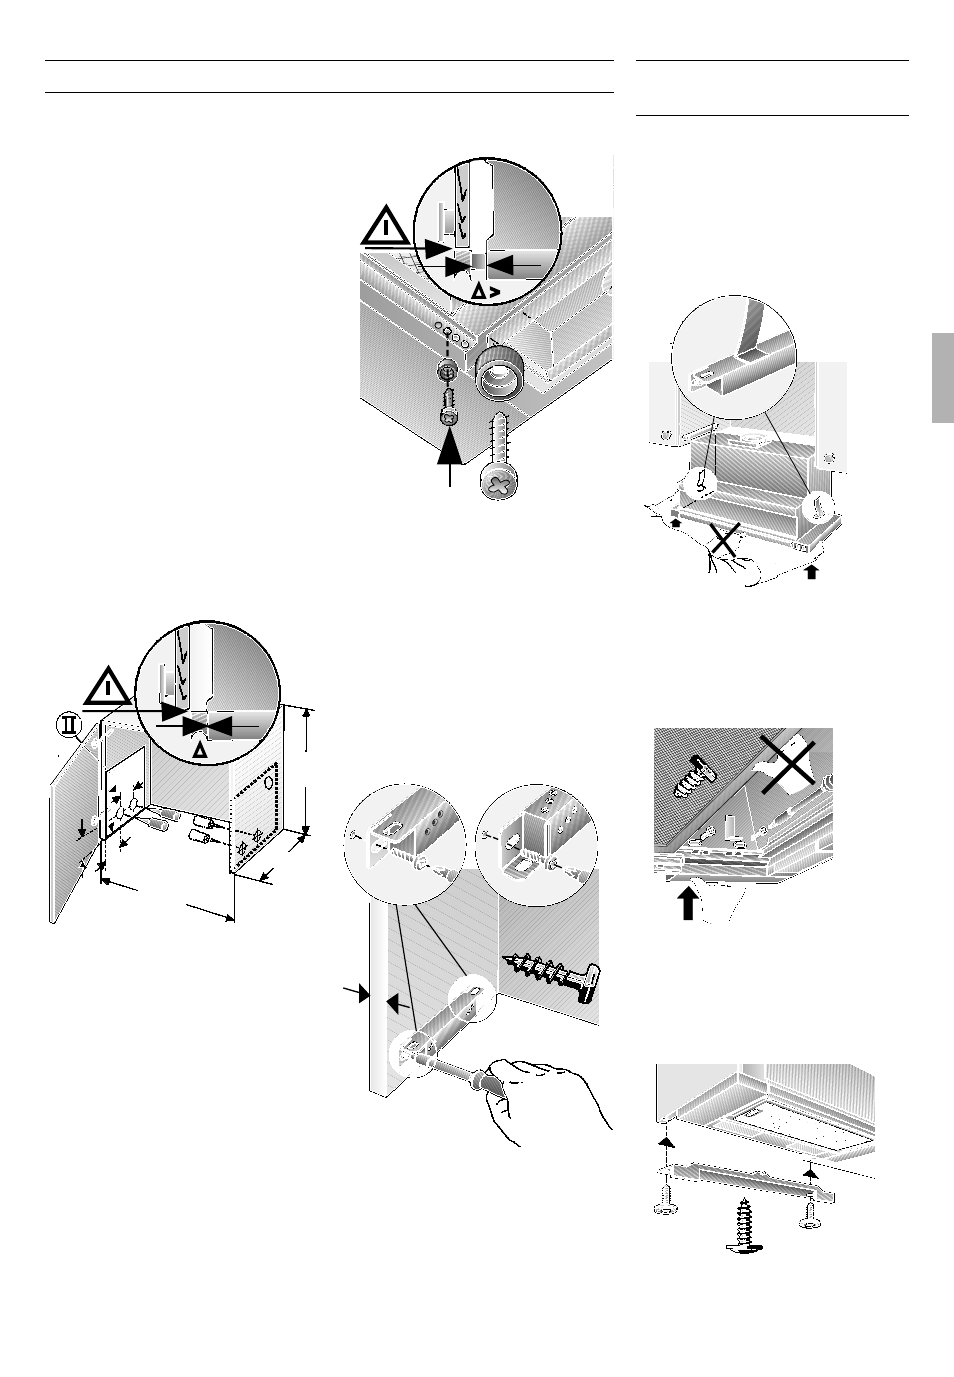
Preparing the wall cupboard
Ensure that there is a minimum gap
between hob and extractor hood of 650
mm (for gas hobs) or 430 mm (for electric
hobs).
This extractor hood has been designed
for installation inside a wall cupboard with
the following dimensions:
Width: 600 mm
Depth: 280 bis 350 mm
Height: at least 300 mm.
Preparation:
1. Remove bottom panel of cupboard – if
fitted.
The stability of the cupboard must be
maintained.
2. Mark two points – right and left – on the
inside of the cupboard where the hood
is to be mounted, and start the hole with
a gimlet.
Details for drilling:
l 2 mm – max. 10 mm deep.
Attention:
❑ Use enclosed template
O
II
for
marking points where hood is to be
mounted.
❑ The mounting points shown on the
template have been configured in such
a way as to allow a 20 mm thick handle
to be attached flush with the front edges
of the cupboard.
❑ A stop allows the handle (Dimension ∆)
to be positioned further forwards.
21
32
600
170
280-350
mind
300.
=0
0
If the cupboard depth is greater than
280 mm, the hood can be mounted further
back,
. . . if the light strip under the cupboard
. . .
units is mounted further back,
. . . if the handle is more than 20 mm thick.
Position the template
O
II
further back.
3. Align and screw on the enclosed
mounting rails.
Note the thickness of the sides of the
cupboard (16 mm or 19 mm).
dimension X.
If the interior depth of the cupboard is
less than 280 mm, the 250 mm high rear
panel must be removed.
X
x=16mm
x=19mm
Installation inside the wall
cupboard
1. Remove the filter frames (see Operating
Manual).
2. If the hinges are no longer accessible
when the extractor hood has been
installed, align the cupboard doors.
3. Lift and push the extractor hood from
below into the cupboard until the
installation aids on the left and right lock
into position.
4. Pull out the filter drawer all the way.
5. Attach the extractor hood by screwing
in 2 screws on the left and right. Do
NOT tighten the screws. Raise the
extractor hood.
6. Align the extractor hood in the
cupboard and tighten the screws.
7. Feed the mains connection cable
through the aperture into the upper
cupboard and connect the pipe.
8. Connect to the power supply.
9. If required, shorten the wall cover to the
required size (e.g. saw off) and screw to
the upper cupboard.