Laurel Electronics LAUREATE SERIES 2 DIGITAL PANEL METER User Manual
Page 51
51
• The Readings pull-down menu provides three formats to display DPM data on the PC
monitor. Use the Pause and Continue buttons to control the timing of data collection, then
press Print for a hardcopy using your PC printer.
- List presents the latest readings in a 20-row by 10-column table. Press Pause at any
time to freeze the display. Press Print for a hardcopy. List can capture peak readings.
- Plot generates a plot of readings vs. time in seconds. It effectively turns the DPM-PC
combination into a printing digital oscilloscope.
- Graph generates a histogram, where the horizontal axis is the reading and the vertical
axis is the number of occurrences of readings. The display continually resizes itself as
the number of readings increases.
• The Jumpers pull-down menu provides
jumper positions for the various meter boards,
duplicating information in this manual.
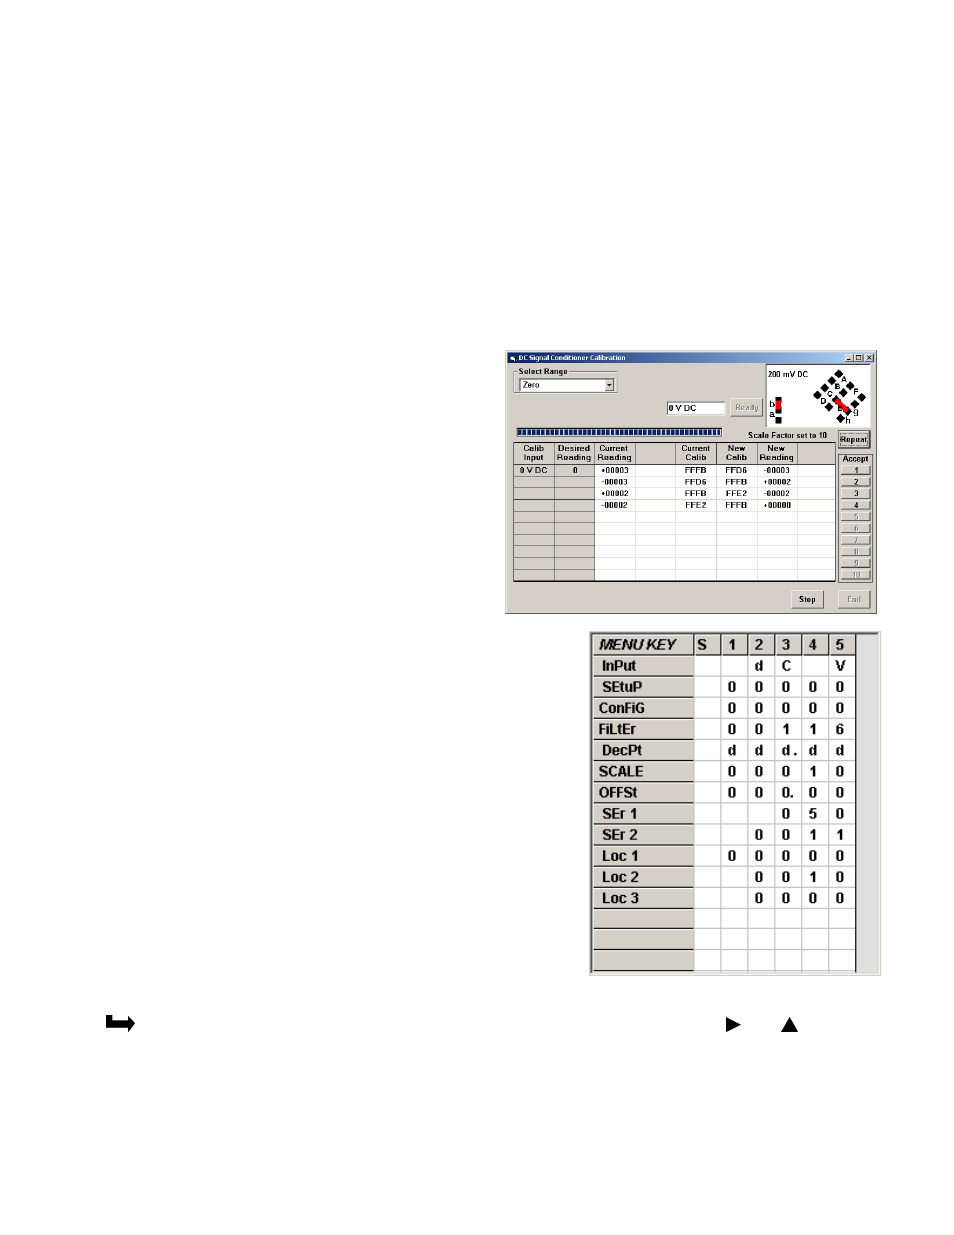
• The Calibration pull-down menu allows
easy calibration of voltage and current ranges
for the DC, load cell, and AC RMS signal
conditioner boards. The PC first recognizes
the type of board, then prompts you to apply
specific jumpers and calibration signals. Press
Ready to take a reading. Press Repeat to take
more readings. When you have decided on
which reading to accept, press on the number
1 through 10 of that reading. Additional cali-
bration software is available online.
METER SETUP WITH AN UNCONNECTED PC
Instrument Setup software is also of benefit when the
PC is not connected to a meter. Upon launching the
software, click on None for Communications, then on
DPM and Series 2. Click on File => Default Setup to
retrieve a default setup file from disk, or on File => Open
Setup to retrieve a previously saved setup file from disk.
To enter new setup information, click on View => Setup,
then make your screen selections as if you were
connected to a meter. Tabs will be grayed out if you
have not selected the required hardware under the
Input+Display tab. When done, press on Main Menu,
then on View => Menu. The selections made under
Setup will now be shown in the form of the required front
panel programming sequence, where each row corresponds to a menu item selected by the
key, and the seven data columns correspond to values entered via the and keys.
Click on any step in the sequence to bring up a detailed help window.
Click on Print for a hardcopy, which you can then use as an instruction sheet to program
your meter via its front panel.
Click on Main Menu => File => Save Setup As to save your setup to disk and have an
electronic record.