Datamax-O'Neil S-Class SV Cutter Option User Manual
Page 11
9
10. Replace the electronics cover and secure it using the two previously removed screws. Proceed to Step
C, below.
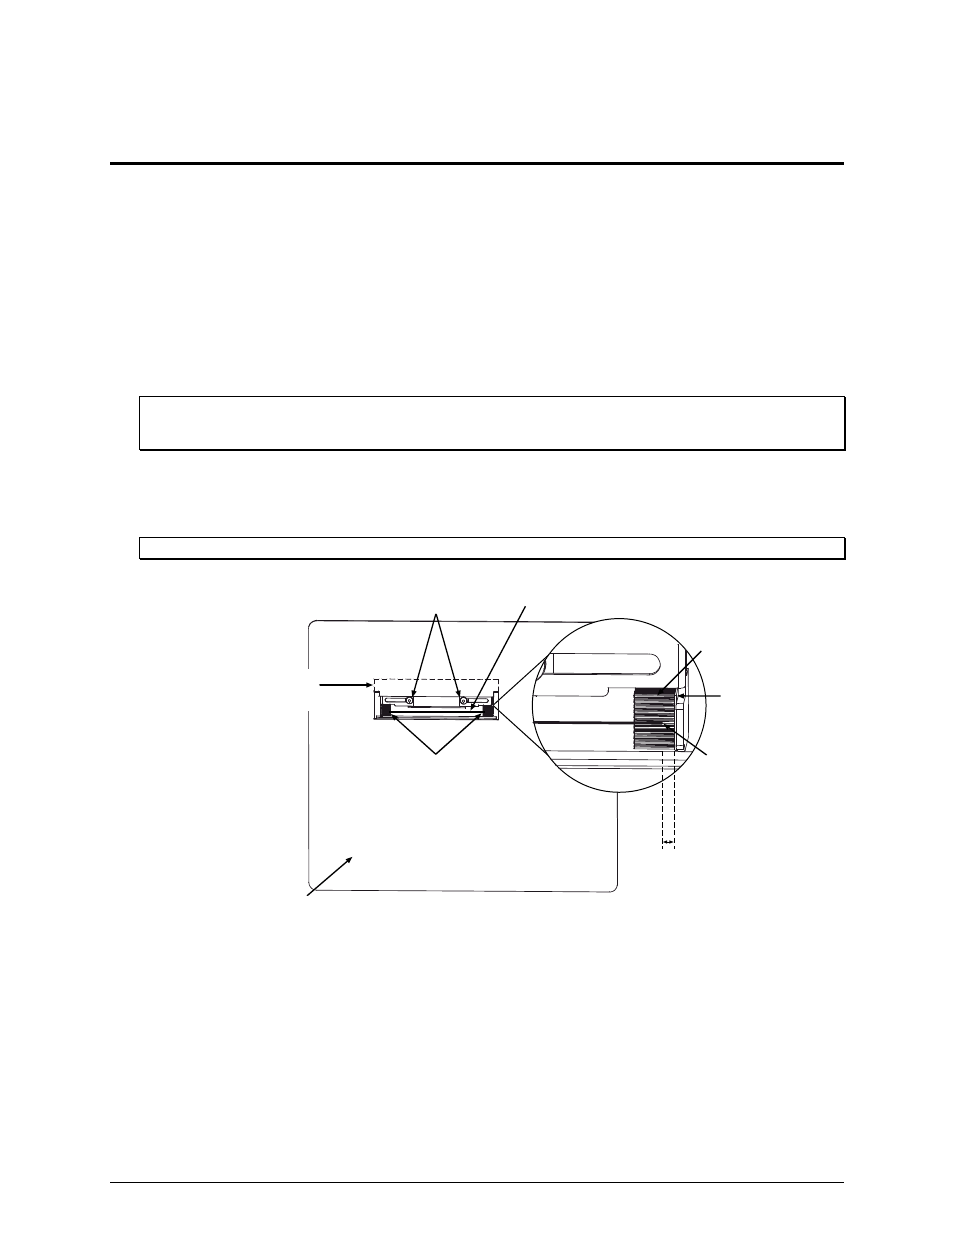
Step C: Adjusting the Front Plate Brushes
For proper ticket stacking following the cut operation, the Brushes within the Front Plate Assembly must
be adjusted, as follows:
11. Ensure that the Brushes in the Front Plate Assembly are at the widest setting (if necessary, slightly
loosen the Screws and reposition the Brushes; see the drawing below).
12. Manually load ticket stock through the printer and adjust the Media Guides to fit the ticket stock
being used (see the Operator’s Manual for details). Ensure the ticket stock is NOT skewed as it exits
the Ticket Door on the Front Plate Assembly.
Note: If unable to pass ticket stock through the cutter mechanism, the blade may be in the “down” position.
To cycle the blade position, plug the AC power cord into the printer, turn on the power switch, and
allow the printer to initialize (about 30 seconds). Then turn off and unplug the printer.
13. With the Screws on the Front Plate Assembly slightly loosened, move each of the Brushes so that the
Ticket Edges are approximately 1/16 inch (1.5 mm) from the Brush Backing.
Note: Do not over-adjust the Brushes because ticket binding or jamming can occur.
Brushes
Screws
Front Plate
Assembly
Ticket Door
(shown as dotted lines)
Ticket Edge
Brush
Brush
Backing
Approximately
1/16 inch
(1.5 mm)
Ticket Stock
14. Tighten the Screws. Remove the Ticket Stock from the printer.
15. Ensure that the printhead locked down, and then gently lower the printer into its enclosure.
16. Reconnect the interface cable(s). Plug in the AC power cord and turn ‘On’ the power switch. This
completes the installation procedure. Upon power-up, the printer will automatically sense the
presence of the Cutter, and then will cycle the Cutter 1 or 2 times. Load ticket stock. Using your
software program, enable the cut function to begin using the Cutter. Test the stacking function by
printing several test tickets. If the tickets are not stacked, or if they are binding, readjust the brushes,
beginning at Step 11, above.