Rs-232 control, H/hv r/c g/y b r/c g/y b v, H/hv v r/c g/y b – Extron Electronics SW 2_4 ARxi User Guide User Manual
Page 22: H/hv v, Host/switcher communications, Operating as a slave
SW AR MX, SW AR MX HV, SW 6 Component • Operation
SW AR MX, SW AR MX HV, SW 6 Component • Operation
SW AR MX, SW AR MX HV, and
SW 6 Component Operation, cont’d
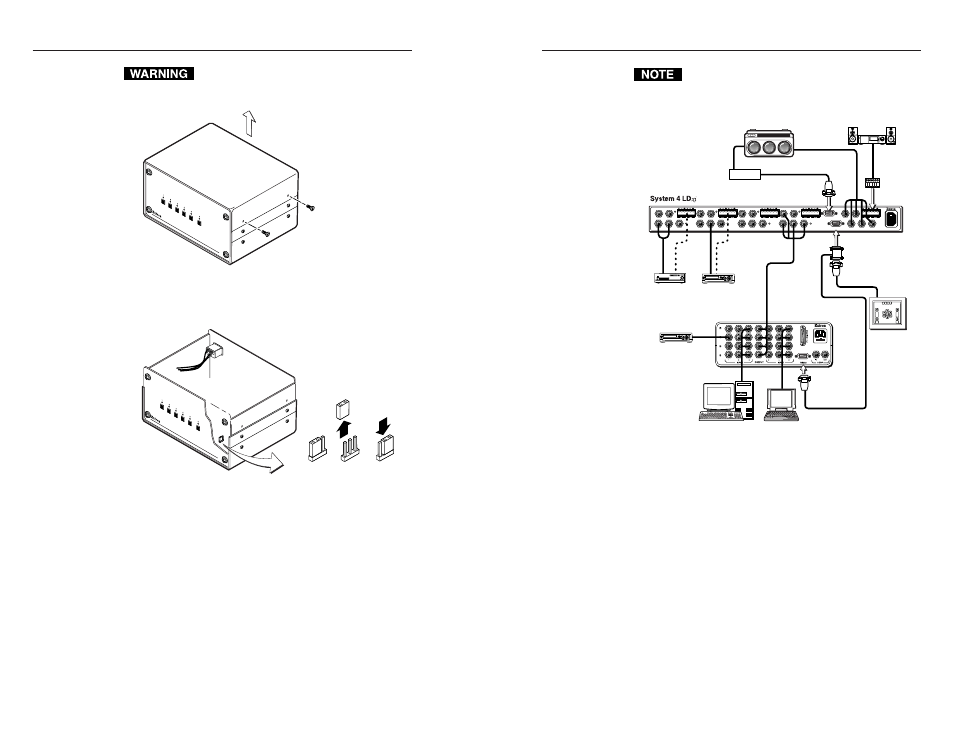
See the System 4 Series Switcher manual for
configuration information regarding the connection
of an SW AR MX type switcher as a slave to a
System 4 switcher.
Figure 30 — SW 6 AR MX operating as a slave
RS-232 Control
The switcher can be controlled through the RS-232 port by a
host device/computer. Cable connection, pinouts, and
protocol are shown in figure 31 on the next page.
Host/switcher communications
The switcher treats any character that comes in from the
RS-232 port as a possible command, but it accepts only a
limited set of characters as legal commands. There are no
codes required to say that a command is being transmitted,
or that a command has ended. A simple command may be
a single character typed on a keyboard, and it does not
require any special characters before or after it. For
example, it is not necessary to press the Enter key from the
keyboard. Simple commands could be from a terminal or
any other controlling device.
Do not touch any electronic components inside
the switcher. Doing so could damage the
switcher.
Figure 28 — Removing the switcher cover
3.
Locate jumper E2 (figure 29). A jumper shunt is on pins
1 and 2.
Figure 29 — Circuit board jumper location
4.
To change the jumper location, use pliers to pull the
jumper shunt off pins 1 and 2, and place the shunt
on pins 2 and 3.
5.
Replace and fasten the enclosure cover, reversing step 2.
Operating as a slave
Figure 30 shows an example of an SW 6 AR MX switcher
operating as a slave to a System 4 switcher. The
SW 6 AR MX provides the System 4 with inputs 4 – 9.
The SW 6 AR MX responds to commands from the System 4
through the RS-232 communications interface.
4-7
SW 6 AR MX
* Do not connect pin #4
or pin #8 (improper slave
operation will occur)
OUTPUT
PJ COMM
RS 232
M
A
N
U
A
L
AUDIO
AUDIO
AUDIO
AUDIO
AUDIO
H/HV
R/C
G/Y
B
R/C
G/Y
B
V
INPUT 4
H/HV
V
R/C
G/Y
B
INPUT 3
H/HV
V
R/C
G/Y
B
INPUT 2
H/HV
V
R/C
G/Y
B
INPUT 1
H/HV
V
CRT Projector
Projector Communication
Extension Cable
Projector
ComAdapter
BNC Cable
Slave Adapter
2-Channel
Stereo Audio
VCR
Laserdisc Player
VCR
Control System
Laptop Computer
SVGA Compatible
Computer
4-6
Remove 2 screws
from each side.
Lift cover straight up.
SW 6AR MX HV
NORMAL
SLAVE
SW 6AR MX HV
E2