Pmk 350 mounting, Versatools, Seq 00 skew equalizer, cont’d – Extron Electronics SEQ 100 15HD User Guide User Manual
Page 10
VersaTools
®
SEQ 100 Skew Equalizer
VersaTools
®
SEQ 00 Skew Equalizer, cont’d
VersaTools
®
SEQ 100 Skew Equalizer
PMK 0 mounting
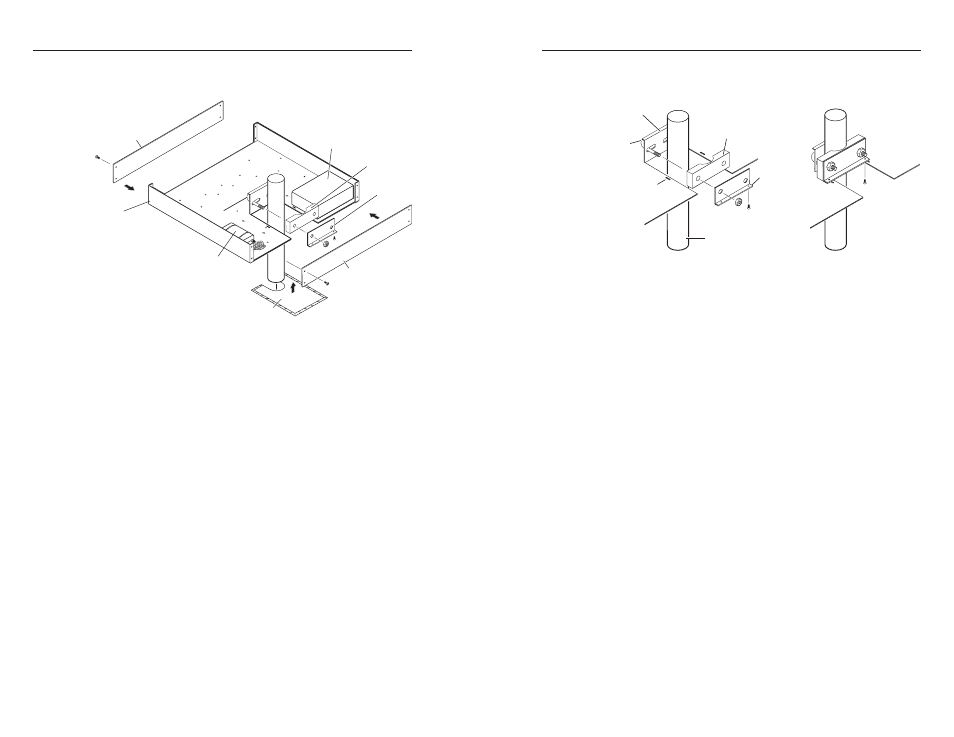
Mount the SEQ to a PMK 350 bracket (figure 10) as follows:
Extron
PMK 350
Multi-product Projector
Mounting Kit
Cover Sheet
Front Plate
Rear Plate
U-bolt
L-shaped
Bracket
Contoured
Base
Extron
Power Supply
Extron
Quarter-rack
Sized Product
Figure 10 — PMK 350 projector mounting a SEQ
1
.
Remove the front and back plates from the PMK 350
(figure 10), using an Extron Tweeker or
a #2 Philips
screwdriver
. Retain the screws to reattach the plates when
you are finished.
2
.
Remove feet from the bottom of the SEQ if installed.
3
.
Secure the SEQ to one side of the mounting tray, using two
of the supplied 4-40 x 3/16" screws in opposite (diagonal)
corners.
4
.
Use the two included tie wraps to strap the power supply
to the bracket.
5
.
Place the PMK 350 around the projector ceiling mounting
pole (figure 10).
6
.
Assemble the U-bolt and the following parts in the
following order (figure 11):
a
. Pass the legs of the U-bolt through the slotted holes on
the mount plate flange.
b
. Place the legs around the projector pole.
c
. Pass the legs through the holes in the contour base.
N
The pole fits snugly into the depression in the
center of the contoured base.
d
. Pass the legs through the holes in the L-shaped bracket.
N
The supplied U-bolt fits a typical (1.5" to 2.0"
diameter) ceiling pole.
U-bolt
Slotted Hole
in PMK Tray
L-shaped
Bracket
L-shaped
Bracket Screws
Contoured
Base
Ceiling
Pole
Mount Plate
Flange
Figure 11 — Hanging the tray on the pole
7
.
Align the two slotted holes in the bottom of the L-shaped
bracket with the two slotted holes in the base of the tray.
Secure the L-bracket to the base by inserting two provided
6-32 x 5/16" screws through the aligned slots.
8
.
Move the PMK 350 up to the desired location on the ceiling
pole, as close to the ceiling as desired.
9
.
Secure the L-shaped bracket to the U-bolt using the
included hex nuts, washers, and lock washers. Tighten the
hex nuts securely.
N
Be sure to tighten the hex nuts securely enough that the
PMK 350 does not slide down the ceiling pole. A socket
wrench is recommended to tighten the hex nuts.
10
. Secure the front panel to the mounting tray with four of
the included #6 screws.
11
. If desired, choose one of the provided four sizes of self-
adhesive cover sheets, and apply it to the underside of the
mounting tray.