Extron Electronics Matrix 6400 Series User Manual
Page 18
Using the FPC 1000 Front Panel Controller • Chapter 3
Matrix 3200/6400 Series Switchers • FPC 1000 • User’s Manual • Extron
I/O Menu (by Output)
Press any menu title
button at any time
to “escape” without
making changes.
To get here from the Main Menu,
press:
• I/O
Displays vary depending upon
system model and options.
Instruction message appears here >
Use option selections with buttons >
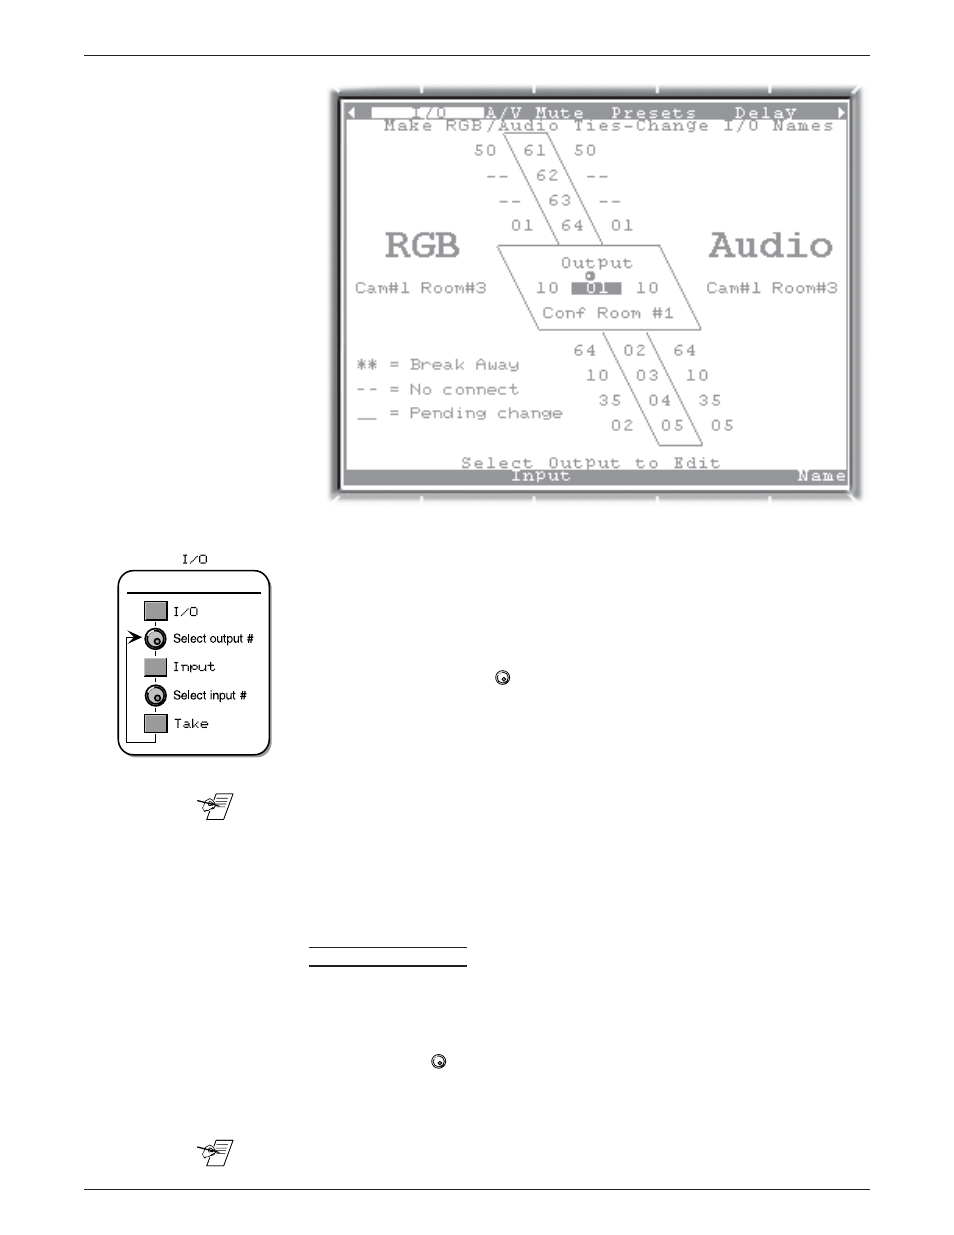
Figure 3-5. I/O menu for a system with both video (RGB) and audio
This display uses a diagonal box with the selected output in the middle, with four
adjacent output numbers above and four below. Along the left side of each
output is the video (RGB) input number that is tied to it (-- if no tie). To the right
of each output is the Audio input number that is tied to it (-- if no tie). The
selected output (in the larger diagonal box) also displays the given names for the
output and input(s). The RGB and Audio input numbers are often the same
unless breakaway switching is used, or if the system has no audio.
The speed knob indicator (
) is shown in the center of the screen above the
output number to indicate that the knob may be used to select a different output.
(Note the instruction message at the bottom of the screen says: “Select output to
edit”.) Turning the knob changes the selected output number as its given name is
displayed in the large diagonal box and the RGB (or Video) and Audio inputs are
displayed on either side of the output information.
_______ If the system is composite video or S-video (not Wideband), the word “Video”
appears instead of “RGB”.
When the I/O menu first appears, it shows Output #01 selected. In this example,
Output #01 has been given the name “Conf Room #1”, which might be a large
monitor located in the main conference room. It is tied to both the video (RGB)
and audio source through Input #10, which has been named “Cam#1 Room#3”.
Below the selected output notice that Output #03 is also tied to Input #10.
Input / Output
This button toggles between working with an input or with an output. When the
desired output has been selected, press the Input button and then select an input
number to tie to that output. For this example, the new instruction message for a
selected input will be: “Select RGB/Audio input – Take to tie”.
The speed knob (
) appears over both the RGB and Audio input numbers next
to the selected output, unless RGB/Audio breakaway switching is being used.
Turn the knob to scroll through the available input numbers or (--) to indicate that
no input will be tied to the selected output.
_______ Several ties can be made before pressing Take. Any pending changes will be
underlined (__) until the Take button is pressed.
3-5
Making Ties