Description of switch settings, Test procedure – GE Industrial Solutions Power Break II Bell Alarm with Lockout User Manual
Page 3
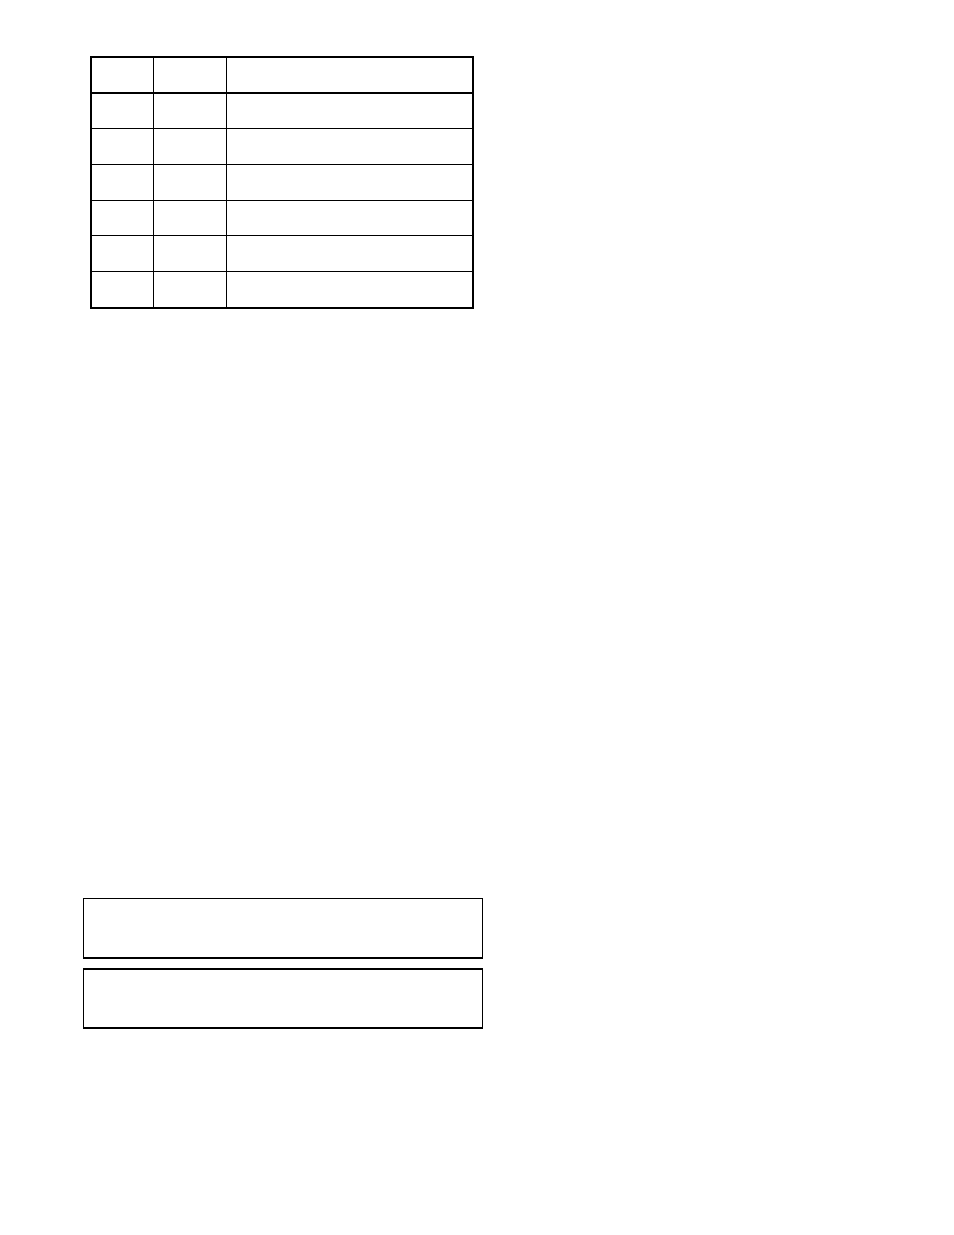
Switch
Factory
Setting
Function
1
Disabled
Shunt trip activates Bell Alarm–Alarm
Only
2
Disabled
UVR trip activates Bell Alarm–Alarm
Only
3
Enabled
Protection trip activates Bell
Alarm–Alarm Only
4
Disabled
Shunt trip activates Bell Alarm with
Lockout
5
Disabled
UVR trip activates Bell Alarm with
Lockout
6
Enabled
Protection trip activates Bell Alarm
with Lockout
Table 2. Accessory switch settings, including factory defaults.
Description of Switch Settings
Following are descriptions of the effects of each accessory switch
when it is enabled:
1. When a Shunt Trip accessory causes the breaker to trip,
the contacts of the Bell Alarm–Alarm Only also change
state. (The factory switch setting is disabled.)
2. When an Undervoltage Release accessory causes the
breaker to trip, the contacts of the Bell Alarm–Alarm Only
also change state. (The factory switch setting is disabled.)
3. When
a
protection
trip
(long-time,
short-time,
instantaneous, ground-fault, or protective-relay) occurs,
the contacts of the Bell Alarm–Alarm Only also change
state. (The factory switch setting is enabled.)
4. When a Shunt Trip accessory causes the breaker to trip,
the contacts of the Bell Alarm with Lockout also change
state. (The factory switch setting is disabled.)
5. When an Undervoltage Release accessory causes the
breaker to trip, the contacts of the Bell Alarm with
Lockout also change state. (The factory switch setting is
disabled.)
6. When
a
protection
trip
(long-time,
short-time,
instantaneous, ground-fault, or protective-relay) occurs,
the contacts of the Bell Alarm with Lockout also change
state. (The factory switch setting is enabled.)
Procedure for Changing Switch Settings
Change the accessory switch settings with the following
procedure:
WARNING: Before beginning this procedure, turn the breaker
off, disconnect it from all voltage sources, and discharge the
closing springs.
AVERTISSEMENT: Avant de commencer cette procédure,
mettre le disjoncteur en position OFF, le déconnecter de toute
tension d’alimentation, et désarmer les ressorts de fermeture.
1. Loosen the four #8-32 screws on the breaker trim-plate
assembly and remove the trim plate.
2. Loosen the four #10-32 screws at the corner of the breaker
cover. Remove the cover from the breaker face.
3. Pull the Trip Unit locking lever to the right, then hold the
Trip Unit near the battery cover and lift it straight out of
the breaker.
4. Refer to Figure 5 and Table 2 to determine the switches
to be changed.
5. Push in the appropriate “Enable” or “Disable” side of the
switch.
6. Confirm all switch settings before reinstalling the Trip
Unit in the breaker.
7. Pull the Trip Unit locking lever to the right. While
holding the lever, carefully align the connector on the rear
of the Trip Unit with the connector in the breaker. Press
down on the Trip Unit, while holding it near the battery
cover. When the Trip Unit is fully seated, slide the locking
lever back to the left.
8. Reinstall the breaker top cover and tighten the four #10-
32 screws to 32 in-lbs.
9. Replace the trim plate and tighten the four #8-32 screws
to 20 in-lbs.
10. Verify that the switch settings are correct by inducing
breaker trips from the UVR and/or Shunt Trip (if
present) and checking the responses of the Bell
Alarm–Alarm Only and Bell Alarm with Lockout
accessories.
Test Procedure
Use the following procedure to test the Bell Alarm with Lockout
for proper operation.
1. Firmly press in the reset button on the front of the Bell
Alarm with Lockout until it latches.
2. With an ohmmeter, verify continuity between positions 10
and 12 at the terminal block on the right side of the
breaker.
3. Verify that terminals 11 and 12 show an open circuit.