Buyers 1501010 User Manual
Page 3
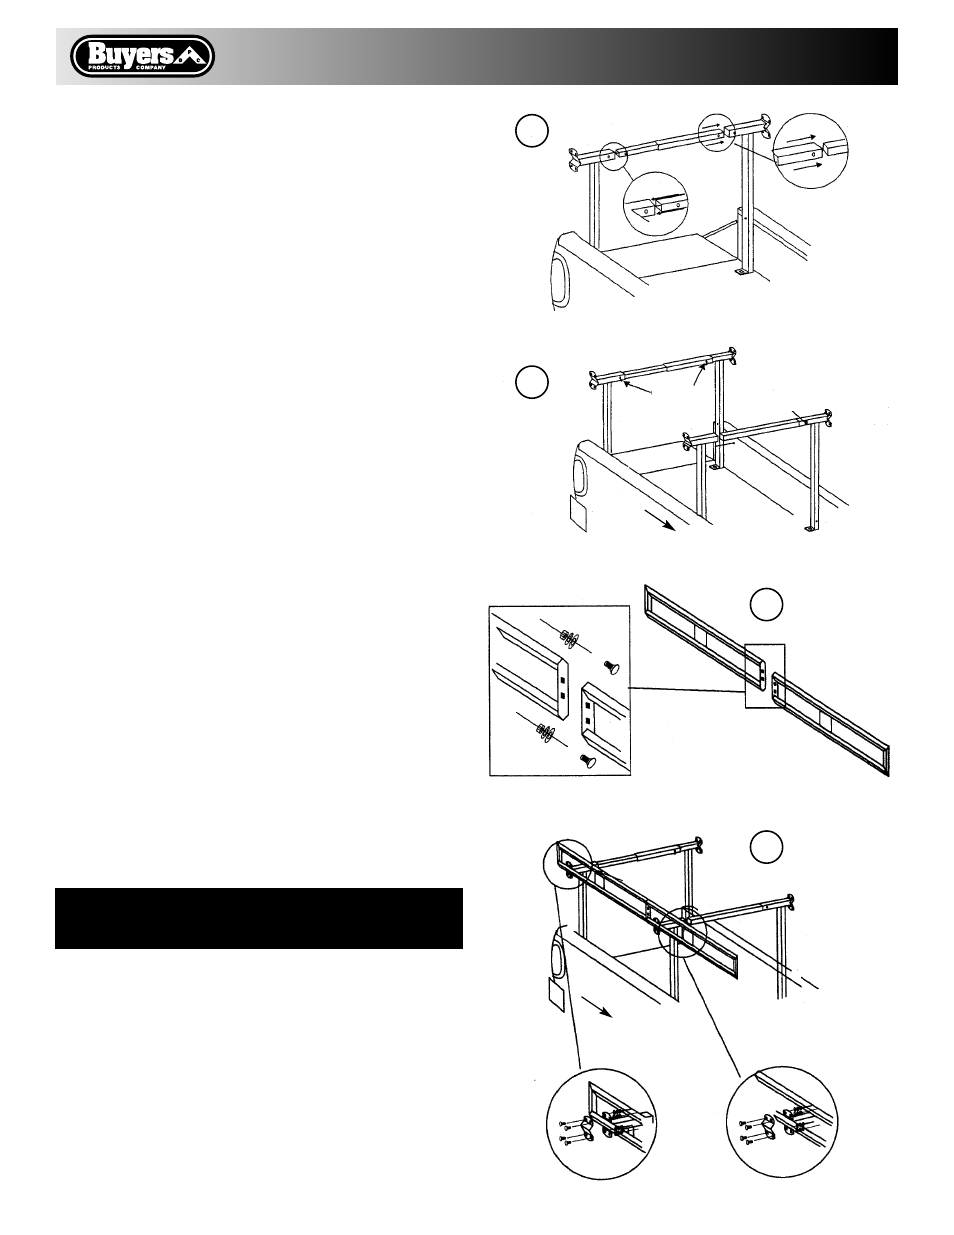
5. After rear posts are secured and tightened with a 9/16”
wrench, identify the Rear bar (telescoping tube with 3/8”
pre-drilled holes on either end), and insert into left & right
rear post making sure:
A. Tubes are compatible and match.
B. Pre-drilled holes match those on corner posts
C. Welded nuts face down
6. Secure Rear Bar to Rear Posts using Locking pins, and
hand tighten 3/8” hex head set bolts into the weld nuts on
the underside of the bars & posts.
7. Position Left Front Post in place and secure
(see steps 3 & 4).
8. Insert one end of the Blank Bar into installed front left
post, and the other end into the right post. Secure right
front post at this time (see steps 3 & 4). If Blank Bar is
too long, you will need to trim it at this time.
9. Insert hex head set bolt into all weld nuts and hand
tighten at this time.
10. Bolt two Side Rails together to make a full length side
rail assembly. Repeat for the second rail. Please note the
direction of the labels and assemble rails so they face the
same way. (see below)
Secure with the following: (per side)
2-3/8”- 16 x 1” Carriage bolt
2-3/8”- flat washer
2-3/8”- lock washer
2-3/8”- hex head nut
11. Install side rail assembly to front and Rear Posts
securing with Clamp, 4 Carriage bolts, 4 lock washers,
4 flat washers and 4 nuts. Tighten with 9/16” wrench.
Quality since 1946
9049 Tyler Blvd. • Mentor, Ohio 44060
Phone (440) 974-8888 • Fax (440) 974-0165
Toll-Free Fax 800-841-8003 • buyersproducts.com
Step 11 may require the help of another person
to lift side rail and secure to posts.
5
6
10
11
INSERT
INTO
LEFT
RIGHT
Locking pins
WELD NUT
LEFT
RIGHT
RIGHT
Front of
Truck
Front of
Truck