Bill of materials – Buyers 85200 User Manual
Page 2
Quality since 1946
9049 Tyler Blvd. • Mentor, Ohio 44060
Phone (440) 974-8888 • Fax (440) 974-0165
Toll-Free Fax (800) 841-8003 • buyersproducts.com
part no.
qty.
description
3004473
1
Window Protector, Ford F-250/350, Dodge 2002
3004548
1
Bracket, driver’s side
3004549
1
Bracket, passenger’s side
3004474
1
Instruction Sheet
-
8
Washer, flat 1/2"
-
2
Screw, hex head 1/2-20 x 2-1/2"
-
4
Washer, lock 1/2" split
0150700
2
Nut, center lock 1/2-20
3003250
2
Cushion, self-adhesive
3002723
2
Anchor
-
2
Screw, hex head 1/2-13 x 2-1/2"
-
2
Screw, hex head 1/2-13 x 1-1/2"
Bill of Materials
3004474 Rev C
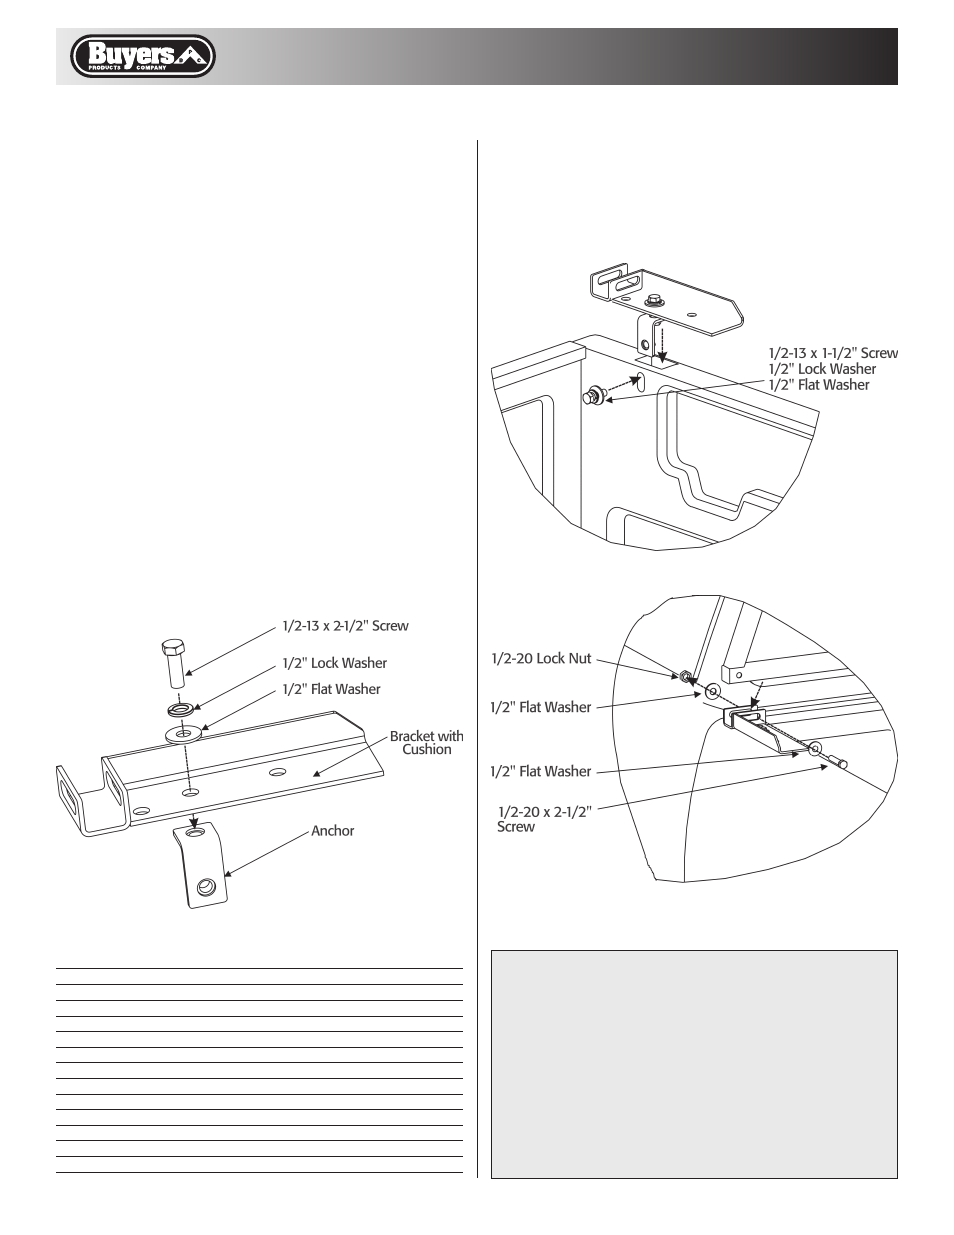
Fig. 5
Fig. 4
WaRRantY
Buyers Products warrants all truck/trailer hardware manufactured or
distributed by it, to be free from defects in material and workmanship
for a period of one year from date of shipment. Parts must be properly
installed and used under normal conditions. Any product which has been
altered, including modification, misuse, accident or lack of maintenance
will not be considered under warranty. Normal wear is excluded. The
sole responsibility of Buyers Products under this warranty is limited to
repairing or replacing any part or parts which are returned, prepaid, and
are found to be defective by Buyers Products. Authorization from Buyers
Products must be obtained before returning any part. No charges for
transportation or labor performed on Buyers’ products will be allowed
under this warranty.
Fig. 3
short side nut.
See Fig. 3
4. If side rail covers are installed, remove protective caps
from the front stake pockets or cut openings in the rail cov-
ers to expose the front stake pockets.
If present, drill holes in bedliner walls to open access to
front stake pocket side holes. Many models of bedliners have
a small mark on a wall against front stake pocket. Use it to
drill necessary holes.
Insert anchors into stake pockets. Make sure that the
anchors’ long sides are facing inside the bed.
Align holes in anchors with stake pocket openings and
install hardware loosely from inside of the bed.
See Fig. 4.
5. Position the Window Protector on the front wall of the
truck box with the “Buyers” decal facing rearward. Slide the
sides of Window Protector in the “U” shaped guides of the
brackets. Align the brackets’ slots with holes in the Window
Protector and insert 1/2-20 x 2-1/2" screws.
Install lock nuts.
See Fig. 5
Position the Window Protector symmetrically on the vehicle.
Tighten lock nuts evenly on both sides with torque 60-70
foot-pounds. Tighten screws on brackets until the lock wash-
ers are flattened plus 1 - 1-1/2 turns. Overtightening these
screws can result in damage to truck’s sheet metal.