Assembly montaje assemblee – BabyTrend SS77718 - SIT N' STAND DOUBLE ECLIPSE STROLLER - SPARK User Manual
Page 8
Copyright © 2013, Baby Trend Inc., All Rights Reserved. Todos los derechos reservados. Tous droits réservés.
Copyright © 2013, Baby Trend Inc., All Rights Reserved. Todos los derechos reservados. Tous droits réservés.
CANOPY
CUBIERTA
AUVENT
•
To attach the front canopy: Line up the
male fittings on the canopy with the slots
on the armrest and push both fittings
downward until snapped into place. (Fig.8)
To open the canopy, push forward on the
front edge of the canopy while holding
the rear of canopy in place. To fold the
canopy, pull backward on the front edge.
•
To remove the front canopy: Press
the snap button under the armrest
and pull to release the fitting from the
slot. Repeat for the other side.
•
Para colocar la cubierta delantera: Alinee
los accesorios macho en la cubierta con las
ranuras del apoyabrazos y empuje ambos
accesorios hacia abajo hasta que encajen.
(Fig. 8) Para abrir la cubierta, empuje hacia
delante el borde delantero de la cubierta
mientras sostiene la parte trasera de la
cubierta en su sitio. Para plegar la cubierta,
empujar hacia adelante del borde delantero.
•
Para retirar la cubierta delantera: Oprima el
botón a presión que se encuentra debajo del
apoyabrazos y tire para soltar el accesorio de
la ranura. Repita la acción en el otro lado.
•
Pour fixer l’auvent arrière : Alignez les
fixations mâles du raccord inférieur avec
les fixations femelles sur le cadre de la
poignée et poussez vers l’intérieur. (Fig. 8)
Verrouillez le raccord supérieur de l’auvent
dans les fentes de verrouillage. Fixez
le velcro au cadre de la poussette.
•
Pour retirer l’auvent : Appuyez sur le bouton
de verrouillage situé sur le pivot tout en tirant
l’auvent vers le haut.
•
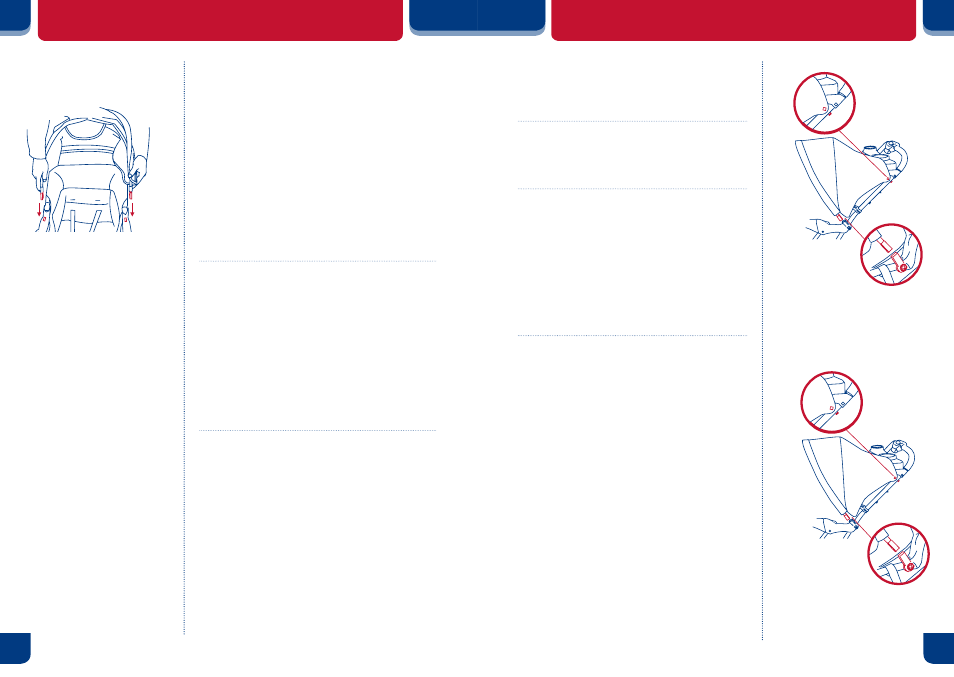
To attach the rear canopy: Line up
the male fittings of the lower connection
with the female fittings on the handle
frame and push inward. (Fig. 9b) Button the top
of the rear canopy to the frame.(Fig. 9a)
•
Para colocar la cubierta trasera: Alinee los
accesorios macho de la conexión inferior con los
accesorios hembra del armazón del manubrio y
empuje hacia dentro. (Fig. 9b) Abroche la parte
superior del dosel trasero al marco (Fig. 9a)
•
Pour fixer l’auvent arrière : Alignez les fixations
mâles du raccord inférieur avec les fixations
femelles sur le cadre de la poignée et poussez
vers l’intérieur. (Fig. 9b) Fixez le haut de la
verrière arrière au châssis.
(Fig. 9a)
•
To remove the rear canopy: Unbutton the
fabric of the rear canopy from the frame. (Fig.
9c) Then press both snap buttons on the inner
side of the lower connection and pull outward.
•
Para retirar la cubierta trasera: Desabroche
la parte superior del dosel trasero al
marco (Fig. 9c). Luego oprima ambos
botones a presión en el lado interno de
la conexión inferior y tire hacia afuera.
•
Pour démonter l’auvent arrière : Déboutonnez
la partie supérieure de la voilure arrière au
châssis (Fig. 9c). Puis appuyez sur les deux
boutons-poussoir situés sur le côté intérieur
du raccord inférieur et tirez vers l’extérieur.
Note: The canopies are only needed when using
the seated positions for your children. They are not
needed when using with the infant car seats.
Nota: Las cubiertas sólo son necesarias
cuando se usan en las posiciones erguidas para sus
hijos. No son necesarias al usarlas con las sillitas
para el automóvil.
Remarque : Les auvents ne sont requis que lorsque
vous utilisez les positions assises pour vos enfants. Ils
ne sont pas requis lorsque vous utilisez la poussette
avec un siège d’auto pour bébé.
14
13
ASSEMBLY MONTAJE ASSEMBLEE
Fig.9c
ASSEMBLY MONTAJE ASSEMBLEE
Upper Connection
Conexión Superior
Raccord Supérieur
Lower Connection
Conexión Inferior
Raccord Inférieur
8)
9)
Fig. 8
Slot
Ranura
Fente
Fig. 9a
Upper Connection
Conexión Superior
Raccord Supérieur
Fig. 9b
Lower Connection
Conexión Inferior
Raccord Inférieur