Banks Power Dodge Trucks: (Diesel ’03 - 07 5.9L Cummins) PowerPack & Stinger w_EconoMind '06-07 For use with PowerPDA User Manual
Page 26
26
96813 v.9.0
If not installing the Banks
PowerPDA, skip to Section 7.
Note: This system has been
designed for use with the Palm
Tungsten E2 PDA.
Warning: The PDA may be
susceptible to damage as a result
of extended exposure to sunlight,
heat or extreme cold. It is highly
recommended that the PDA be
removed from its mounting location
if the vehicle will be subjected to
high concentrations of sunlight,
heat or cold for an extended period
of time. Gale Banks Engineering
is not responsible for damage to
PDA’s resulting from exposure
conditions.
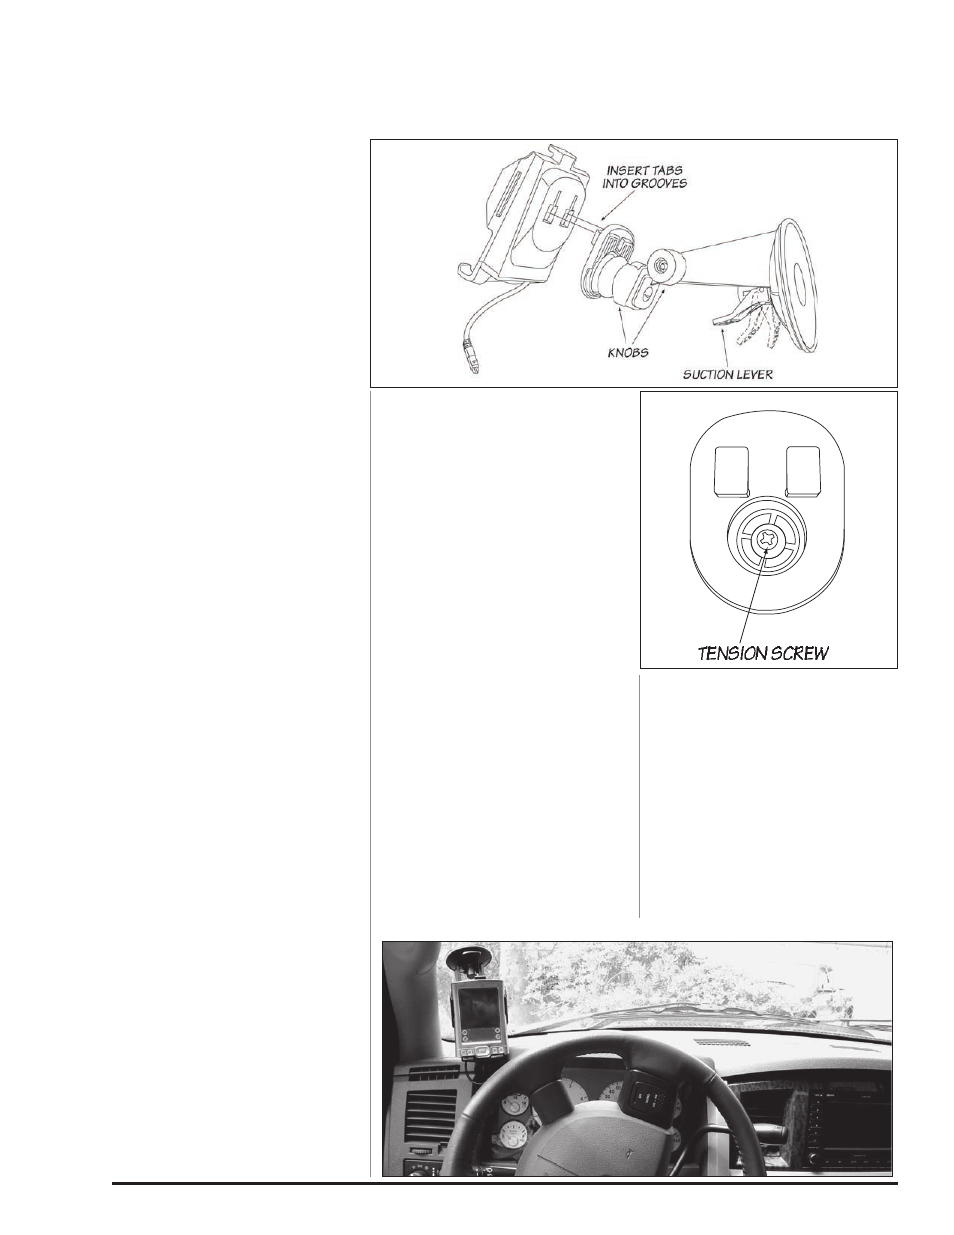
1.
Locate the Universal Mount and
Docking Station in your kit. Now
interlock the docking station to the
Universal Mount by inserting and
sliding the Universal Mount tabs into
the Docking Station grooves. See
Figure 30.
2.
Loosen both knobs and move and
the swivel suction plate and Docking
Station to achieve desired viewing
angle of PowerPDA screen. Do a test
fit and note the angle necessary to
achieve the correct viewing angle.
Tighten both knobs to lock in the
position. See Figure 30.
Note: If the universal mount swivel
does not move or is tight after
loosening the hold down knob, then
remove the previously inserted
docking station and slightly loosen
the tension screw. See Figure 31.
3.
Locate the alcohol swap in the
kit. clean the suction cup and the
mounting area on the windshield and
let dry. With the suction lever in the
up position ensure the suction cup is
flat against the windshield then push
suction level down to secure in place.
4.
Locate the RJ12 cable (similar
to telephone connector) on your
EconoMind wiring harness and pull
enough cable through to reach the
Docking Station.
5.
Route the RJ12 cable to reach the
Docking Station and connect it to the
left most receptacle on the bottom of
the Docking Station.
Note: You may need to remove and
or loosen dash panel or covers to
install the RJ12 cable between dash
crevice or behind dash panels.
WARNING: THE CHARGING CABLE
ON THE DOCKING STATION IS
DESIGNED TO SUPPLY A CONSTANT
LOW-VOLTAGE POWER SOURCE
(+5VDC) TO THE BANKS POWERPDA
AND IS “LIVE” AS LONG AS THE
SYSTEM’S OBD II INTERFACE CABLE
IS COMPLETELY INSTALLED AND THE
RJ12 CONNECTOR IS PLUGGED INTO
THE DOCKING STATION. ALTHOUGH
THIS CHARGING CABLE IS SHORT
AND ITS CIRCUITRY IS FUSE-
PROTECTED, THE USER IS EXPECTED
TO TAKE APPROPRIATE MEASURES
TO PREVENT SMALL CHILDREN AND/
OR PETS FROM CONTACT WITH ANY
PART OF THIS SYSTEM.
6.
Re-install the electric connector
bracket that was removed in
Section 5, Step 4 below the
steering column in the front of the
firewall with the original two (2)
bolts. Route all wiring away from any
pedals or other moving components.
Using the cable ties supplied, secure
the wiring under the dash. Secure
all wiring under the hood away
from heat sources or sharp edges.
Re-install the lower dash panel with
the original 2 screws.
7.
Your Docking Station is now
installed and is ready for the Banks
PowerPDA. See Figure 32. Install the
Banks PowerPDA into the Docking
Station. Be sure the Banks PowerPDA
is completely seated in the Docking
Station against the lower support
bracket.
8.
Plug the Docking Station’s
charging cable into the charging
receptacle on the lower edge of the
Banks PowerPDA.
NOTE: There may be a snug fit when
installing the Banks PowerPDA into
the Docking Station. Take care not to
force this process.
-END, SEcTION 6-
Section 6
MouNTING THE DoCKING STATIoN AND CoNNECTING THE BANKS PoWERPDA
VEHICLE CoMMAND CENTER
Figure 30
Figure 32
Figure 31