Veris Industries HS Install User Manual
Page 2
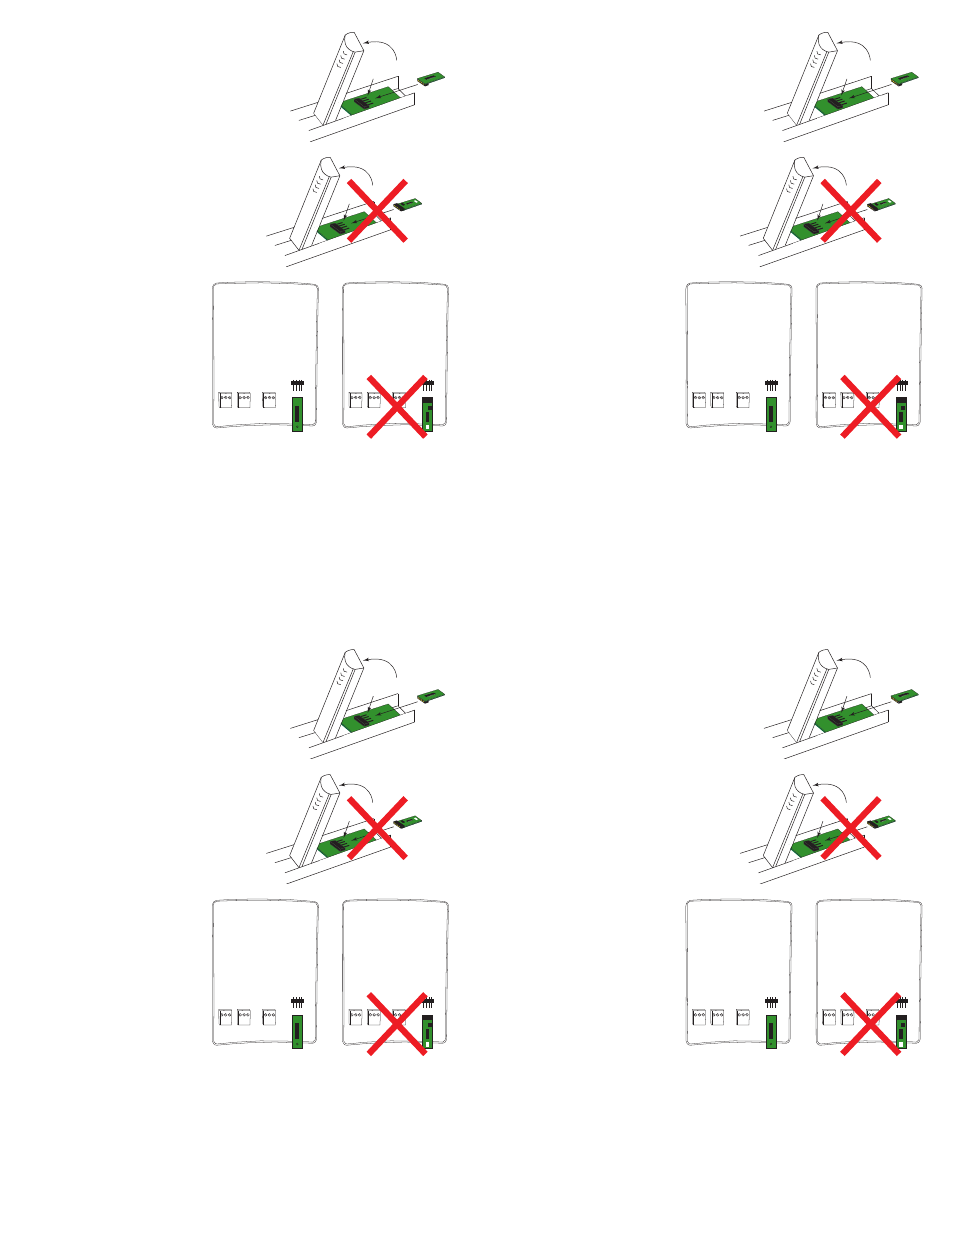
CO
2
Duct Units
1. Disconnect power to the unit.
2. Remove unit from duct.
3. Lift lid at end of probe.
4. Remove HS element by gently pulling from pin
connector.
5. Place new HS element onto pin connector. Orient
as shown, or unit will not function.
6. Close lid.
7. Replace unit in duct.
Pins
HS Sensor
Lift to open tip
of probe
Pins
HS Sensor
Lift to open tip
of probe
Wall Units
1. Disconnect power to the unit.
2. Remove faceplate.
3. Remove HS element by gently
pulling from pin connector.
4. Place new HS element onto pin
connector. Orient as shown, or unit
will not function.
5. Replace faceplate.
For further detail regarding humidity sensing devices, including safety
information, refer to the full product installation guide at www.veris.com or
contact Veris customer support at 1-800-354-8556.
Z205266-0B
08113
Top
Side
Bottom
Side
Top
Side
Bottom
Side
Pins
HS Sensor
Lift to open tip
of probe
Pins
HS Sensor
Lift to open tip
of probe
For further detail regarding humidity sensing devices, including safety
information, refer to the full product installation guide at www.veris.com or
contact Veris customer support at 1-800-354-8556.
Z205266-0B
08113
Top
Side
Bottom
Side
Top
Side
Bottom
Side
CO
2
Duct Units
1. Disconnect power to the unit.
2. Remove unit from duct.
3. Lift lid at end of probe.
4. Remove HS element by gently pulling from pin
connector.
5. Place new HS element onto pin connector. Orient
as shown, or unit will not function.
6. Close lid.
7. Replace unit in duct.
Wall Units
1. Disconnect power to the unit.
2. Remove faceplate.
3. Remove HS element by gently
pulling from pin connector.
4. Place new HS element onto pin
connector. Orient as shown, or unit
will not function.
5. Replace faceplate.