The shooting menu, Keeping colors true: white-balance – Nikon Coolpix 4300 User Manual
Page 49
97
96
Menu Guide—The Shooting Menu
The shooting menu is available only in
å mode, and only when the
camera is in shooting mode.
The Shooting menu contains two pages of advanced shooting options:
WHITE BALANCE
P. 97-98
METERING
P. 99
CONTINUOUS
P. 100-101
BEST SHOT SELECTOR
P. 102
IMAGE ADJUSTMENT
P. 103
IMAGE SHARPENING
P. 104
LENS
P. 105-106
SHOOTING MENU 1
IMAGE SIZE & QUALITY
P. 80-82
SENSITIVITY
P. 106
EXPOSURE OPTIONS
P. 106-110
FOCUS OPTIONS
P. 111-113
AUTO BRACKETING
P. 114-115
NOISE REDUCTION
P. 116
CF CARD FORMAT
P. 90
SHOOTING MENU 2
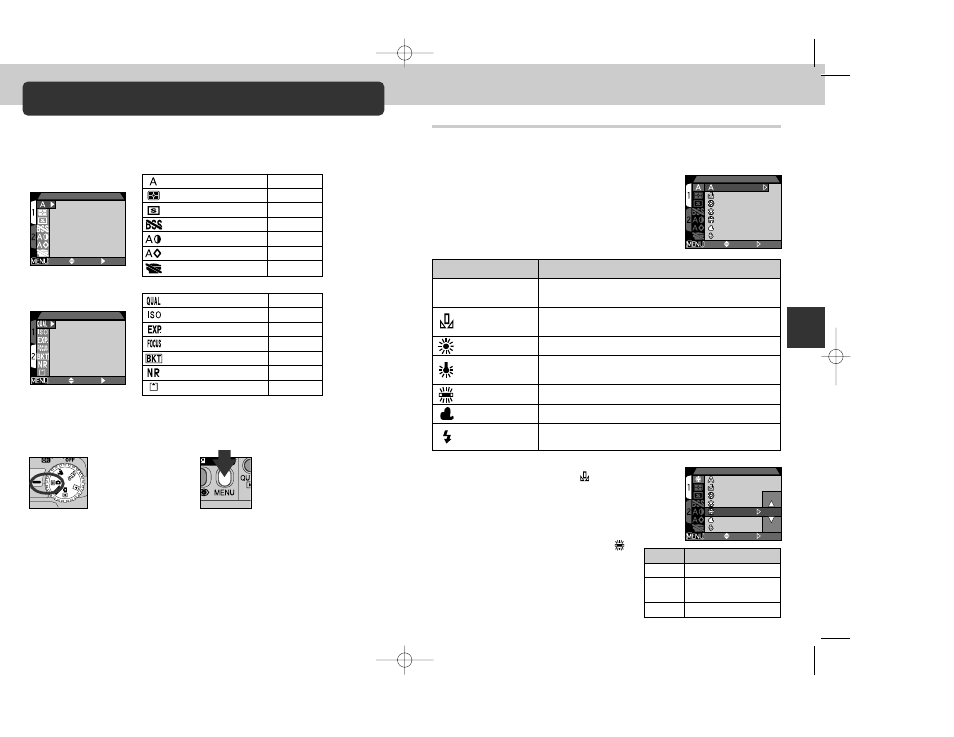
Keeping Colors True: White-Balance
White Balance is used to preserve natural colors under different types
of lighting.
Choosing a White Balance Setting
In
å shooting mode, white balance can be
chosen from the white-balance menu (in other
modes, white balance is adjusted automatically
according to the type of scene).
Option
Description
A
Auto
White balance automatically adjusted to suit lighting
conditions. Best choice in most circumstances.
White Bal Preset
White object used as reference to set white balance
under unusual lighting conditions.
Fine
White balance adjusted for direct sunlight.
Incandescent
Use when taking pictures indoors under incandescent
light.
Fluorescent
Use when taking pictures indoors under fluorescent light.
Cloudy
Use for pictures taken outdoors under overcast skies.
Speedlight
White balance adjusted to match light produced by
flash.
WHITE BALANCE
SELECT
SET
OFF
Auto
White Bal Preset
White Bal Preset
Fine
Incandescent
Fluorescent
Cloudy
Cloudy
Speed
Speed l i ght
Auto
White Bal Preset
Fine
Incandescent
Fluorescent
Cloudy
Speed l i ght
Select
å
(shooting menu).
1
Press MENU button to
display
å shooting
menu.
2
WHITE BALANCE
PAGE2
SELECT
SET
IMAGE SIZE & QUALITY
OFF
SELECT
SET
The Shooting Menu
To view the
å shooting menu:
Fine-Tuning White Balance
At settings other than A (auto) and
(preset), white
balance can be “fine-tuned” by highlighting the desired
setting and selecting an adjustment from a sub-menu.
Adjustments range from –3 to +3 in increments of one;
raising white balance tends to give images a blue cast,
while lowering white balance generally makes photos
appear slightly yellow or red. In the case of
(Fluorescent), the sub-menu offers a choice of
bulb types (see table at right).
F
L
1
F
L
2
F
L
3
OFF
SELECT
SET
WHITE BALANCE
Auto
Auto
White Bal Preset
White Bal Preset
Fine
Incandescent
Fluorescent
Cloudy
Cloudy
Speed
Speed l i ght
Auto
White Bal Preset
Fine
Incandescent
Fluorescent
Cloudy
Speed l i ght
Option
Description
FL1
White (W)
FL2
Daylight White
(Neutral [N])
FL3
Daylight (D)
E4300 (E) 02.12.9 1:47 PM Page 96