Step 4—choose a language, Step 5—set the date and time – Nikon Coolpix 4300 User Manual
Page 11
21
20
Introduction—First Steps
Step 4—Choose a Language
Camera menus and messages can be displayed in your choice of
German, English, French, Japanese or Spanish.
Set mode dial to SETUP
and turn camera on
1
SET-UP2
Controls
Shot Confirm Lamp
Pic data/Transfer
Date
Interface
Language
Reset All
PAGE1
SELECT
SET
Press MENU button to
display SET-UP 2 menu
2
SET-UP2
Controls
Shot Confirm Lamp
Pic data/Transfer
Date
Interface
Language
Reset All
PAGE1
SELECT
SET
Highlight “Language”
3
LANGUAGE
Controls
Shot Confirm Lamp
Pic data/Transfer
Date
Interface
Language
Reset All
SELECT
SET
De
En
Fr
EI
Es
Choose a language from:
De : Deutsch (German)
En : English
Fr : Français (French)
EI
: Japanese
Es : Español (Spanish)
5
SET-UP2
Steuerung
LampeAufnahmebestätigung
Bilddaten/Transfer
Datum
Schnittstelle
Sprache
Wert löschen
SEITE1
AUSW
STL
Press
> to set
6
LANGUAGE
Controls
Shot Confirm Lamp
Pic Data/Transfer
Date
Interface
Language
Reset All
De
En
Fr
EI
Es
SELECT
SET
Display options
4
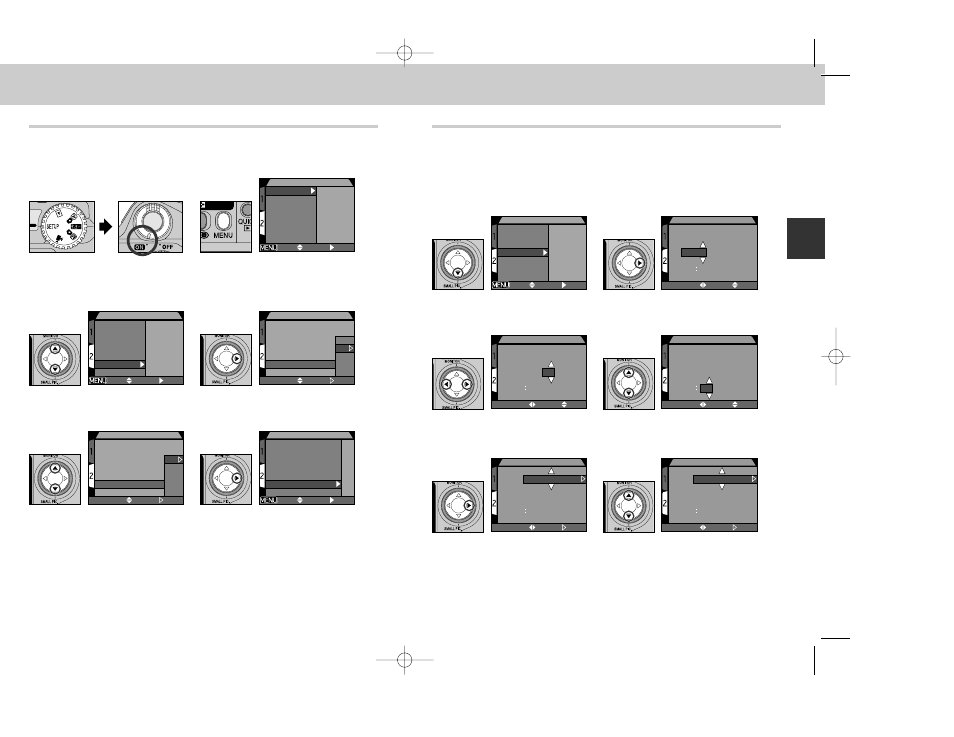
Step 5—Set the Date and Time
Information on the time and date of recording is included with all
pictures and movies taken with your Nikon digital camera. To set the
camera’s internal clock to the correct time and date, display the set-up
menu as described in steps 1-2 of “Choose a Language” and then
follow the steps below:
SET-UP2
Controls
Shot Confirm Lamp
Pic data/Transfer
Date
Interface
Language
Reset All
PAGE1
SELECT
SET
Highlight “Date”
1
DATE
Y M D
2 0 0 2 .
0 9 .
0 1
0 0 0 0
SELECT
SET
Highlight Year, Month, Day, hour or
minute
3
DATE
Y M D
2 0 0 2 .
0 9 .
1 5
1 5
3 0
SELECT
SET
Edit selected item
• Repeat steps 5 and 6 until all
items have been set.
4
DATE
Y M D
2 0 0 2 .
0 1 .
0 1
0 0 0 0
SELECT
SET
Display DATE menu
2
DATE
Y M D
2 0 0 2 .
0 9 .
1 5
1 5 3 0
SELECT
SET
Highlight YMD
5
DATE
M
D Y
0 9 .
1 5 .
2 0 0 2
1 5
3 0
SELECT
SET
Choose order in which year, month
and day will be displayed
6
E4300 (E) 02.12.9 1:47 PM Page 20