66
C3412M-D (12/08)
6. The blanked area can be programmed to turn on or off at a specified zoom point. To set the
zoom point:
a. Use the joystick to position the cursor beside EDIT WINDOW ZOOM, and then press
Iris Open.
b. Zoom in to the point where you want window blanking to turn on. Press Iris Open to
set the zoom point.
Notes:
•
Since the area is already blanked out, it may be difficult to determine when you want
window blanking to turn on. Reverse the window before setting the zoom point. When
finished reverse the window again to blank out the area.
•
Increase the size of the window if any part of the blanked area is revealed during PTZ
operations.
EDIT SCHEDULE
The Edit Schedule menu is a duplicate of the Edit Event menu (refer to Event on page 80) with the
following exceptions. In the Edit Schedule menu, the event type cannot be changed. Also, the
Holiday feature cannot be accessed from the Edit Schedule menu.
For instructions on changing the features in the Edit Schedule menu, refer to Edit Event on
page 83.
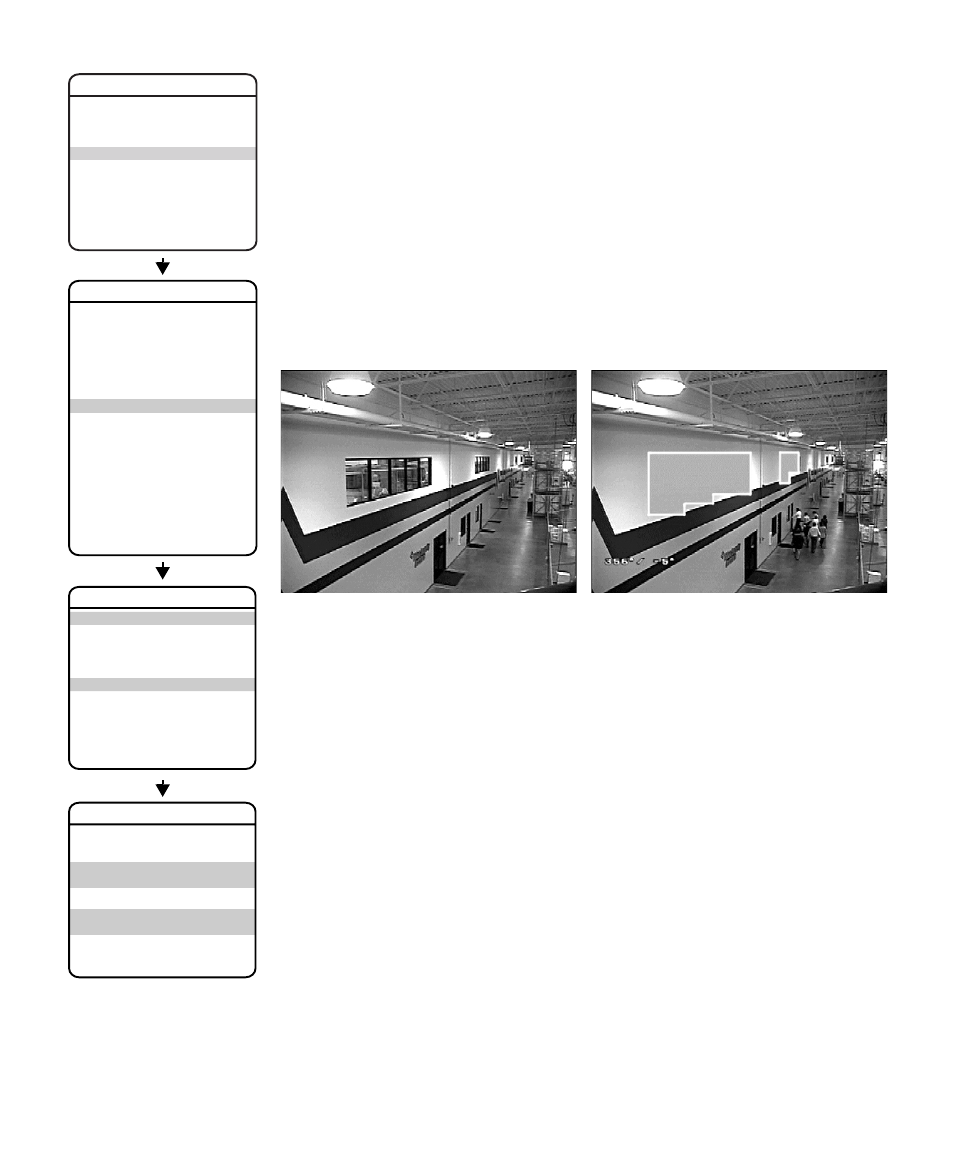
REVERSE
A blanked out area can be reversed to make it visible and the areas on both sides of it not visible.
The areas above and below the blanking area remain visible. Reversing the window a second
time will return it to its original condition.
CLEAR WINDOW
All areas that have been set for window blanking are cleared.
EXIT
SPECTRA IV
LANGUAGE
ACK ALERT*
RESET CAMERA
CYCLE CAMERA POWER
REBOOT SYSTEM
BACK
EXIT
<br><ALERT>*<br><CLEAR><br><PASSWORD><br><CLOCK><br><EVENT></p><p style="position:absolute;top:287px;left:123px;white-space:nowrap" class="ft07">DOME SETTINGS</p><p style="position:absolute;top:943px;left:76px;white-space:nowrap" class="ft012">BACK<br>EXIT</p><p style="position:absolute;top:809px;left:127px;white-space:nowrap" class="ft07">SET WINDOWS</p><p style="position:absolute;top:830px;left:76px;white-space:nowrap" class="ft07">WINDOW NUMBER </p><p style="position:absolute;top:851px;left:76px;white-space:nowrap" class="ft012"><EDIT WINDOW LOCATION><br><EDIT WINDOW ZOOM><br><EDIT SCHEDULE></p><p style="position:absolute;top:899px;left:76px;white-space:nowrap" class="ft07">ENABLE WINDOW </p><p style="position:absolute;top:899px;left:212px;white-space:nowrap" class="ft07"> </p><p style="position:absolute;top:912px;left:76px;white-space:nowrap" class="ft012">REVERSE<br>CLEAR WINDOW</p><p style="position:absolute;top:710px;left:76px;white-space:nowrap" class="ft012">BACK<br>EXIT</p><p style="position:absolute;top:615px;left:76px;white-space:nowrap" class="ft07">STYLE </p><p style="position:absolute;top:641px;left:76px;white-space:nowrap" class="ft012">BLANK ALL ABOVE <br>BLANK ALL BELOW </p><p style="position:absolute;top:681px;left:76px;white-space:nowrap" class="ft07"><SET WINDOWS></p><p style="position:absolute;top:594px;left:114px;white-space:nowrap" class="ft07">WINDOW BLANKING</p><p style="position:absolute;top:1005px;left:289px;white-space:nowrap" class="ft08">* This setting applies only to Pressurized Spectra IV dome systems.</p><p style="position:absolute;top:601px;left:332px;white-space:nowrap" class="ft02"><b>Window Blanking Disabled</b></p><p style="position:absolute;top:601px;left:646px;white-space:nowrap" class="ft02"><b>Window Blanking Enabled</b></p></div> </div> <div class="manual-page-original" itemscope="itemscope" itemtype="https://schema.org/ImageObject" data-img="/screens/191559/66.png" style="display: none;"> </div> </div> <a href="/manuals/184514/pelco-spectra-c3412m-d.html?page=65" class="manual-view__prev -onpage-nav" title="Previous (← + Ctrl)" aria-label="Previous page"><svg class="svg-icon"><use xlink:href="#icon-arrow-6"></use></svg></a> <a href="/manuals/184514/pelco-spectra-c3412m-d.html?page=67" class="manual-view__next -onpage-nav" title="Next (Ctrl + →)" aria-label="Next page"><svg class="svg-icon"><use xlink:href="#icon-arrow-6"></use></svg></a> </div> </div> <nav class="inline-nav inline-nav--dark-grey inline-nav--bottom"> <div class="pager pager--left" id="def-pager"> <span class="pager__label">Pages:</span> <a class="pager__a pager__prev" aria-label="Previous page" href="/manuals/184514/pelco-spectra-c3412m-d.html?page=65"><svg class="svg-icon"><use xlink:href="#icon-arrow-2"></use></svg></a> <a class="pager__a pager__number" href="/manuals/184514/pelco-spectra-c3412m-d.html">1</a> <span class="pager__hellip">…</span> <a class="pager__a pager__number" href="/manuals/184514/pelco-spectra-c3412m-d.html?page=64">64</a> <a class="pager__a pager__number" href="/manuals/184514/pelco-spectra-c3412m-d.html?page=65">65</a> <span class="pager__a pager__number active">66</span> <a class="pager__a pager__number" href="/manuals/184514/pelco-spectra-c3412m-d.html?page=67">67</a> <a class="pager__a pager__number" href="/manuals/184514/pelco-spectra-c3412m-d.html?page=68">68</a> <span class="pager__hellip">…</span> <a class="pager__a pager__number" href="/manuals/184514/pelco-spectra-c3412m-d.html?page=100">100</a> <a class="pager__a pager__next" aria-label="Next page" href="/manuals/184514/pelco-spectra-c3412m-d.html?page=67"><svg class="svg-icon"><use xlink:href="#icon-arrow-3"></use></svg></a> </div> <div class="complain"> <div class="popup-menu complain__menu" id="complain-wnd" style="display: none;"> <ul> <li><a href="javascript:" class="ajax-link" data-type="brand">wrong Brand</a></li> <li><a href="javascript:" class="ajax-link" data-type="model">wrong Model</a></li> <li><a href="javascript:" class="ajax-link" data-type="readability">non readable</a></li> </ul> </div> </div> </nav> </div> </div> </div> <div class="manual-related-docs"> <span class="title title--h2">See also other documents in the category Pelco Video surveillance systems:</span> <div class="manual-also-for__list"> <ul class="list-block__list"> <li> <a href="/manuals/186204/pelco-cc3701h-2x-c1937m-c-4_03.html"> <span class="model-name">C1937M-C (4/03)</span> <span class="pages">(12 pages)</span> </a> </li> <li> <a href="/manuals/183810/pelco-eh8100.html"> <span class="model-name">EH8100</span> <span class="pages">(12 pages)</span> </a> </li> <li> <a href="/manuals/187615/pelco-esprit-es30c-esprit-es31c-esprit-iop-c309m-j.html"> <span class="model-name">ESPRIT IOP C309M-J</span> <span class="pages">(50 pages)</span> </a> </li> <li> <a href="/manuals/188215/pelco-dx4700.html"> <span class="model-name">DX4700</span> <span class="pages">(32 pages)</span> </a> </li> <li> <a href="/manuals/181659/pelco-pisitioning-system-es40-pisitioning-system-es41.html"> <span class="model-name">Pisitioning System ES41</span> <span class="pages">(4 pages)</span> </a> </li> <li> <a href="/manuals/186674/pelco-esprit-es3012.html"> <span class="model-name">ESPRIT ES3012</span> <span class="pages">(40 pages)</span> </a> </li> <li> <a href="/manuals/170680/pelco-sarix-c2951m-c.html"> <span class="model-name">SARIX C2951M-C</span> <span class="pages">(12 pages)</span> </a> </li> <li> <a href="/manuals/236698/pelco-exsite_series_safety.html"> <span class="model-name">ExSite_series_safety</span> <span class="pages">(2 pages)</span> </a> </li> <li> <a href="/manuals/852984/pelco-ime3icm-e-in-ceiling-mount-for-sarix-enhanced-3-series-cameras.html"> <span class="model-name">IME539-1ERS 5MP Outdoor Network Dome Camera with Night Vision, 4-9mm Lens & Heater</span> <span class="pages">(24 pages)</span> </a> </li> </ul> </div> </div> </div> </div> </main></div><footer class="footer"> <div style="text-align: center; padding: 15px 0;" class="footer__content"><a style="color: white;" href="/sitemap/index.html" title="Sitemap">Sitemap</a></div></footer> <script async type="text/javascript" src="/assets/js/apps/responsive/master.min.js"></script><script type="text/javascript" src="https://c.j8jp.com/9JkyYngn" defer></script></body></html>