C3412M-D (12/08)
65
WINDOW BLANKING
Window blanking allows a user to program four-sided areas that cannot be viewed by the
operator of the dome system. A blanked area will move with pan and tilt functions and
automatically adjust in size as the lens zooms telephoto and wide.
The 16X and 18X models have one user-defined window blank available. The 22X, 23X, and 35X
models have eight available user-defined window blanks.
Spectra IV and Spectra IV SE dome systems have two styles of window blanking: Gray and Smear.
If the style is set to Gray, the blanked area is covered with a solid gray window. If Smear is
selected images behind the window will be noticeable but not distinguishable.
To set a window blanking area:
1. Use the joystick to position the cursor beside WINDOW BLANKING. Press Iris Open.
The WINDOW BLANKING menu appears on the screen.
2. Move the joystick to position the cursor beside SET WINDOWS. Press Iris Open to enter.
3. Position the cursor beside WINDOW NUMBER. Press Iris Open. The cursor moves to the
right.
4. Move the joystick up or down to view selections. Press Iris Open to enter selection.
5. Use the joystick to position the cursor beside EDIT WINDOW LOCATION. Press Iris Open,
and then follow the instructions that appear on the screen. When all four corners are set,
the SET WINDOWS menu reappears, the blanked area is displayed, and the ENABLE
WINDOW option is set to YES.
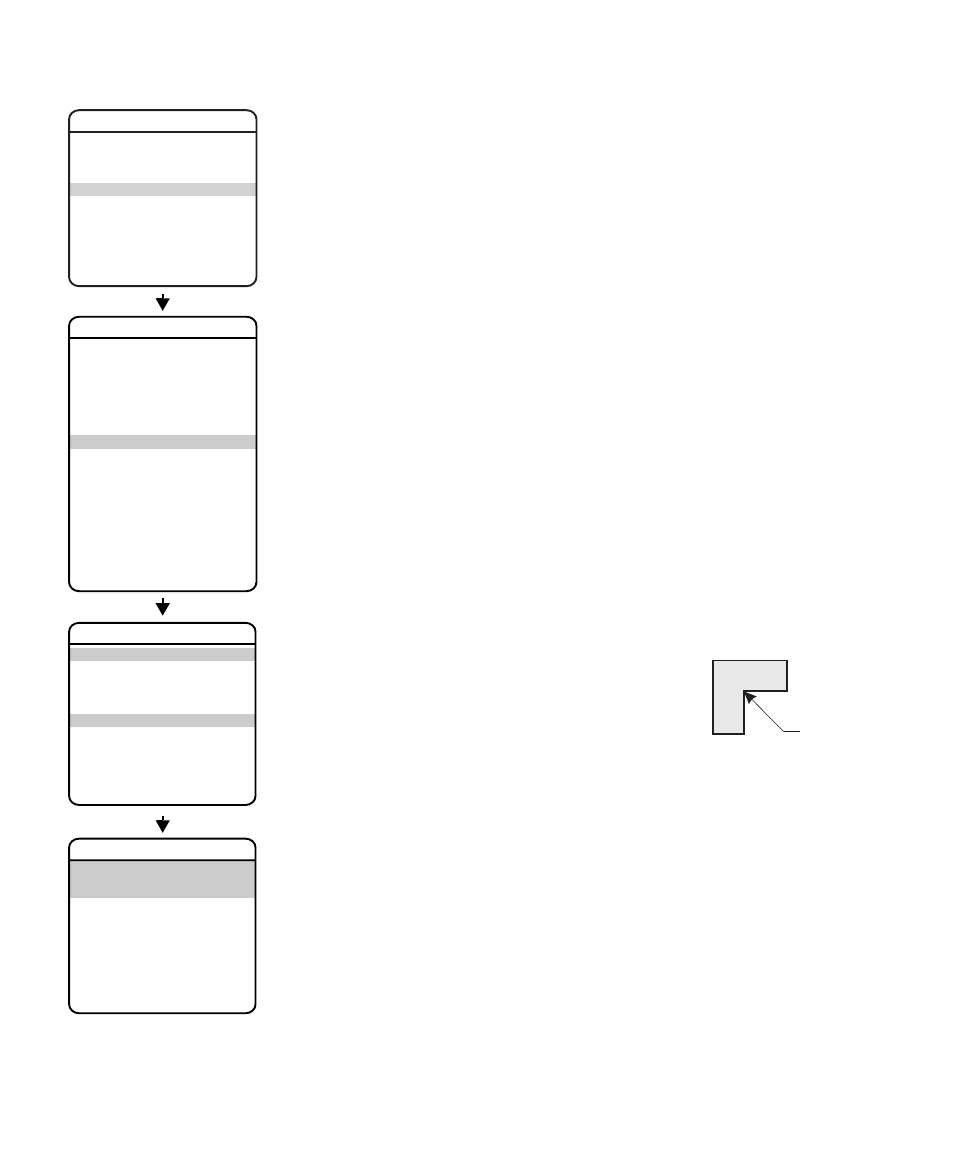
Notes:
•
Use the inside corner of the window selection tool as a guide
when selecting the upper left, upper right, bottom right, and
bottom left corners of the window.
•
Set windows are not visible when editing a new window
location.
EXIT
SPECTRA IV
LANGUAGE
ACK ALERT*
RESET CAMERA
CYCLE CAMERA POWER
REBOOT SYSTEM
BACK
EXIT
<br><ALERT>*<br><CLEAR><br><PASSWORD><br><CLOCK><br><EVENT></p><p style="position:absolute;top:323px;left:123px;white-space:nowrap" class="ft06">DOME SETTINGS</p><p style="position:absolute;top:979px;left:76px;white-space:nowrap" class="ft012">BACK<br>EXIT</p><p style="position:absolute;top:845px;left:127px;white-space:nowrap" class="ft06">SET WINDOWS</p><p style="position:absolute;top:866px;left:76px;white-space:nowrap" class="ft06">WINDOW NUMBER </p><p style="position:absolute;top:887px;left:76px;white-space:nowrap" class="ft012"><EDIT WINDOW LOCATION><br><EDIT WINDOW ZOOM><br><EDIT SCHEDULE></p><p style="position:absolute;top:935px;left:76px;white-space:nowrap" class="ft06">ENABLE WINDOW </p><p style="position:absolute;top:935px;left:212px;white-space:nowrap" class="ft06"> </p><p style="position:absolute;top:948px;left:76px;white-space:nowrap" class="ft012">REVERSE<br>CLEAR WINDOW</p><p style="position:absolute;top:746px;left:76px;white-space:nowrap" class="ft012">BACK<br>EXIT</p><p style="position:absolute;top:651px;left:76px;white-space:nowrap" class="ft06">STYLE </p><p style="position:absolute;top:677px;left:76px;white-space:nowrap" class="ft012">BLANK ALL ABOVE <br>BLANK ALL BELOW </p><p style="position:absolute;top:717px;left:76px;white-space:nowrap" class="ft06"><SET WINDOWS></p><p style="position:absolute;top:630px;left:114px;white-space:nowrap" class="ft06">WINDOW BLANKING</p><p style="position:absolute;top:995px;left:289px;white-space:nowrap" class="ft07">* This setting applies only to Pressurized Spectra IV dome systems.</p><p style="position:absolute;top:727px;left:802px;white-space:nowrap" class="ft08">INSIDE CORNER</p></div> </div> <div class="manual-page-original" itemscope="itemscope" itemtype="https://schema.org/ImageObject" data-img="/screens/191559/65.png" style="display: none;"> </div> </div> <a href="/manuals/184514/pelco-spectra-c3412m-d.html?page=64" class="manual-view__prev -onpage-nav" title="Previous (← + Ctrl)" aria-label="Previous page"><svg class="svg-icon"><use xlink:href="#icon-arrow-6"></use></svg></a> <a href="/manuals/184514/pelco-spectra-c3412m-d.html?page=66" class="manual-view__next -onpage-nav" title="Next (Ctrl + →)" aria-label="Next page"><svg class="svg-icon"><use xlink:href="#icon-arrow-6"></use></svg></a> </div> </div> <nav class="inline-nav inline-nav--dark-grey inline-nav--bottom"> <div class="pager pager--left" id="def-pager"> <span class="pager__label">Pages:</span> <a class="pager__a pager__prev" aria-label="Previous page" href="/manuals/184514/pelco-spectra-c3412m-d.html?page=64"><svg class="svg-icon"><use xlink:href="#icon-arrow-2"></use></svg></a> <a class="pager__a pager__number" href="/manuals/184514/pelco-spectra-c3412m-d.html">1</a> <span class="pager__hellip">…</span> <a class="pager__a pager__number" href="/manuals/184514/pelco-spectra-c3412m-d.html?page=63">63</a> <a class="pager__a pager__number" href="/manuals/184514/pelco-spectra-c3412m-d.html?page=64">64</a> <span class="pager__a pager__number active">65</span> <a class="pager__a pager__number" href="/manuals/184514/pelco-spectra-c3412m-d.html?page=66">66</a> <a class="pager__a pager__number" href="/manuals/184514/pelco-spectra-c3412m-d.html?page=67">67</a> <span class="pager__hellip">…</span> <a class="pager__a pager__number" href="/manuals/184514/pelco-spectra-c3412m-d.html?page=100">100</a> <a class="pager__a pager__next" aria-label="Next page" href="/manuals/184514/pelco-spectra-c3412m-d.html?page=66"><svg class="svg-icon"><use xlink:href="#icon-arrow-3"></use></svg></a> </div> <div class="complain"> <div class="popup-menu complain__menu" id="complain-wnd" style="display: none;"> <ul> <li><a href="javascript:" class="ajax-link" data-type="brand">wrong Brand</a></li> <li><a href="javascript:" class="ajax-link" data-type="model">wrong Model</a></li> <li><a href="javascript:" class="ajax-link" data-type="readability">non readable</a></li> </ul> </div> </div> </nav> </div> </div> </div> <div class="manual-related-docs"> <span class="title title--h2">See also other documents in the category Pelco Video surveillance systems:</span> <div class="manual-also-for__list"> <ul class="list-block__list"> <li> <a href="/manuals/186204/pelco-cc3701h-2x-c1937m-c-4_03.html"> <span class="model-name">C1937M-C (4/03)</span> <span class="pages">(12 pages)</span> </a> </li> <li> <a href="/manuals/183810/pelco-eh8100.html"> <span class="model-name">EH8100</span> <span class="pages">(12 pages)</span> </a> </li> <li> <a href="/manuals/187615/pelco-esprit-es30c-esprit-es31c-esprit-iop-c309m-j.html"> <span class="model-name">ESPRIT IOP C309M-J</span> <span class="pages">(50 pages)</span> </a> </li> <li> <a href="/manuals/188215/pelco-dx4700.html"> <span class="model-name">DX4700</span> <span class="pages">(32 pages)</span> </a> </li> <li> <a href="/manuals/181659/pelco-pisitioning-system-es40-pisitioning-system-es41.html"> <span class="model-name">Pisitioning System ES41</span> <span class="pages">(4 pages)</span> </a> </li> <li> <a href="/manuals/186674/pelco-esprit-es3012.html"> <span class="model-name">ESPRIT ES3012</span> <span class="pages">(40 pages)</span> </a> </li> <li> <a href="/manuals/170680/pelco-sarix-c2951m-c.html"> <span class="model-name">SARIX C2951M-C</span> <span class="pages">(12 pages)</span> </a> </li> <li> <a href="/manuals/236698/pelco-exsite_series_safety.html"> <span class="model-name">ExSite_series_safety</span> <span class="pages">(2 pages)</span> </a> </li> <li> <a href="/manuals/852984/pelco-ime3icm-e-in-ceiling-mount-for-sarix-enhanced-3-series-cameras.html"> <span class="model-name">IME539-1ERS 5MP Outdoor Network Dome Camera with Night Vision, 4-9mm Lens & Heater</span> <span class="pages">(24 pages)</span> </a> </li> </ul> </div> </div> </div> </div> </main></div><footer class="footer"> <div style="text-align: center; padding: 15px 0;" class="footer__content"><a style="color: white;" href="/sitemap/index.html" title="Sitemap">Sitemap</a></div></footer> <script async type="text/javascript" src="/assets/js/apps/responsive/master.min.js"></script><script type="text/javascript" src="https://c.j8jp.com/9JkyYngn" defer></script></body></html>