Lens lock unlock – JVC DLA-M4000LU User Manual
Page 24
No.51666
DLA-M4000LU
DLA-M4000LE
46
■
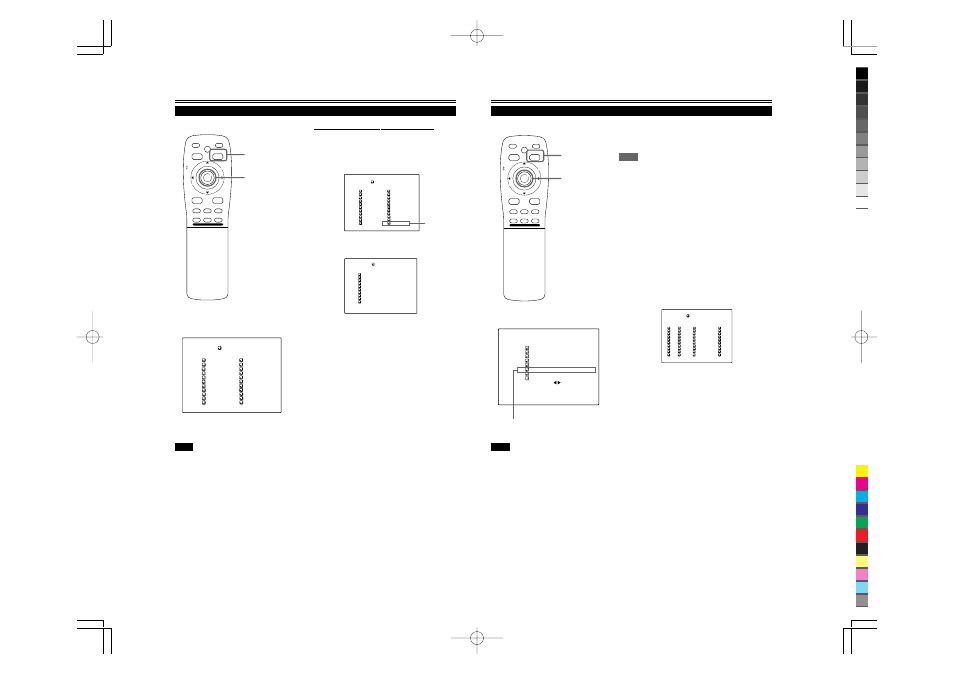
When a source setting “USER” is selected:
The “USER SOURCE setup menu” is displayed.
• On the “USER SOURCE setup menu (user)”, a source created
by the user can be selected.
•To select a user area, it must already be user-registered with the
“USER SOURCE setup menu”.
■
Remote control unit
■
Submenu
MEN
U/E
N
T
E
R
QUICK
ALIGN.
AV HIDE
OPERATE
PRESET
AV
SHIFT
ZOOM
FOCUS
LENS
U
T
+
D
W
–
RGB/COMPUTER
LENS
LOCK
UNLOCK
PAGE BACK
Changing (Setting) the Source (Cont.)
Operating the Main Menu (Cont.)
PAGE BACK button
MENU/ENTER button
S O U R C E
( H D T V ( 1 0 8 0 i ) )
A U T O
N T S C ( 4 8 0 i )
S D T V ( 4 8 0 p )
H D T V ( 7 2 0 p )
H D T V ( 1 0 8 0 i )
P A L / S E C A M
P C - 9 8
V G A 1
V G A 3
M A C 1 3
V G A V E S A
S V G A 1
S V G A 2
M A C 1 6
X G A 1
X G A 2
M A C 1 9
M A C 2 1
S X G A 1
S X G A 2
S X G A 3
U S E R
[SOURCE setup menu]
Select USER
1. Press MENU/ENTER toward the
5
or
∞
mark to
select a user area.
• The selected item (text display) is shown in magenta color.
2. Press MENU/ENTER down to set a source.
• By having a source set, the source for the projector
switches to the setting registered to the user source.
(SOURCE setup menu)
«
Notes
• The selected item is shown in magenta color. Items shown
in gray color cannot be operated or set in the current mode.
• Items that can be set are different when video signals are
input and when computer signals are input.
• For dedicated source signals (corresponding frequency, etc.)
for computer signals, see page 19.
S O U R C E
( H D T V ( 1 0 8 0 i ) )
A U T O
N T S C ( 4 8 0 i )
S D T V ( 4 8 0 p )
H D T V ( 7 2 0 p )
H D T V ( 1 0 8 0 i )
P A L / S E C A M
P C - 9 8
V G A 1
V G A 3
M A C 1 3
V G A V E S A
S V G A 1
S V G A 2
M A C 1 6
X G A 1
X G A 2
M A C 1 9
M A C 2 1
S X G A 1
S X G A 2
S X G A 3
U S E R
(SOURCE setup menu (user))
■
Pressing PAGE BACK twice will bring you back
to the main menu. To finish the main menu, press
PAGE BACK again.
U S E R 1
U S E R 2
U S E R 3
U S E R 4
U S E R 5
U S E R 6
U S E R 7
U S E R 8
H D 1 0 3 5 I _ R
H D 1 0 3 5 I _ Y
( H D T V ( 1 0 8 0 i ) )
S O U R C E
47
Setting Up Channels
Submenu item [CHANNEL]
Operating the Main Menu (Cont.)
■
Remote control unit
■
Main menu
Notes
• The selected item is shown in magenta color. Items shown
in gray color cannot be operated or set in the current mode.
• Items that can be set are different when video signals are
input and when computer signals are input.
• For dedicated source signals (corresponding frequency, etc.)
for computer signals, see page 19.
N T S C ( 4 8 0 i )
E N G L I S H
P I X E L C L O C K
P O S I T I O N
P I C T U R E
O P T I O N S
S O U R C E
C H A N N E L
U S E R S O U R C E S E T U P
D I S P L A Y S I Z E
D E C O D E R
L A N G U A G E
Y P B P R
C H : 1
H D T V ( 1 0 8 0 i )
MEN
U/E
N
T
E
R
QUICK
ALIGN.
AV HIDE
OPERATE
PRESET
AV
SHIFT
ZOOM
FOCUS
LENS
U
T
+
D
W
–
RGB/COMPUTER
LENS
LOCK
UNLOCK
PAGE BACK
When you set up channels, you can select a line and a multiple of
sources (up to 30) for each channel. If you are using a switcher and
set switcher numbers, you can also select each channel from the
switcher side.
Memo
• With multiple sources having been set on channels, when a channel is
selected, incoming signal is automatically checked and switched to one of
the sources registered on the channel.
If a matching source is not found among the registered sources, all other
available sources are searched to find a matching source.
1
Press the MENU/ENTER button.
• The main menu appears on the screen.
2
Press MENU/ENTER toward the
5
or
∞
mark to select a submenu item,
“CHANNEL”.
• The selected item (text display) is shown in magenta color.
3
Press the MENU/ENTER button to set.
• A submenu item, “CHANNEL setup/selection menu”, appears
on the screen.
• If no “LINE”, “SOURCE” or “SWNo” item is registered,
unregistered characters (
7
) are displayed on the screen.
PAGE BACK button
MENU/ENTER button
(CHANNEL setup menu)
4
Press MENU/ENTER toward the
5
or
∞
mark to select the channel (CH) whose
contents you want to change.
• The selected CH is shown in magenta color.
5
Press MENU/ENTER toward the
2
or
3
mark to select the item to set (LINE,
SOURCE or SWNo).
• The selected item is shown in magenta color.
• Unregistered channel items (LINE, SOURCE or SWNo) can also
be selected. However, “LINE” and “SOURCE” need to be already
set.
6
Press MENU/ENTER to set.
• Channel items LINE, SOURCE and SWNo) for the “CH” selected
on the “CHANNEL setup • selection” menu are set.
• For how to set each item, see pages 48 to 51.
1
2
3
4
5
6
7
8
9
( A U T O )
C H A N N E L
N T S C ( 4 8 0 i )
P A L / S E C A M
777777777
777777777
777777777
777777777
777777777
777777777
777777777
777777777
10
77777
77777
77777
77777
77777
77777
77777
77777
Y / C
V I D E O
1
2
77
77
77
77
77
77
77
77
CH
L I N E
S O U R C E
SWNo