Lens lock unlock – JVC DLA-M4000LU User Manual
Page 17
No.51666
DLA-M4000LU
DLA-M4000LE
32
Operating the Main Menu (Cont.)
Configuration of the Main Menu (Computer-related input)
Main menu (Computer-related inputs : During COMPUTER IN-1 or -2 input signal)
PIXEL CLOCK TRACKING
: The lateral size and display area of video image are adjusted.
PHASE
: Flickering or dim video image is adjusted.
POSITION
V. POS.
: The vertical position of the video image being projected is adjusted.
H. POS.
: The horizontal position of the video image being projected is adjusted.
PICTURE
BRIGHTNESS
: The brightness of the video image being projected is adjusted.
CONTRAST
: The contrast of the video image being projected is adjusted.
R-GAIN
: The gain in red signal of the video image being projected is adjusted.
G-GAIN
: The gain in green signal of the video image being projected is adjusted.
B-GAIN
: The gain in blue signal of the video image being projected is adjusted.
TEXT MODE
: Adjust easiness for reading text during RESIZE.
NORMAL: Normal
TEXT 1:
Display the outline of small letters already.
TEXT 2:
Makes the outline of large letters sharp.
ALL RESET
: All the items adjusted are reset.
OPTIONS
MENU AUTO OFF : Sets whether to turn off menu display automatically (YES) or not (NO).
LINE DISPLAY
: Sets whether to make the line display effective (ON) or not (OFF) for about 5 seconds after input
switching.
RIGHT LEFT REV. : Image is reversed right-to-left.
TOP BOTTOM INV. : Image is inverted top-to-bottom.
CLAMP
: Sets the clamp pulse’s position at the back porch (BP) or on the sink tip (ST). Normally, the clamp
pulse is used at BP. If, with some PCs or workstations, the screen becomes unstable such as
being too dark or too bright, try to switch to ST.
RESIZE
: When the number of pixels (resolution) sought by the video image input is smaller than that
(resolution) of D-ILA device, the video image is then enlarged to a virtually full screen size of D-ILA
device and projected. (Resizing indication)
BACK COLOR
: Specifies the background color when there is no image signal. Background color can be selected
from BLUE, CYAN, BLACK, GREEN, MAGENTA, RED, and YELLOW.
COLOR TEMP.
: Adjusts the color temperature of the video image being projected. Make adjustment when the
video image becomes reddish or bluish.
Color temperature can be set to LOW, MIDDLE, or HIGH.
ASPECT CHANGE : Selects the vertical-to-horizontal ratio of the video image projected. The factory-set ratio is 4 : 3.
When projecting high-vision image, a ratio of 16 : 9 can be selected.
SLEEP TIME
: Sets the length of sleep time. A set sleep time after input signal is depleted, the projector goes into
a stand-by state. Sleep time can be selected from 10 minutes, 20 minutes, 30 minutes, 60 minutes
and 0 minute. (If you select 0 minutes, the sleep time will be cleared.)
LAMP TIME
: Indicates accumulated used hours of the light-source lamp.
SOURCE
: Normally used in AUTO. If use in AUTO is unstable such as color not appearing, the screen being disturbed or the
screen being intermitted, set to the dedicated source (forced mode) in accordance with the input signal.
USER allows you to set a source which is uniquely adjusted by the user.
CHANNEL
:
Sets a line and multiple sources for each channel.
USER SOURCE
: Sets up an area for the source being input, and registers the user name.
SET UP
DISPLAY SIZE
: Adjusts H PIXEL, V PIXEL, H CENTER and V CENTER of video image.
DECODER
: Does not work with computer-related inputs. (The color system is indicated in gray.)
LANGUAGE
: Text on the screen can be changed to a language other than English. Languages that can be displayed are the
following six :
(Japanese), ENGLISH, DEUTSCH (German), ESPAÑOL (Spanish), ITALIANO (Italian), and
FRANÇAIS (French). However, some text such as “QUICK ALIGNMENT”, etc. are shown only in English.
33
N T S C ( 4 8 0 i )
E N G L I S H
P I X E L C L O C K
P O S I T I O N
P I C T U R E
O P T I O N S
S O U R C E
C H A N N E L
U S E R S O U R C E S E T U P
D I S P L A Y S I Z E
D E C O D E R
L A N G U A G E
Y P B P R
C H : 1
H D T V ( 1 0 8 0 i )
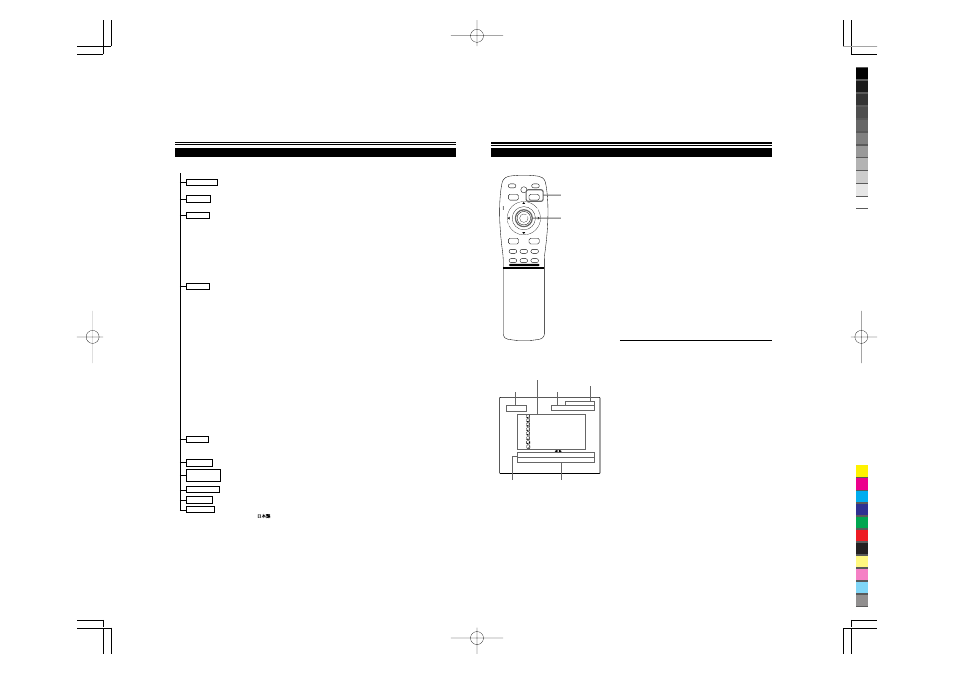
Operating the Main Menu (Cont.)
Operating the Main Menu (Basic Operation of the Main Menu)
Submenu items
Input line
Source
Decoder (color system)
Language
For projector’s menus, the setting menu and the main menu are
available.
Here, we explain about the operation of the main menu.
For the setting menu, refer to “Making Basic Settings” on page 30.
1
Press the MENU/ENTER button.
• The main menu is displayed on the screen.
2
Press MENU/ENTER toward the
5
or
∞
mark to select an item.
• The selected item (displayed text) is shown in magenta color
on the screen.
3
Set (adjust) the item.
■
When you have selected DECODER or LANGUAGE,
• Press MENU/ENTER toward the
2
or
3
mark to set.
* To finish the main menu, press the PAGE BACK button.
■
When you have selected an item on the submenu,
• Press MENU/ENTER to display the submenu. Then, set
(adjust) the item by pressing MENU/ENTER toward the
2
/
3
or
5
/
∞
mark.
* To return to the main menu, press PAGE BACK again. To
finish the main menu, press PAGE BACK again. (To finish the
main menu from the submenu, press PAGE BACK twice.)
■
About main menu display:
Line display:
The selected input-mode designation is
displayed. For input-mode designation, “Y/C”,
“VIDEO”, “Y, P
B
/B-Y, P
R
/R-Y”, “COMPUTER 1”
and “COMPUTER 2” are available.
Source display: The type of signal being input is displayed. With
this projector, unique designations are
previously given to specific horizontal and
vertical frequencies. This allows the source
selected under SOURCE (submenu item) to
be indicated. The source setting can be
selected from AUTO mode, dedicated (forced)
modes and USER mode. When AUTO is
selected, the horizontal and vertical
frequencies of a signal being input are detected
and the matched designation is displayed
in ( ).
Display example: “AUTO (NTSC(480i))”
Therefore, be careful as the source display
does not always correspond to the indication
or type of the input signal.
For the unique designations for the specific
horizontal and vertical frequencies, see page
19.
Channel display: The channel selected by the user is displayed.
The line, sources and switcher No. selected
by the user have been registered to the
channel. Once registered, the line, sources and
switcher No. of the projector will change to the
ones the user has registered only by switching
between channels. The settings should be
made on the “Channel setup/selection menu”.
For details, see page 47.
Submenu item display:
See pages 36 to 58.
Decoder (Color system) display:
See page 34.
Language display:
See page 35.
■
Remote control unit
■
Main menu
MEN
U/E
N
T
E
R
QUICK
ALIGN.
AV HIDE
OPERATE
PRESET
AV
SHIFT
ZOOM
FOCUS
LENS
U
T
+
D
W
–
RGB/COMPUTER
LENS
LOCK
UNLOCK
PAGE BACK
PAGE BACK button
MENU/ENTER button
Channel