Names and functionsof parts, Front panel, Names and functions of parts – JVC BR-DV6000U User Manual
Page 7
11
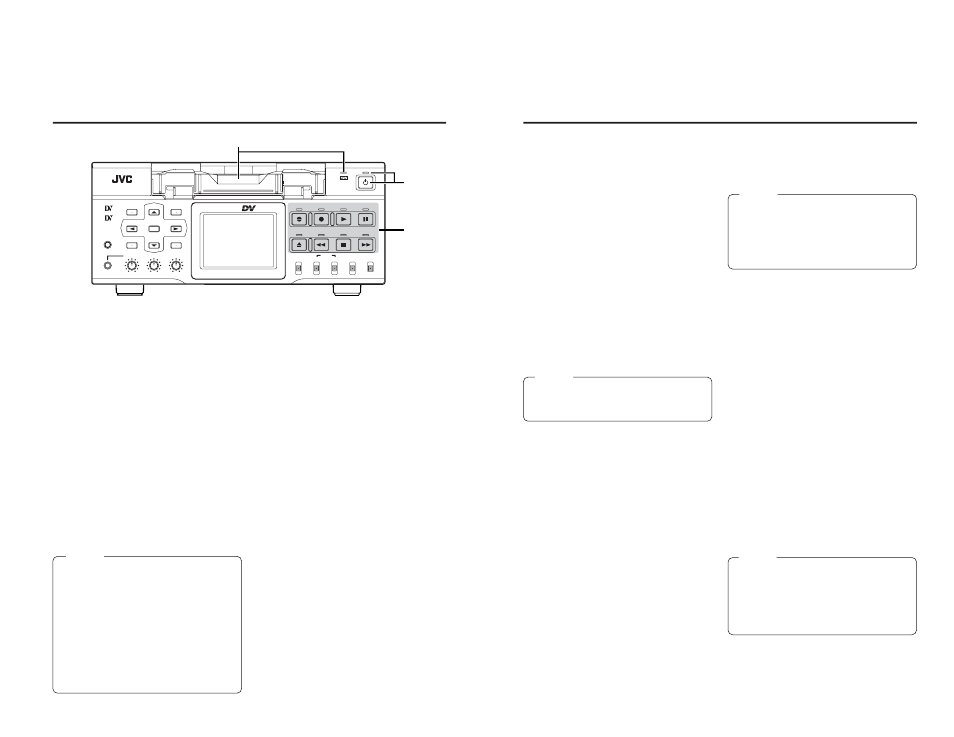
Ⅵ [PLAY] button/LED
• Press this button to start playing back a tape.
During playback, the green LED lights up.
• When recording is paused, press this button
to resume recording.
• When audio dubbing is paused, press this
button to resume audio dubbing.
Ⅵ [PAUSE] button/LED
• During recording, press this button to pause
it.
• In the PLAYBACK or STOP mode, press this
button to enter the STILL mode. In the RE-
CORDING PAUSE or STILL mode, the green
LED lights up.
• When BR-DV6000 is in the STILL mode, hold
down the A.DUB button and press this but-
ton to enter into the audio-dubbing pause
mode.
• When BR-DV6000 is in the STILL mode,
press this button for frame advance playback.
Ⅵ [FF] button/LED
• When BR-DV6000 enters the STOP mode,
press this button to fast-forward the tape.
• When BR-DV6000 is in the PLAYBACK or
STILL mode, press this button for fast-forward
playback. The fast forward playback speed
can be changed by pressing the INDEX +/
:
button
*
or the INDEX –/
; button (when
“
;,:” KEY FUNC in the SYSTEM (1/2) Menu
screen is set to VAR).
(
☞
Page 50 “Search Mode”)
• Hold down the PLAY button and press this
button to perform playback in the forward di-
rection at 1.07 times the normal speed. At
this state, if the PLAY button is released first,
the playback continues at 1.07 times the nor-
mal speed.
If this button is released first, it plays back at
the normal speed.
• During fast-forwarding or fast-forward play-
back, the LED lights up in green.
Ⅵ [STOP] button
• Press this button to stop operation.
• When BR-DV6000 is in the STANDBY OFF
mode, press this button to enter the
STANDBY ON mode.
Ⅵ
[REW] button/LED
• When BR-DV6000 enters the STOP mode,
press this button to rewind the tape.
• When BR-DV6000 is in the PLAYBACK or
STILL mode, press this button for reverse
playback. The rewind playback speed can be
changed by pressing the INDEX +/
: button
*
or the INDEX –/
; button (when “;,:” KEY
FUNC in the SYSTEM (1/2) Menu screen is
set to VAR).
(
☞
Page 50 “Search Mode”)
• Hold down the PLAY button and press this
button to perform playback in the reverse di-
rection at 0.9 times the normal speed. At this
state, if the PLAY button is released first, the
playback continues at 0.9 times the normal
speed.
If this button is released first, it plays back at
the normal speed.
• During rewinding or rewind playback, the LED
lights up in green.
Ⅵ [EJECT] button
• Press this button to eject the cassette.
Memo
Still images or images in frame advance can
be selected with STIL/F.ADV of the SYSTEM
(1/2) MENU screen.
Memo
● It takes about 6 seconds for the cassette to
be ejected.
● The cassette can be ejected even when BR-
DV6000 is in the OPERATE OFF mode. Af-
ter the eject action is completed, BR-DV6000
returns to the OPERATE OFF mode.
Memo
There are two stop modes.
● STANDBY OFF: For protecting the tape and
the drum, the drum does not rotate.
● STANDBY ON: The drum rotates so that it
starts up faster after BR-DV6000 moves into
another mode.
10
3
Operation buttons
Ⅵ [A. DUB] Audio dubbing button/LED
• Press this button for audio dubbing (after-re-
cording).
For audio dubbing, set AUDIO MODE in the
AUDIO MENU screen to “32K”.
The sound produced by the MIC terminal
#
or the AUDIO IN terminal is recorded on chan-
nels CH3 and CH4.
• During audio dubbing, the red A. DUB LED
lights up.
• If the INPUT SELECT switch is set to DV,
audio dubbing cannot be performed.
(
☞
Page 44 “Audio Dubbing”)
Ⅵ [REC] button/LED
• Hold down this button and press the PLAY
button to start recording. During recording,
the red LED lights up.
• Hold down this button and press the PAUSE
button to pause recording.
• If this button is pressed during recording, an
index signal is recorded on the tape (when
INDEX WRITE in the SYSTEM MENU screen
is set to ON).
• When this button is pressed in the STOP
mode, the time code generator value can be
checked while the button is being held down.
If TC DUPLICATE Menu is set to AUTO or
NON DROP, the time code, date and time of
the DV input can be checked.
• If this button is pressed during playback, the
input signal can be checked while the button
is held down. (EE check)
EE check is not available for DV signal input.
Memo
● If DC IN MODE in the SYSTEM MENU screen
is set to “OPE ON” or the Timer Switch is set
to “REC” or “PLAY” and power is supplied to
the DC IN terminal located on the rear panel,
BR-DV6000 goes into the OPERATE ON
state even if this button is not pressed.
● Even after the power is turned off with this
button, BR-DV6000 is live with a small amount
of electricity.
Therefore, if BR-DV6000 is not to be used
for a long period of time, please remove the
AC adapter to save energy.
1
Cassette loading slot/LED
• For loading a cassette into or unloading it from
the slot.
Insert a standard DV cassette or a mini DV
cassette. (
☞
Page 38)
• When BR-DV6000 is in the OPERATE OFF
state and a cassette is loaded, it changes to
the OPERATE ON state.
• With a cassette loaded, the LED lights up in
green.
When a cassette is being loaded or ejected,
the LED flashes.
2
[OPERATE] button/LED
• Press this button to turn on the power and
BR-DV6000 becomes ready for operation.
(Operate ON)
Press this button again when BR-DV6000 is
already on to turn off the power.
(Operate OFF)
• OPERATE LED lights up as follows.
Operate ON : the green LED lights up
Operate OFF : the red LED lights up
VCR error
: the red LED blinks
NAMES AND FUNCTIONS
OF PARTS
– Front panel –
BR-DV6000
PROFESSIONAL
MENU
RESET
A.DUB
EJECT
COUNTER
AUDIO
INPUT
SELECT
MONITOR OUTPUT
REMOTE
LOCAL
CTL
L
MIX
R
CH-1/2
MIX
CH-3/4
DV
LINE
Y/C
(CPN)
TC
UB
REW
STOP
FF
REC
OPERATE
PLAY
PAUSE
DISP
SET
INDEX+
BLANK
CUE UP
HOLD
PHONES
REC LEVEL
CH-1/3
CH-2/4
MIC
INDEX–
Mini
1
2
3