Diagnostics, Beacon ii troubleshooting guide (continued) – Heatcraft Refrigeration Products BEACON II H-IM-79E User Manual
Page 25
25
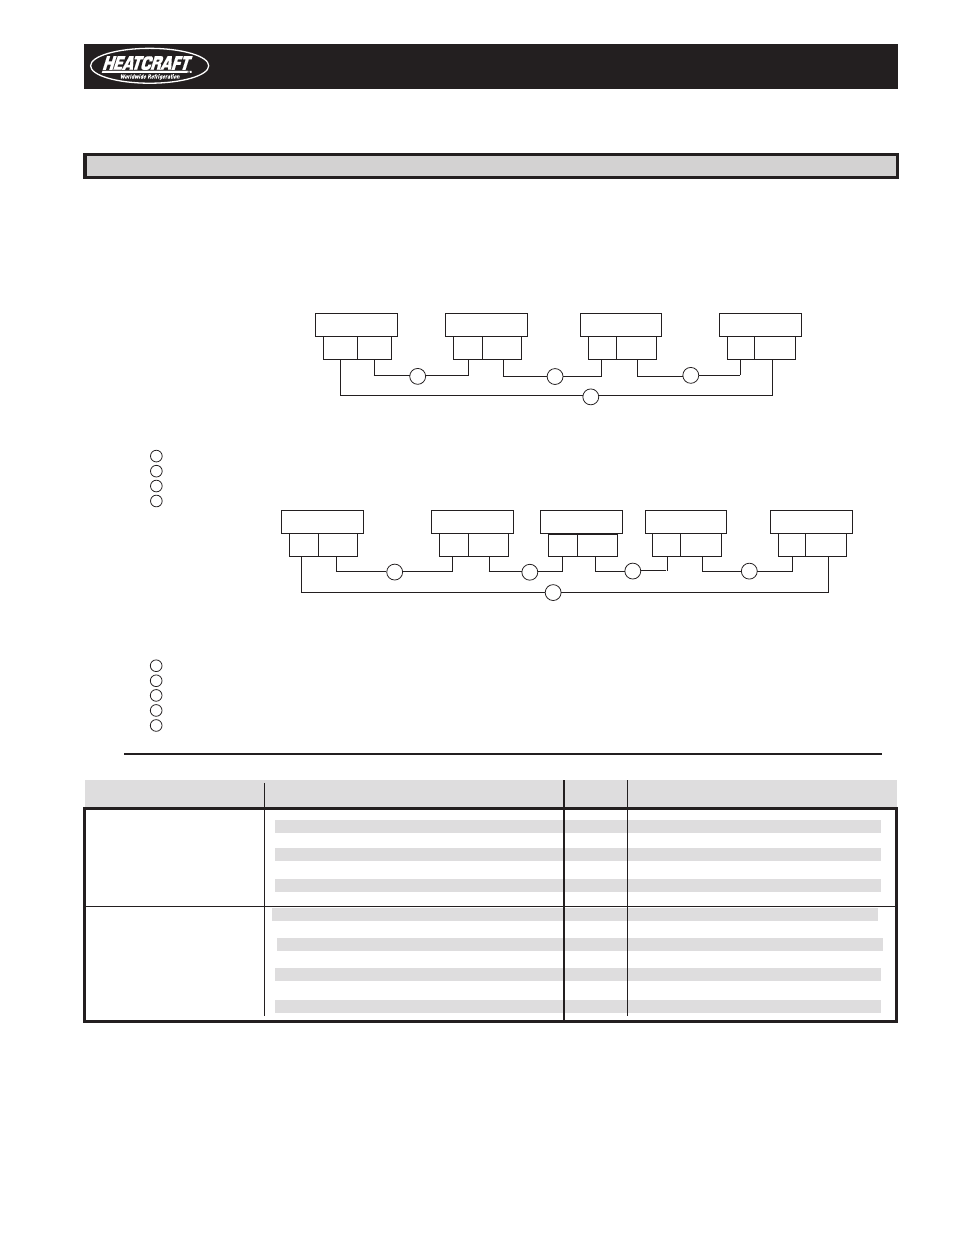
Beacon II Troubleshooting Guide (continued)
Master
in out
Slave 1
in out
Slave 2
in out
Slave 3
in out
1
2
3
in out
Master
in out
Slave 1
in out
Slave 2
in out
1
2
3
5
Slave 3
in out
4
Diagnostics
Beacon II Smart
Controller
4
PROBLEM
Step ACTION ITEM
IF OK
IF NOT OK
E9
Multi-out to Multi-in
1.
Check for 24 volts power to the board
1. If no voltage, see “LED is not lit” above
Communication Wiring
for low voltage, see “88888 LED display”
(only shows after initial
2.
Check for crossed communication wiring
Go to
2. Correct wiring from “Master” unit Multi-out
successful connection)
(multi-out not wired to multi-in terminals)
next step
to Multi-in of “Slave” unit, etc. to all Slaves
and return to Master. (See wiring diagrams)
3.
Check for broken communication wiring
3. Correct wiring between first Slave with
error to previous board in the sequence.
Communication Error
Occurrence:
Break in the designated
lines will cause errors
as follows:
Line #
Master
Slave1
Slave 2
Slave 3
1
E9
E9
E9
E9
2
E9
no error
E9
E9
3
E9
no error
no error
E9
4
E9
no error
no error
no error
[With Beacon II Smart Controller]
Line #
SMART
Master
Slave1
Slave 2
Slave 3
1
+COMM+
E9
no error
no error
no error
2
+COMM+
no error
E9
E9
E9
3
+COMM+
no error
no error
E9
E9
4
+COMM+
no error
no error
no error
E9
5
+COMM+
no error
no error
no error
no error
PROBLEM
Step ACTION ITEM
IF OK
IF NOT OK
1. Check board for proper ground on mounting
1. Replace/tighten screws
screws
888 LED display 2. Check Voltage to Evaporator Transformer
Go to
2. Check field wiring for breaks or shorts
(power is below 18V and 3. Check Transformer Secondary Output Volts
next step 3. Replace if necessary
appears at initial power) 4. Check Voltage at Control Board (24 and C)
4. Check factory wiring and connections
5. Check Voltage at Beacon II Smart Controller
5. Check field wiring from board
1. Check board for proper grouning on mounting
1. Replace/tighten screws
screws
LED displays dLY 2. Check for low voltage
Go to
2. Check all steps for “888 LED display”
then oFF with no
next step Voltage could drop off too fast to show.
displayed erros 3. Check for short in field wiring from “comp” on
3. Check internal factory wiring to
board to condensing unit terminal connection
compressor contactor.
4. Replace defective contactor (holding coil)