Fig.1 fig.3 fig.2 a b c door top view window – Sealey EC95 User Manual
Page 2
3.
OPERATION
NOTE: It is our policy to continually improve products and as such we reserve the right to alter data, specifications and component parts without prior notice.
IMPORTANT: No liability is accepted for incorrect use of this product.
WARRANTY: Guarantee is 12 months from purchase date, proof of which will be required for any claim.
INFORMATION: For a copy of our latest catalogue and promotions call us on 01284 757525 and leave your full name and address, including postcode.
Sole UK Distributor, Sealey Group,
Kempson Way, Suffolk Business Park
,
Bury St. Edmunds, Suffolk,
IP32 7AR
Original Language Version
EC95.V2 Issue: 1 - 09/02/10
01284 757500
01284 703534
www.sealey.co.uk
Web
Parts support is available for this product. To obtain a parts listing and/or diagram,
please log on to www.sealey.co.uk, email [email protected] or phone 01284 757500.
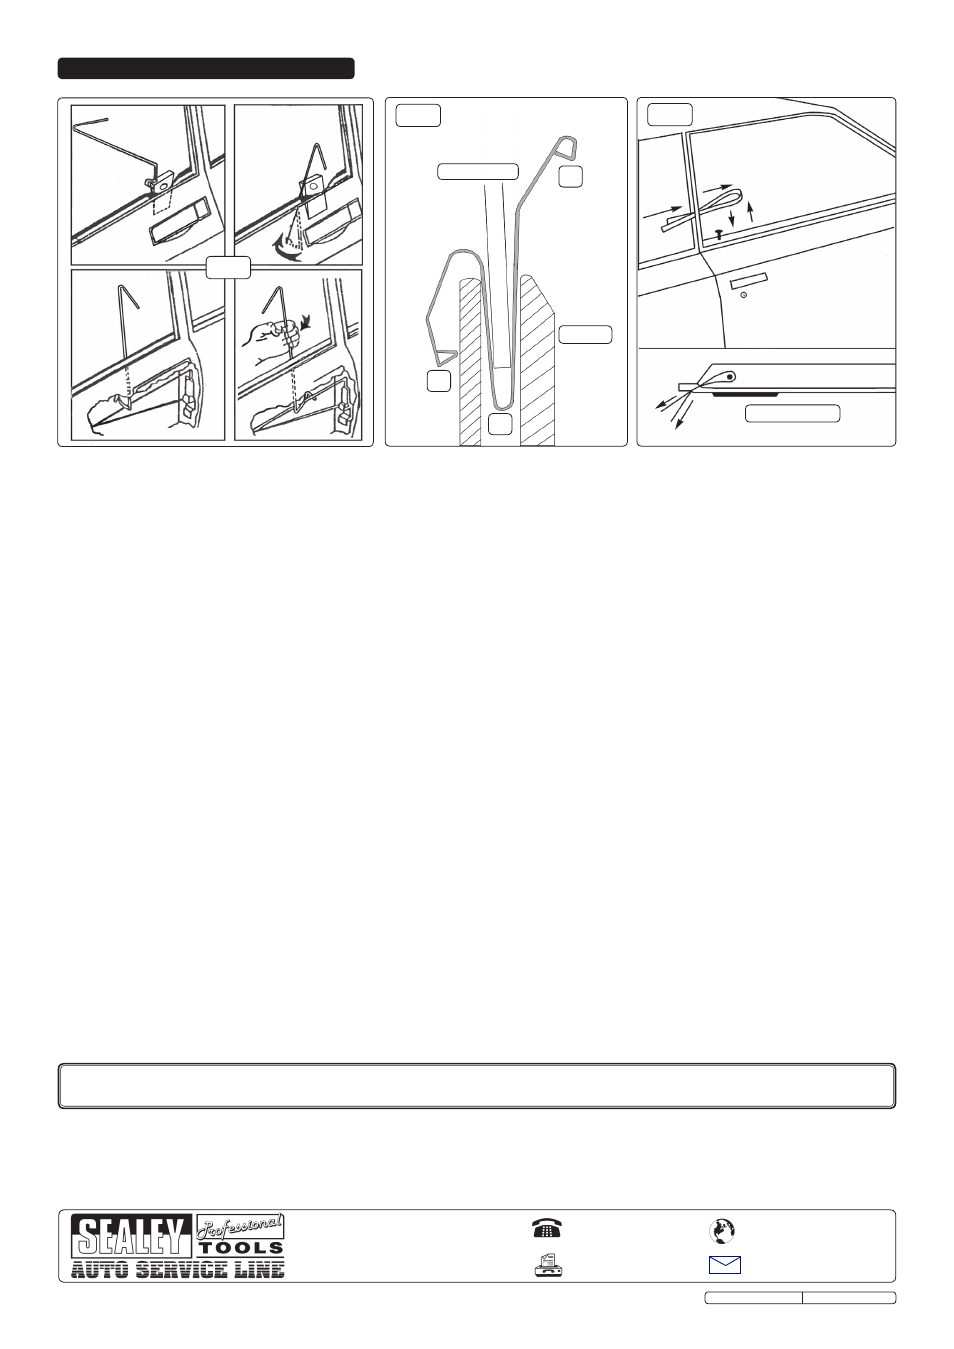
3.1.
Slide Lock Tool (fig.1)
This tool can be used to hook onto the connecting linkage rods inside the door. Carefully insert a wedge between the window and door
surround and slide the tool down into the door space about 10cms. Twist it through 90° so the hook is facing outwards.
Remove the wedge. Lower the tool so that it touches the linkage rod. Move the tool until you can feel the linkage rod fit into the hook.
Twist the tool to grip the linkage rod and move the linkage rod to open the lock.
3.2.
Wire S Hook
Similar to the Slide Lock tool in operation and use. For hooking under linkage/rod or pushing linkage/rod down.
3.3.
Wonder Tool (fig.2)
This tool can be used to reach inside the vehicle and move the door handle or locking switch. The tool may need to be adjusted width
wise to fit the door, by bending A inwards. Carefully insert a wedge between the window and door surround and slide the tool down into
the door space until loop (B) is below the window glass. remove the wedge. Twist the tool through about 20-30° (just enough so that it is
inside the glass) and lift the tool upwards slowly, easing the tool past the inside rubber seal. Once the end of the tool (A) has cleared the
door capping, turn the tool so that it is at 90° to the window and move the tool down to engage (A) with the handle or switch to open the
lock.
3.4.
Thin Bar and Wide Bar
These bars are used in a similar way to the Slide Lock tool, for hooking onto the linkage rods or manipulating the door lock lever. They
are useful where space is very limited. As they are flat bladed, they cannot be twisted in use, but may need to be bent to be used.
3.5.
Plastic Strap (fig.3)
This is useful for older vehicles which have flat topped door locking buttons. Push the loop of the strap past the rubber door seal and
using the two strap ends, manouvre the loop down over the door button. Once positioned, pull the loop tight, then pull the strap
upwards and lift the button up.
3.6.
Wedges
Use to open up a small gap between the window glass and the rubber seal, to enable the tools to slide in more easily.
3.7.
Fuel Cap Key
Work the key in and out of the lock several times, jiggling it up and down at the same time. It may be necessary to try using both ends of
the key to see which one fits best.
fig.1
fig.3
fig.2
A
B
C
Door
Top View
Window