Sealey WD202 User Manual
Page 3
4. MAINTENANCE/EXAMINATION/INSPECTION
5. ASSEMBLY/STORAGE INSTRUCTIONS
NOTE: The crane MUST be kept clean and dry and must be maintained in accordance with these instructions.
4.1.
Lubrication.
a)
oil all working parts monthly.
b)
the ram is filled with oil and should only require occasional topping up.
DO NOT
use brake fluid, as this will damage the hydraulic seals. Proceed as follows:
a) use only good quality hydraulic jack oil available from your supplier.
b) fully lower the jib extension arm and remove the filler plug on the ram.
c) fill until oil overflows from the hole and wait until the level settles before
replacing the plug.
4.2.
Inspection and Examination of Crane Before Use.
a)
Before each use of the crane you must perform an inspection for leaks, damage,
loose or missing parts.
b)
the workshop crane must be examined immediately if it has been subject to an abnormal load
or shock. It is recommended that such an examination is made by an authorised service agent.
c)
the owner and/or operator must be aware that repair of this equipment will require specialised
knowledge and facilities. It is recommended that an annual examination of the workshop crane
is made by an authorised service agent.
d)
unauthorised parts may be dangerous and will invalidate the warranty.
NOTE! Please see the Definition of ‘inspection’ and ‘examination’ below.
Inspection:
Looking at the crane for defects and checking the operation of the controls, limiting and indicating
devices without loading the crane. this is much more than a check but does not normally require
any part of the crane to be dismantled other than removal or opening of covers or housings.
Examination:
Verification that the crane can safely continue in service including a functional test of all
safety devices i.e. limiting, indicating equipment, brakes, clutches, safety valves etc to
verify that they operate within the required tolerances. An examination is more
thorough than an inspection.
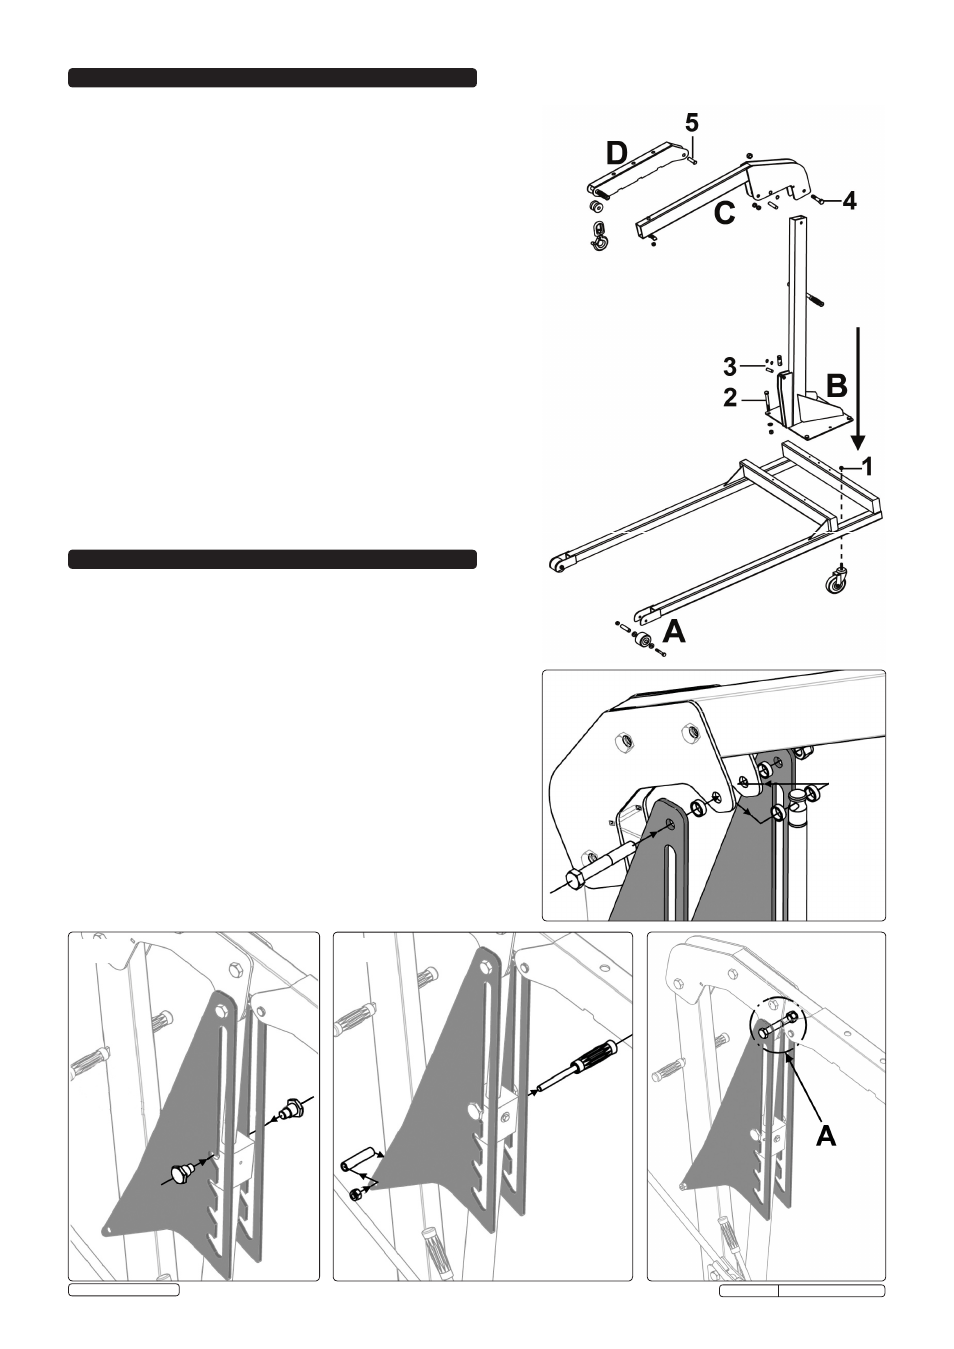
5.1
ASSEMBLY.
WARNING! Due to its weight please ensure that there is adequate help
available when assembling this cranes.
a)
remove the top and one end of the wooden transit crate and lift out
the main arm and jib components.
b)
Lift the main frame out of the crate and position it in the assembly area.
c)
Attach the front solid wheels as per fig.3A, and attach castor wheels to
the rear cross member and secure with nut (fig.3.1). chock the wheels
to stop the frame moving.
d)
Attach base of ram to the upright pin and circlips fig.3.3.
e)
take the main upright (fig.3B) and place it upright onto the two cross
members of the main frame. Align the footplate holes with the holes in
the frame and secure with four bolts, four washers and nuts (fig.3.2)
f)
remove the jib extension (fig.3D) from the arm (fig.3c). Lift the arm
and support it over the top end of the upright. Align the pivot holes in
both parts and slide the pivot bolt (fig.3.4) through and secure with nut.
g)
Lift up the arm (fig.3c) and support it in an approximate horizontal
position. Hinge the ram unit away from the upright and align the hole in
the end of the ram shaft with the hole in the arm. then hold up the two
sides of the safety locking system to the same holes, with spacers in
between each plate (see fig.4) slide the pivot bolt through the aligned
holes and spacers and secure with nut, only secure nut finger tight.
fig.3
fig.4
fig.5
fig.6
fig.7
© Jack sealey Limited
Original Language Version
WD202.V3 Issue no: 1 - 20/06/12