Fig.8, Fig.7, Fig.a fig.b fig.c – Sealey SG101 User Manual
Page 4: Grinding/cutting discs, Operating instructions
4. GRINDING/CUTTING DISCS
WARNING! DO NOT USE DISCS THAT ARE DAMAGED, OR SUSPECTED TO BE DAMAGED.
4.1
Before using a grinding/cutting disc ensure that there are no fissures or cracks. Once
mounted on the grinder, test the disc before use by facing the grinder in a safe direction
(point away from yourself, others and vulnerable items) and run for a short time.
DANGER! Use of damaged discs is dangerous and may cause personal injury.
4.2. Grinding and cutting discs used in association with this machine shall be of an adequate
speed rating and be suitable for the job in hand. The discs shall be made in accordance with
British Standard 4481:Part 1 1989. Only persons holding a grinding wheel certificate are
authorised to change grinding discs. Ensure that the speed rating on the disc is equal to, or
higher than, that of the grinder.
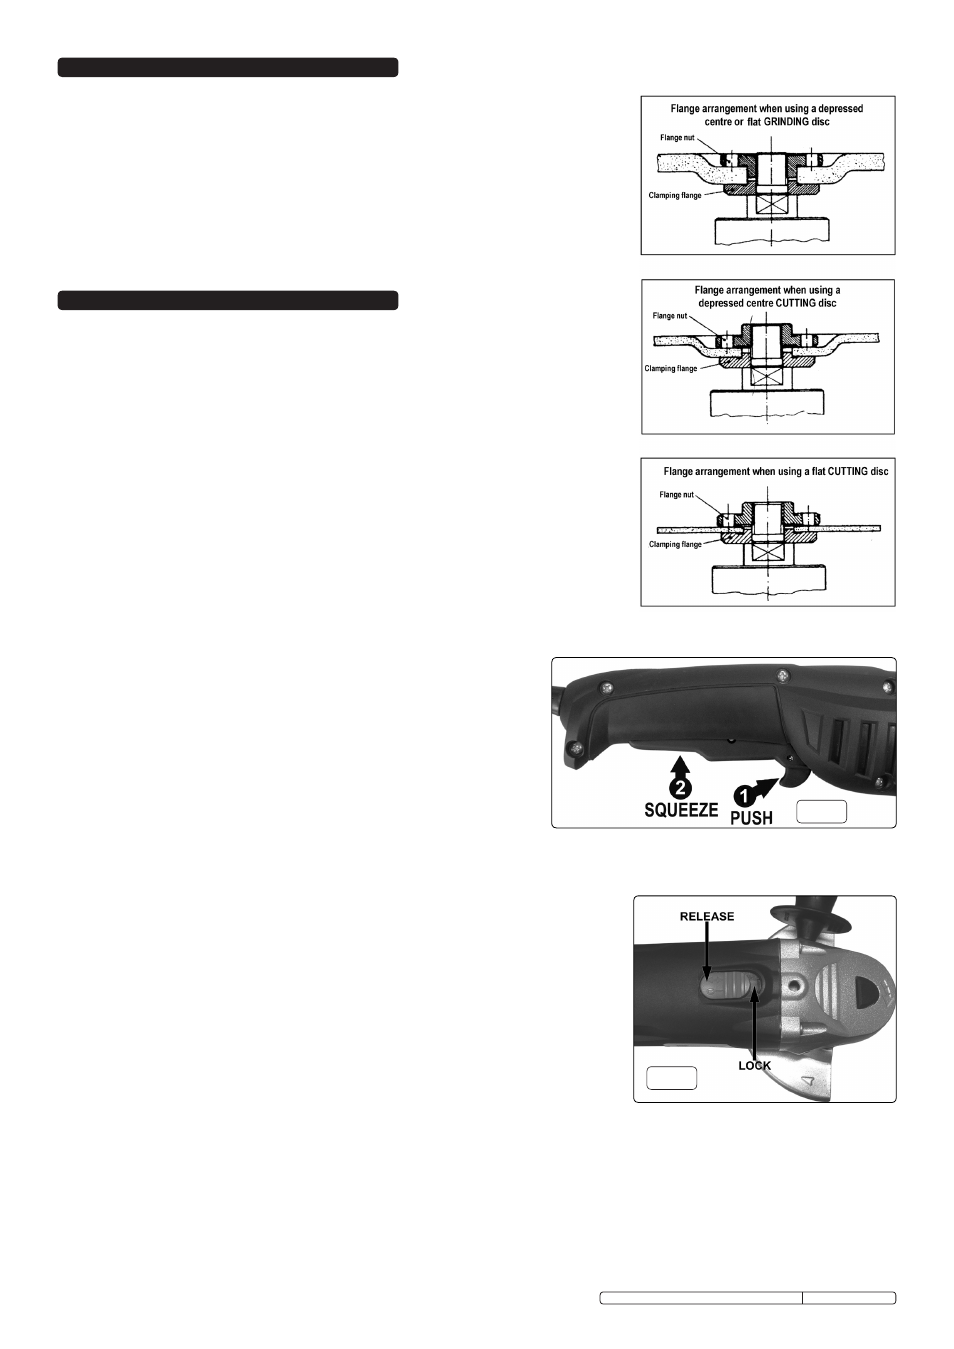
fig.A
fig.B
fig.C
5.4
GRINDING
5.4.1
The key to effective operating is controlling the pressure and surface contact between the
disc and the workpiece.
WARNING! DO NOT switch the grinder on whilst the disc is in contact with the work
piece. Bring the rotating disc to the workpiece.
5.4.2 Allow the disc to reach full speed before starting to grind.
5.4.3 Grind flat surfaces at an angle of between 10 to 20 degrees to the work piece. Too great
an angle will cause a concentration of pressure in one small area resulting in gouging or
burning of the surface.
5.4.4 When grinding is complete allow the workpiece to cool. DO NOT touch the hot surface.
5.4.5 Unplug the grinder from the mains power supply, clean and store in a safe, dry, childproof
area.
fig.8
5. OPERATING INSTRUCTIONS
WARNING! Ensure grinder is unplugged from the mains power supply before changing
accessories.
5.1
PREPARATION
5.1.1
Attach grinding/cutting disc according to section 3.2. and position the handle grip
conveniently for the task.
5.1.2 Ensure the disc safety guard is correctly positioned.
5.1.3 Plug grinder into the mains power supply.
WARNING! When the grinder first starts it will kick to the right. You must ensure, therefore,
that the tool is securely gripped in both hands. Especially important is the position you choose
for the side handle in order to maintain stability.
WARNING! Before use, ensure that you are wearing approved safety goggles, ear
defenders, appropriate dust mask if dust will be generated and safety gloves, and that
all other safety instructions in Section 1 are followed carefully.
5.2.
ON/OFF Switch (SG101.V2, SG115.V2)
5.2.1 The On/Off switch (fig 6A) is designed to avoid accidental starting.
5.2.2 Once plugged into the power supply start the grinder by sliding the switch forward and
pressing down.
5.2.3 To turn off the machine press the switch at the rear and it will spring back to the ‘Off’ position.
5.3
ON/OFF Switch (SG125, SG2303.V2)
5.3.1 Once plugged into the mains power supply the grinder is started by a two
stage switching operation. Place your fingers over the switch and using
your index finger unlock the trigger by pushing the lock lever forwards and
then squeeze the trigger into the ‘ON’ position. (See fig.7 )
5.3.2 To stop the grinder release the trigger.
5.3.3 When the trigger is released and returns to the ‘OFF’ position it is
automatically locked to prevent inadvertent starting.
5.3.4 The trigger can be locked in the ‘ON’ position for continuous running. To do
this release the lock and squeeze the trigger as previously described. With
the trigger fully depressed push the lock lever one stage further forward.
Whilst maintaining pressure on the lock lever release the trigger which will
now stay in the ‘ON’ position.
5.3.5 To stop the grinder squeeze the trigger to unlock it and release the trigger.
5.3.6 If the power is cut to the grinder whilst the switch is locked ‘ON’ always
release the trigger and unplug the grinder. Do not reconnect the grinder until you are sure that
the power has been restored.
fig.7
Original Language Version
SG101.V2, SG115.V2, SG125, SG2303.V2 Issue: 2 - 16/02/10