Fig.6, 7 . operating instructions, Maintenance – Sealey DFS55 User Manual
Page 4
7 . OPERATING INSTRUCTIONS
WARNING! Ensure you have read and understood and
adhere to Section 1 safety instruction. dO NOT vacuum
hazardous substances. Use of an incorrect filter will
invalidate your warranty.
Ensure you are using the personal protection items
appropriate to the task before operating the unit and before
opening the vacuum system drum.
7.1.
PREPARATION FOR USE.
7.1.1 Check that the filter to be used is in good condition.
7.1.2. Check the vacuum system and attached tools are in good
working order and condition and all air and electrical
connections are sound.
7.1.3 Check that the switches are in the correct positions as
described in section 4.2 and 4.3.
7.1.4 Turn the electrical mains power on and the external air supply.
7.2.
OPERATING THE dUST FREE SYSTEM.
IMPORTANT: Ensure fine particle filter is fitted.
7.2.1 Make the tool ready for use and operate the tool which in
turn will automatically activate the dust vacuum system.
Whilst performing the task the vacuum system will draw the
dust up into the unit.
7.2.2 When you turn off the tool, the vacuum system will
continue
to operate for approximately a further 10 seconds
drawing up any remaining dust.
7.2.3 When the task is complete, unplug the unit from the mains
power supply. Turn off the source of the air supply and
disconnect the unit from the air supply.
7.3.
USING THE UNIT AS AN ORdINARY VACUUM CLEANER.
7.3.1 sWITCH Off THE AuTO sTART fuNCTION. To use the
unit as a standard wet or dry vacuum cleaner without a dust
free tool attached the Parallel switch (auto start), (see fig.3D),
must be in the Off position. Press the lower part of the
switch ("O") to turn it off.
NOTE: The main on/off switch will not work if the Auto Start
switch is left on.
7.3.2 DIsCONNECT TOOLs/AIRLINEs. Disconnect any airlines or
airtools ensuring that the source of the air supply is off first.
Disconnect the flexible hose from any airtool dust port and
remove the rubber adaptor. unplug any electric tools from
the front panel of the unit. Tidy away any airlines or
unwanted tools to maintain a safe working area.
7.3.3 fIT THE CORRECT fILTER. undo the clasps on either side of
the drum. Remove the power head and fit the required filter.
DRY VACuuM. fit the disposable filter bag over the suction
inlet inside the drum. Alternatively fit cartridge filter down over
the filter basket and push fully home. stretch the wire
retainer into place over the filter. When the cartridge filter is
fitted dust and debris are collected in the drum.
WET VACuuM. fit the cartridge filter only. Reposition the
power head onto the drum body, and refasten the clasps.
7.3.4 CONNECT THE fLEXIBLE HOsE. Insert the larger end of
the flexible hose into the front inlet on the drum container and
push home until it clicks.
7.3.5 CONNECT THE REQuIRED ATTACHMENTs. Attachments
such as the crevice tool (fig.2-I) and the brush (fig.2-E) can be
pushed directly on to the end of the flexible hose. for floor work
push the bent connector (fig.2-J) onto the flexible tube and then
use the metal extension tubes (K) and either the dry floor tool
(f) or the wet floor tool (G).
7.3.6 CONNECT TO MAINs POWER suPPLY. Insert the 13amp
plug into the mains power supply.
7.3.7 TuRN ON THE uNIT. Press the upper part ("I") of the
Vacuum on/off switch (see fig.3E) to start the vacuum cleaner.
7.3.8 When you have completed vacuuming, press the switch to ‘Off’.
7.3.9 NOTEs REGARDING WET VACuuMING:
WARNING! dO NOT vacuum solvents, explosives,
inflammable and/or hazardous liquids such as petrol, oil,
spirits, paint, thinners, acids etc.
7.3.10 To vacuum large quantities of liquid, from a sink or tank etc,
do not immerse the nozzle completely in the liquid, leave a
gap at the top of the nozzle opening to allow an air inflow.
The machine is fitted with a float valve which stops the
suction action when the tank has reached its maximum
capacity. The user will notice an increase in motor speed.
When this happens, turn off the machine, disconnect from
power supply, remove the power head from the container
and empty the liquid into a suitable receptacle or drain. To
continue vacuuming, refit the power head and proceed. After
wet vacuuming, turn the machine off and unplug from power
supply. Empty the container and clean and dry the inside and
outside before storage.
Remember! A dry cartridge filter must be fitted before dry
vacuuming again.
WARNING! Not designed for liquid storage. Always
empty liquids after use and before storing.
7.4.
BLOWING
7.4.1 Open the hinged access hatch on the power head and push
the large end of the flexible hose into the blowing port
against spring pressure until it latches.
7.4.2 Ensure the power switch is turned off and plug in the power
supply.
7.4.3 switch on the power (position ‘I’).
7.4.4 The unit will now blow through the hose and can be used to
clear obstructions within the pipe.
WARNING! If after a few seconds the hose is still blocked turn
of the unit and clear the hose manually.
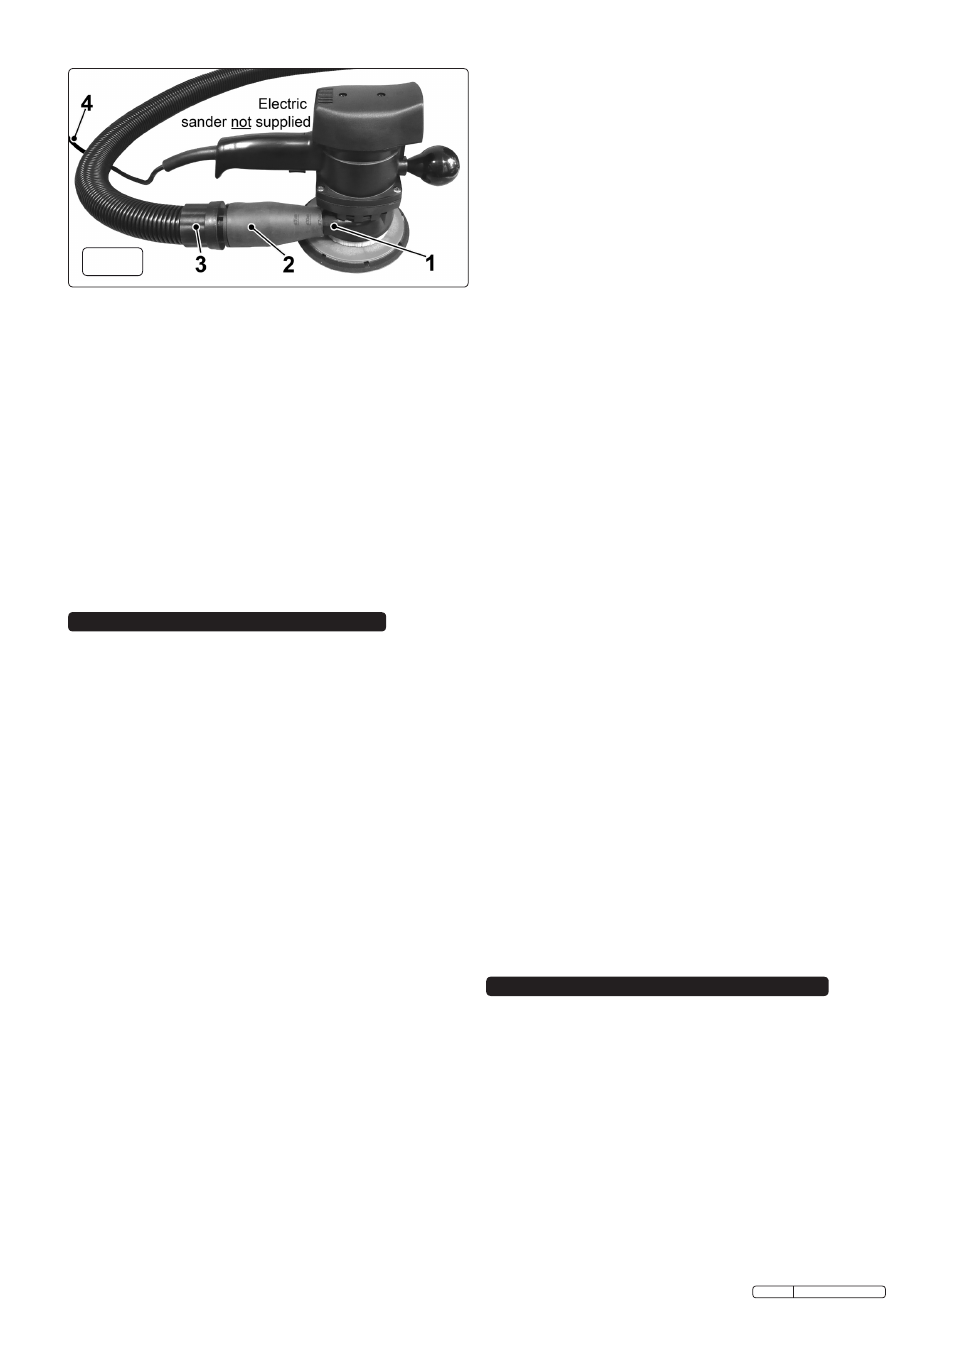
6.2.
Connecting an Electrically operated tool. (See fig.6)
6.2.1 fIT THE fINE PARTICLE fILTER. undo the clasps that hold
the power head onto the drum (see fig.1-12) and lift off the
head. Remove the cartridge filter if fitted and drop the large
fine dust filter into the drum so that it rests on the rim of the
container. Replace the power head and secure it with the
clasps.
6.2.2 TRIM RuBBER ADAPTOR. Take the dust free rubber
adaptor (see fig.5-2) and trim the coned end with a sharp
knife so that it is a tight fit onto the dust extraction port on the
electric tool (see fig.5-1).
6.2.3 CONNECT fLEXIBLE HOsE. Insert the smaller end of the
flexible hose fully into the rubber adaptor (see fig.5-3). Insert
the larger end of the flexible hose into the suction port
on the front of the drum (see fig.1-5).
6.2.4 PLuG IN ELECTRIC TOOL. Take the plug at the end of the
tool cable (see fig.5-4) and insert it into the 13amp socket in
the center of the control panel.
6.2.5 sET uP sWITCHEs fOR DusT fREE OPERATION. see
section 4.3.
8.1
GENERAL MAINTENANCE.
8.1.1 Ensure the machine is unplugged from the power supply.
8.1.2 Disconnect the hose from the container.
8.1.3 undo the clasps and remove power head from the
container.
8.1.4 Clear out any dirt or debris from the container and hose.
8.1.5 If changing from wet to dry use ensure that the inside of the
drum is thoroughly dry before commencing work.
8.2
dUST COLLECTION BAG.
8.2.1 The bag is designed for single use. Once it is full it should be
disposed off and a new bag fitted.
8.3
CARTRIdGE FILTER MAINTENANCE.
8.3.1 Handle the filter carefully when cleaning or installing.
8.3.2 Carefully remove the cartridge filter and inspect it for
damage. A filter that has small holes or tears in it will not
perform efficiently and should be replaced.
8. MAINTENANCE
fig.6
Original Language Version
Dfs55 Issue: 2 - 17/02/10