Operating your unit – Florabest FBKS 4015 User Manual
Page 9
GR
56
üτι εÜν το ξýλο εßναι νεκρωmÝνο Þ σÜπιο, το
ροκανßδι δεν θα εßναι καλÞj ποιüτηταj.
S
Το πριüνι κüβει προj τη mßα πλευρÜ Þ υπü
γωνßα.
S
ΠρÝπει να ασκηθεß πßεση στο πριüνι κατÜ
την κοπÞ.
Εργαλεßα που απαιτοýνται
:
S
ΣτρογγυλÞ λßmα διαmÝτρου 5/32 ιντσþν (4
mm) και βÜση λßmαj
S
Επßπεδη λßmα
S
Εργαλεßο οδηγοý βÜθουj κοπÞj
ΓΙΑ ΝΑ ΑΚΟΝΙΣΕΤΕ ΤΗΝ ΑΛΥΣΙ∆Α:
1. ΜετακινÞστε το διακüπτη στη θÝση
STOP.
2. ΕλÝηξτε εÜν η αλυσßδα τεντþνεται
σωστÜ. Ρυθmßστε το τÝντωmα τηj
αλυσßδαj, εÜν απαιτεßραι.
3. Ακονßστε τα δüντια κοπÞj.
S
Για να ακονßσετε τα δüντια κοπÞj,
τοποθετÞστε τη βÜση τηj λßmαj σε
επßπεδη
θÝση
(90°)
þστε
να
ακουmπÜει στα πÜνω Üκρα των
δοντιþν κοπÞj και του οδηγοý
βÜθουj κοπÞj.
ΣΗΜΕΙΩΣΗ:
Η αλυσßδα διαθÝτει
δüντια κοπÞj στην αριστερÞ και στη
δεξιÜ πγευρÜ.
Οδηγοý
βÜθουj κοπÞj
Λßmα
ΒÜση λßmαj
∆οντι
κοπÞj
90°
S
Ευθυγραmmßστε τιj ενδεßξειj τηj βÜσηj
τηj λßmαj 30° παρÜλλmλα mε τη λÜmα
και προj το κÝντρο τηj αλυσßδαj.
∆οντι κοπÞj
30°
ΓραmmÞ βÜσηj λßmαj
∆οντι κοπÞj
S
Ακονßστε τα δüντια κοπÞj στη mßα
πλευρÜ τηj αλυσßδαj πρþτα. ΛιmÜπετε
απü το εσωτερικü τmÞmα κÜθε δοντιοý
κοπÞj προj το εξωτερικü. Στη
συνÝχεια, γυρßστε το αλυσοπρßονο και
επαναλÜβετε τη διαικασßα για την
Üλλη πλευρÜ τηj αλυσßδαj.
S
ΛιmÜρετε müνο στην κατεýθυνση
προj τα εmπρüj. ΛιmÜρετε κÜθε Üκρο
δοντιοý κοπÞj 2 Þ 3 φορÝj.
S
¼λα τα δüντια κοπÞj πρÝπει να Ýχουν
το ßδιο mÞκοj κατÜ το λιmÜρισmα.
S
ΛιmÜρετε τα δüντια üσο χρειÜζεται
þστε να αποκατασταθοýν τυχüν
φθορÝj στα Üκρα των δοντιþν κοπÞj
(πλευρικü και Üνω τmÞmα δοντιοý
κοπÞj).
ºδιο mÞκοj για üλα
τα δüντια κοπÞj
Αποκατασταοη
φθορÜj
Πλευρικü
τmÞmα
¶νω
τmÞmα
S
ΛιmÜρετε την αλυσßδα σýmφωνα mε
τιj προδιαγραφÝj που αναφÝρονται.
30°
80°
60°
ΣτρογγυλεmÝνη
γωνßα
0,65
mm
Σωστü
Γωνßα αγκßστρωσηj
ΛÜθαj
ΤετραγωνισmÝνη
γωνßα
Πολý mεγÜλη γωνßα
αγκßστρωηj
ΠΡΟΕΙ∆ΟΠΟΙΗΣΗ:
Τηρεßτε τη
σωστÞ γωνßα αγκßστρωσηj σýmφωνα mε τιj
προδιαγραφÝj του κατασκευαστÞ για την
αλυσßδα που χρησιmοποιεßτε. ΕÜν η γωνßα
αγκßστρωσηj εßναι εσφαλmÝνj, αυξÜνεται ο
κßνδυνοj κλωτσÞmατοj που mπορεß να οδηγÞσει
σε σοβαρü τραυmατισmü.
4. ΕλÝγξτε και mειþστε το ýψοj των οδηγþν
βÜθουj κοπÞj.
Εργαλεßο οδηγοý
βÜθουj κοπÞj
Λßmα
Οδηγοý
βÜθουj κοπÞj
S
ΤοποθετÞστε το επγαλεßο οδηγοý
βÜθουj κοπÞj στο δüντι κοπÞj.
S
ΕÜν ο οδηγüj βÜθουj κοπÞj βρßσκεται
πιο πÜνω απü το εργαλεßο οδγηοý
βÜθουj κοπÞj, λιmÜρετε τον οδηγü
þστε να βρßσκεται στο ßδιο επßπεδο mε
το πÜνω mÝροj του εργαλεßου οδηγοý
βÜθουj κοπÞj.
S
ΛιmÜρετε mε επßπεδη λßmα þστε η
mπροστινÞ γωνßα του οδηγοý βÜθουj
κοπÞj να εßναι στρογγυλÞ.
ΣΗΜΕΙΩΣΗ:
Το πÜνω Üκρο του
οδηγοý βÜθουj κοπÞj πρÝπει να
εßναι επßπεδο. ΛιmÜρετε το mισü
mπροστινü τmÞmα mε επßπεδη λßmα
þστε να εßναι στρογγυλü.
GB
9
1. Loosen bar nuts until they are finger tight
against the clutch cover.
2. Turn adjusting screw clockwise until chain
solidly contacts bottom of guide bar rail.
Adjusting
Screw
3. Using bar tool, roll chain around guide bar
to ensure all links are in bar groove.
4. Lift up tip of guide bar to check for sag.
Release tip of guide bar, then turn adjust-
ing screw
1
/
4
turn clockwise. Repeat un-
til sag does not exist.
Adjusting Screw --
1
/
4
Turn
5. While lifting tip of guide bar, tighten bar
nuts securely with the bar tool.
Bar Nuts
6. Use the screwdriver end of the bar tool to
move chain around guide bar.
7. If chain does not rotate, it is too tight.
Slightly loosen bar nuts and loosen chain
by turning the adjusting screw
1
/
4
turn
counterclockwise. Retighten bar nuts.
8. If chain is too loose, it will sag below the
guide bar. DO NOT operate the saw if the
chain is loose.
WARNING
: If the saw is operated
with a loose chain, the chain could jump off
the guide bar and result in serious injury.
WARNING
: Muffler is very hot during
and after use. Do not touch the muffler or al-
low combustible material such as dry grass
or fuel to do so.
OPERATING YOUR UNIT
BEFORE STARTING ENGINE
WARNING
: Be sure to read the fuel
information in the safety rules before you be-
gin. If you do not understand the safety rules,
do not attempt to fuel your unit. Contact an
authorized service dealer.
BAR AND CHAIN LUBRICATION
The bar and chain require continuous lubri-
cation. Lubrication is provided by the auto-
matic oiler system when the oil tank is kept
filled. Lack of oil will quickly ruin the bar and
chain. Too little oil will cause overheating
shown by smoke coming from the chain and/
or discoloration of the bar. Only use Bar and
Chain Oil for bar and chain lubrication.
Oil Cap
Fuel mix cap
FUELING ENGINE
WARNING
: Remove fuel cap slowly
when refueling.
CAUTION:
Never use straight petrol in
your unit. This will cause permanent engine
damage.
FUEL REQUIREMENTS
Use good quality unleaded petrol. The lowest
recommended octane grade is 90 (RON).
IMPORTANT
Use of alcohol blended fuels (more than 10%
alcohol) can cause major engine performance
and durability problems.
WARNING
: Incorrect use of fuel and/
or lubricants will cause problems such as:
improper clutch engagements, overheat-
ing, vapor lock, power loss, lubrication de-
ficiency, deterioration of fuel lines, gas-
kets and internal carburetor components,
etc. Alcohol blended fuels will cause a high
absorption of moisture in the fuel/oil mix-
ture, causing the separation of oil and fuel.
CHAIN BRAKE
Ensure chain brake is disengaged by pulling
the front hand guard back toward the front han-
dle as far as possible. The chain brake must
be disengaged before cutting with the saw.
WARNING
: The chain must not
move when the engine runs at idle speed. If
the chain moves at idle speed refer to CAR-
BURETOR ADJUSTMENT within this
manual. Avoid contact with the muffler. A hot
muffler can cause serious burns.
To stop the engine, move the ON/STOP
switch to the STOP position.
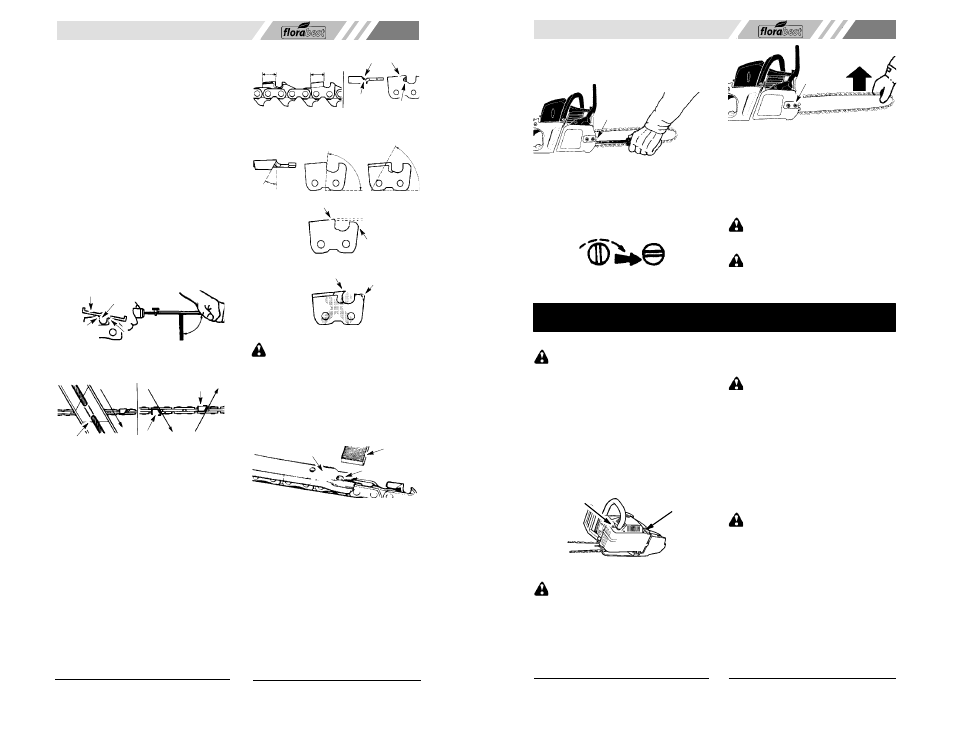
To start the engine, hold the saw firmly on
the ground as illustrated below. Make sure
the chain is free to turn without contacting
any object.