Florabest FBKS 4015 User Manual
Page 12
GB
12
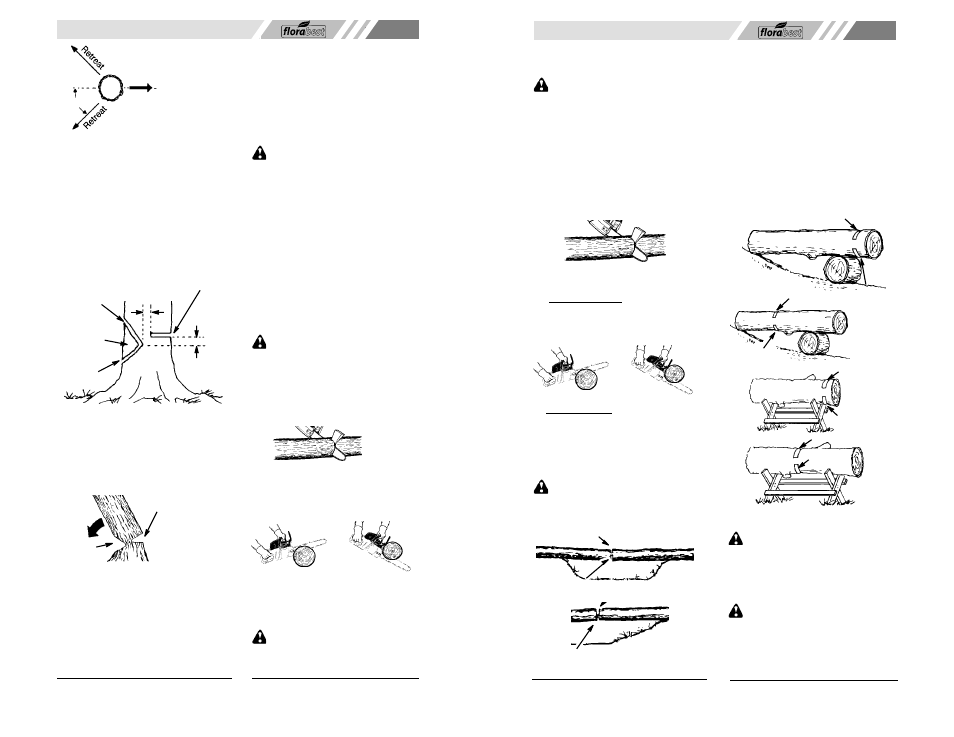
Direction of Fall
45_
Plan a clear retreat path
FELLING LARGE TREES
(15 cm in diameter or larger)
The notch method is used to fell large trees.
A notch is cut on the side of the tree in the de-
sired direction of fall. After a felling cut is
made on the opposite side of tree, the tree
will tend to fall into the notch.
NOTCH CUT AND FELLING THE
TREE
S
Make notch cut by cutting the top of the
notch first. Cut through
1/3
of the diameter
of the tree. Next complete the notch by cut-
ting the bottom of the notch. See illustra-
tion. Once the notch is cut remove the
notch of wood from the tree.
Notch
First cut
Second cut
Final cut here. 5 cm above
center of notch.
5 cm
5 cm
S
After removing the wood from the notch,
make the felling cut on the opposite side of
the notch. This is done by making a cut
about two inches higher than the center of
the notch. This will leave enough uncut
wood between the felling cut and the notch
to form a hinge. This hinge will help prevent
the tree from falling in the wrong direction.
Opening
of felling
cut
Closing
of notch
Hinge holds tree on stump and helps
control fall
NOTE
: Before felling cut is complete, use
wedges to open the cut when necessary to
control the direction of fall. To avoid kickback
or chain damage, use wood or plastic
wedges, but never steel or iron wedges.
S
Be alert to signs that the tree is ready to fall:
cracking sounds, widening of the felling cut,
or movement in the upper branches.
S
As tree starts to fall, stop saw, put it down,
and get away quickly on your planned re-
treat path.
S
DO NOT cut down a partially fallen tree
with your saw. Be extremely cautious with
partially fallen trees that may be poorly
supported. When a tree doesn’t fall com-
pletely, set the saw aside and pull down the
tree with a cable winch, block and tackle,
or tractor.
CUTTING A FALLEN TREE
(BUCKING)
Bucking is the term used for cutting a fallen
tree to the desired log length.
WARNING
: Do not stand on the log
being cut. Any portion can roll causing loss
of footing and control. Do not stand downhill
of the log being cut.
Important points
S
Cut only one log at a time.
S
Cut shattered wood very carefully; sharp
pieces of wood could be flung toward oper-
ator.
S
Use a sawhorse to cut small logs. Never
allow another person to hold the log while
cutting and never hold the log with your leg
or foot.
S
Do not cut in an area where logs, limbs,
and roots are tangled. Drag the logs into a
clear area before cutting by pulling out ex-
posed and cleared logs first.
TYPES OF CUTTING USED FOR
BUCKING
WARNING
: If saw becomes pinched
or hung in a log, don’t try to force it out. You
can lose control of the saw resulting in injury
and/or damage to the saw. Stop the saw,
drive a wedge of plastic or wood into the cut
until the saw can be removed easily. Restart
the saw and carefully reenter the cut. Do not
attempt to restart your saw when it is pinched
or hung in a log.
Turn saw
OFF
and use a plastic or
wooden wedge to force cut open.
Overcutting begins on the top side of the log
with the saw against the log. When overcut-
ting use light downward pressure.
Overcutting
Undercutting
Undercutting involves cutting on the under-
side of the log with top of saw against the log.
When undercutting use light upward pres-
sure. Hold saw firmly and maintain control.
The saw will tend to push back toward you.
WARNING
: Never turn saw upside
down to undercut. The saw cannot be con-
trolled in this position.
GR
53
ΤΥΠΟΙ ΚΟΨΙΜΑΤΟΣ ΠΟΥ
ΧΡΗΣΙΜΟΠΟΙΟΥΝΤΑΙ ΓΙΑ
ΤΕΜΑΧΙΣΜΟ
ΠΡΟΕΙ∆ΟΠΟΙΗΣΗ:
Αν
το
αλυσοπρßονο σφηνþσει mÝσα σε κÜπ
οιο ξýλο,
προσπαθÞστε να το απελευθερþσετε βßαια.
Μπορεß να χÜσετε τον Ýλεγχο του
αλυσοπρßονου mε αποτÝλεσmα τραυmατισmü
Þ/και ζηmιÜ στο αλυσοπρßονο. ΣβÞστε το
αλυσοπρßονο και τοποθετÞστε mια πλαστικÞ
Þ ξýλινη σφÞνα στην τοmÞ mÝχρι που να
mπορεß
να
αφαιρεθεß
εýκολα
το
αλυσοπρßονο. ΒÜλτε και πÜλι εmπρüj το
αλυσοπρßονο και προσεκτικÜ ξανακüψτε
mÝσα
στην
προηγοýmενη
τοmÞ.
Μην
προσπαθÞσετε να βÜλετε το αλυσοπρßονο
εmπρüj üσο εßναι σφηνωmÝνο mÝσα σε ξýλο.
ΣβÞστε το αλυσοπρßονο και χρησιmοποιÞστε
mια πλαστικÞ Þ ξýλινη σφÞνα για να ανοßξετε
την τοmÞ.
Το κüψιmο απü πÜνω ξεκινÜ στην επÜνω
πλευρÜ του κορmοý mε το αλυσοπρßονο να
ακουmπÜ στον κορmü. Οταν κüβετε απü
πÜνω εφαρmüστε mια ελαφριÜ πßεση προj τα
κÜτω.
Κüψιmο απü πÜνω
Κüψιmο απü κÜτω
Το κüψιmο απü κÜτω ξεκινÜ mε το κüψιmο τηj
κÜτω mεριÜj του κορmοý mε το πÜνω mÝροj
του αλυσοπρßονο να ακουmπÜ στον κορmü.
Οταν κüβετε απü κÜτω εφαρmüστε mια
ελαφριÜ πßεση προj τα πÜνω. ΚρατÞστε
γερÜ το αλυσοπρßονο και διατηρÞστε τον
Ýλεγχο. Το αλυσοπρßονο θα Ýχει την τÜση να
σπρþξει προj τα πßσω, προj τη mεριÜ σαj.
ΠΡΟΕΙ∆ΟΠΟΙΗΣΗ:
ΠοτÝ mην
γυρßσετε το αλυσοπρßονο ανÜποδα για να
κüψετε απü κÜτω. Το αλυσοπρßονο δεν
mπορεß να ελεγχθεß σε αυτÞ τη θÝση .
∆εýτερη τοmÞ
Πρþτα κüψτε στην πλευρÜ που Ýχει πßεση
ο κορmüj
∆εýτερη τοmÞ
Πρþτα κüψτε στην πλευρÜ που Ýχει πßεση
ο κορmüj
ΤΕΜΑΧΙΣΜΟΣ ΧΩΡΙΣ
ΥΠΟΣΤΗΡΙΓΜΑ
S
Κüψτε απü πÜνω κατÜ το 1/3 τηj
διαmÝτρου του κορmοý.
S
ΚυλÞστε τον κορmü να γυρßσει απü την
Üλλη πλευρÜ και ολοκληρþστε mε mια
δεýτερη τοmÞ απü πÜνω.
S
∆εßξτε ιδιαßτερη προσοχÞ σε κορmοýj υπü
πßεση για να αποφýγετε σφÞνωmα του
αλυσοπρßονου. ΚÜντε την πρþτη τοmÞ στην
πλευρÜ που Ýχει πßεση ο κορmüj για να
απελευθερωθεß η τÜση του κορmοý.
ΤΕΜΑΧΙΣΜΟΣ ΜΕ ΥΠΟΣΤΗΡΙΓΜΑ
S
Θυmηθεßτε η πρþτη τοmÞ εßναι πÜντοτε
στην πλευρÜ που Ýχει πßεση ο κορmüj.
S
Η πρþτη τοmÞ θα πρÝπει να εκτεßνεται στο
1/3 τηj διαmÝτρου του κορmοý.
S
Ολοκληρþστε mε τη δεýτερη τοmÞ.
ΧρÞση ρεmαχισmοσ
1η ΤοmÞ
2η ΤοmÞ
2η ΤοmÞ
1
η ΤοmÞ
1η ΤοmÞ
2η ΤοmÞ
ΧρÞση υποστηρßγmατοj
1η ΤοmÞ
2η ΤοmÞ
ΑΦΑΙΡΕΣΗ ΒΡΑΧΙΟΝΩΝ ΚΑΙ
ΚΛΑ∆ΕΜΑ
ΠΡΟΕΙ∆ΟΠΟΙΗΣΗ:
Να Ýχετε το
νου σαj þστε να φυλÜγεστε απü τυχüν
απüτοmα τινÜγmατα του αλυσοπρßονου. Μην
επιτρÝπετε να Ýρχεται η κινοýmενη αλυσßδα
σε επαφÞ mε Üλλα κλαδιÜ Þ αντικεßmενα στο
σηmεßο τηj mýτηj του οδηγοý κατÜ το
κλÜδεmα Þ το πριüνισmα κλαδιþν.
ΠΡΟΕΙ∆ΟΠΟΙΗΣΗ:
ΠοτÝ mην
ανεβεßτε mÝσα στο δÝντρο για να αφαιρÝσετε
βραχßονεj Þ να το κλαδÝψετε. Μην στÝκεστε
πÜνω σε σκÜλÜ, σκαλωσιÜ, ξýλο Þ σε Üλλη
θÝση στην οποßα mπορεß χÜσετε την ισορροπßα
σαj Þ τον Ýλεγχο του αλυσοπρßονου.