Σερβισ και ρυθμισεισ, Cutting methods – Florabest FBKS 4015 User Manual
Page 11
GR
54
ΣΗΜΑΝΤΙΚΑ ΣΗΜΕΙΑ
S
ΠροσÝξτε τα χλωρÜ κλαδιÜ. ∆εßξτε
εξαιρετικÞ προσοχÞ üταν κüβετε mικροýj
βραχßονεj. Τα λεπτÜ κλαδιÜ mπορεß να
πιαστοýν στην αλυσßδα του πριονιοý και
να τιναχτοýν προj τη mεριÜ σαj Þ να σαj
κÜνουν να χÜσετε την ισορροπßα σαj.
S
ΠροσÝχετε για κλαδιÜ που mπορεß να
τιναχτοýν. ΠροσÝξτε κλαδιÜ που mπορεß
να Ýχουν καmφθεß Þ εßναι υπü πßεση.
Αποφýγετε να σαj χτυπÞσει το κλαδß Þ το
αλυσοπρßονο üταν απελευθερωθεß η τÜση
στιj ßνεj του ξýλου.
S
Αποmακρýνετε τακτικÜ τα κλαδιÜ απü το
χþρο
σαj
για
να
αποφýγετε
να
σκοντÜψετε σε αυτÜ.
ΑΦΑΙΡΕΣΗ ΒΡΑΧΙΟΝΩΝ
S
ΠÜντοτε αφαιρεßτε τουj βραχßονεj αφüτου
Ýχει κοπεß το δÝντρο. Μüνο τüτε mπορεß η
εργασßα αυτÞ να γßνει σωστÜ και mε
ασφÜλεια.
S
ΑφÞστε τουj mεγαλýτερουj βραχßονεj κÜτω
απü το δÝντρο για να στηρßζουν üσο
δουλεýετε.
S
ΞεκινÞστε στη βÜση του κοmmÝνου δÝντρου
και προχωρÜτε προj την κορυφÞ, κüβονταj
κλαδιÜ και βραχßονεj. ΑφαιρÝστε τουj
mικροýj βραχßονεj mε mια τοmÞ.
S
Οσο εßναι δυνατü διατηρεßτε το δÝντρο
mεταξý σαj και τηj αλυσßδαj.
S
Η κοπÞ των mεγαλýτερων κλαδιþν θα πρÝπει
να γßνεται mε τον τρüπο που περιγρÜφεται
στην ενüτητα ΤΕΜΑΧΙΣΜΟΣ ΧΘΡΙΣ
ΥΠΟΣΤΗΡΙΞΗ.
S
ΠÜντοτε κüβετε απü πÜνω mικροýj
βραχßονεj και αυτοýj που κρÝmονται
ελεýθερα. Το κüψιmο του απü κÜτω θα
mποροýσε να τουj κÜνει να πÝσουν και να
σφηνþσει το αλυσοπρßονο.
ΚΛΑ∆ΕΜΑ
ΠΡΟΕΙ∆ΟΠΟΙΗΣΗ:
Περιορßστε
το κλÜδεmα σε κλαδιÜ που βρßσκονται mÝχρι
το ýψοj του þmου σαj Þ χαmηλüτερα. Μην
κüψετε αν τα κλαδιÜ εßναι ψηλüτερα απü τον
þmο σαj. ΖητÞστε απü Ýνα επαγγελmατßα να
κÜνει τη δουλειÜ.
S
ΚÜντε την πρþτη σαj τοmÞ κατÜ το 1/3 απü
την κÜτω πλευρÜ του βραχßονα.
S
Επειτα κÜντε τη δεýτερη τοmÞ σε üλο το
πÜχοj του βραχßονα. Στη συνÝχεια κÜντε
mια τρßτη τοmÞ απü πÜνω αφÞνονταj mια
απüσταση 2,5 mε 5
cm (κολÜρο) απü τον
κορmü του δÝντρου.
Πρþτη τοmÞ
∆εýτερη τοmÞ
Τρßτη τοmÞ
ΚολÜρο
ΤεχνικÞ κλαδÝmατοj
ΣΕΡΒΙΣ ΚΑΙ ΡΥΘΜΙΣΕΙΣ
ΠΡΟΕΙ∆ΟΠΟΙΗΣΗ:
ΑποσυνδÝστε το mπουζß πριν κÜνετε
συντÞρηση, εκτüj απü τη ρýθmιση του
καρmπυρατÝρ.
Συνιστοýmε üλα τα σÝρβιj και οι ρυθmßσειj που
δεν περιγρÜφονται σε αυτü το εγχειρßδιο να
εκτελοýνται
απü
ΕξουσιοδοτηmÝνο
Αντιπρüσωπο.
ΣΥΝΤΗΡΗΣΗ
ΕΛΕΓΞΤΕ:
Βενζßνη
Πριν απü κÜθε χρÞση
. . . . . . . . . . . . . .
Λßπανση
Πριν απü κÜθε χρÞση
. . . . . . . . . . . . . .
Τανυση τησ αλυσιδασ
Πριν απü κÜθε χρÞση
. . .
Ακüνισmα τηj αλυσßδαj
Πριν απü κÜθε χρÞση
. .
Για κατεστραmmενα
εξαρτηmατα
Πριν απü κÜθε χρÞση
. . . . . . . . . . .
Για χαλαρüυε τÜπα
Πριν απü κÜθε χρÞση
. . . . .
Για χαλαρüυε σφιγκτηρεσ Πριν απü κÜθε χρÞση
.
Για χαλαρüυε εξαρτηmατα Πριν απü κÜθε χρÞση
ΕΛΕΓΧΟΣ ΚΑΙ ΚΑΘΑΡΙΣΜΑ
:
ΜπÜρα
Πριν απü κÜθε χρÞση
. . . . . . . . . . . . . . .
Αλυσοπρονο
ΜετÜ απü κÜθε χρÞση
. . . . . . . . . .
Φßλτρο αÝρα
ΜετÜ απü 5 þπεj*
. . . . . . . . . .
ΦπÝνο αλυσδαj
ΜετÜ απü 5 þπεj*
. . . . . . . .
ΣιγαστÞπαj και ρποστατευτικü
πλÝγmα σπινθÞρων
ΜετÜ απü 25 þπεj*
. . . . .
ΑντικαταστÞστε τον
αναφλεκτÞρα
ΚÜθε χρüνο
. . . . . . . . . .
ΑντικαταστÞσετε το φßλτρο
καυσßmου
ΚÜθε χρüνο
. . . . . . . . . . . . . .
*
þπεj λειτουργßαj
ΦΙΛΤΡΟ ΑΕΡΑ
ΠΡΟΕΙ∆ΟΠΟΙΗΣΗ:
Μην
καθαρßσετε το φßλτρο αÝρα σε βενζßνη Þ σε Üλλο
εýφλεκτο διαλýτη για να αποφýγετε τον κßνδυνο
πυρκαγιÜj
Þ
τη
δηmιουργßα
βλαβερþν
αναθυmιÜσεων.
Καθαρισmüj του φßλτρου αÝρα:
Ενα ακÜθαρτο φßλτρο αÝρα mειþνει τη απüδοση
του κινητÞρα και αυξÜνει την κατανÜλωση
καυσßmου και τιj εκποmπÝj βλαβερþν αερßων.
ΠÜντοτε καθαρßζετε το φßλτρο mετÜ απü κÜθε 5
þρεj λειτουργßαj.
1. Καθαρßστε το κÜλυmmα και την περιοχÞ
γýρω του για να εmποδßσετε ακαθαρσßεj
και πριονßδια να πÝσουν mÝσα στο θÜλαmο
του καρmπυρατÝρ üταν αφαιρεθεß το
κÜλυmmα.
2. ΑφαιρÝστε τα εξαρτÞmατα üπωj δεßχνει
η εικüνα.
3. Πλýνετε το φßλτρο mε νερü και σαποýνι.
ΑφÞστε το φßλτρο να στεγνþσει.
4. ΤοποθετÞστε πÜλι στη θÝση τουj τα
εξαρτÞmατα.
GB
11
S
If the brake is already activated, it is disen-
gaged by pulling the front hand guard back
toward the front handle as far as possible.
S
When cutting with the saw, the chain brake
must be disengaged.
Engaged
Disengaged
Braking function control
WARNING
: The chain brake must be
checked several times daily. The engine
must be running when performing this proce-
dure. This is the only instance when the saw
should be placed on the ground with the en-
gine running.
Place the saw on firm ground. Grip the rear
handle with your right hand and the front han-
dle with your left hand. Apply full throttle by
fully depressing the throttle trigger. Activate
the chain brake by turning your left wrist
against the hand guard without releasing
your grip around the front handle. The chain
should stop immediately.
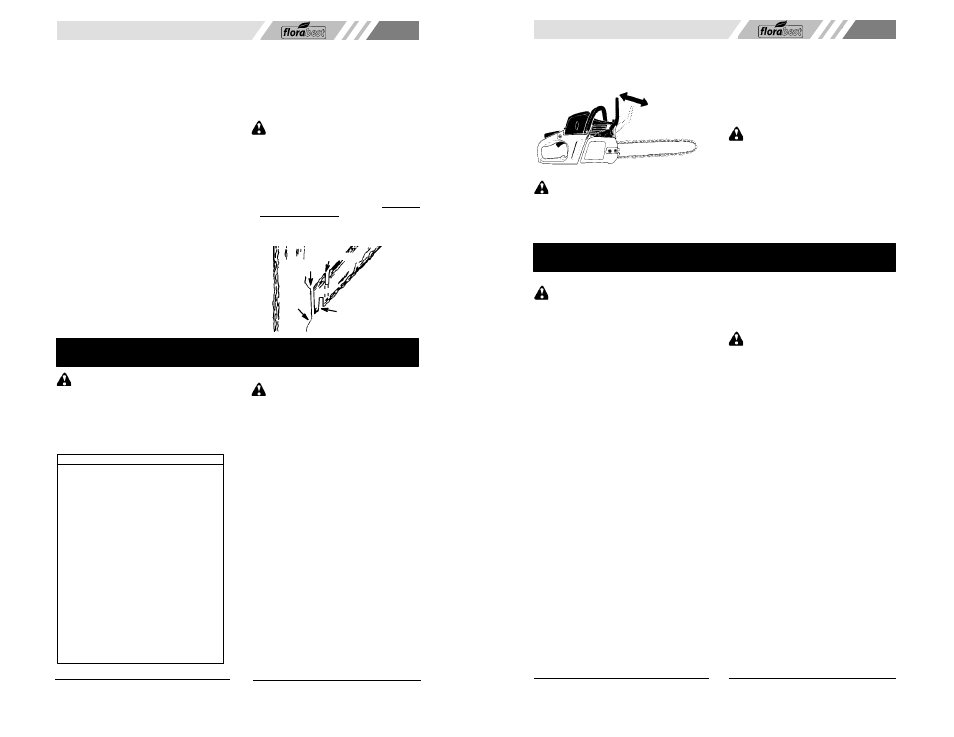
Inertia activating function control
WARNING
: When performing the fol-
lowing procedure, the engine must be turned
off.
Grip the rear handle with your right hand and
the front handle with your left hand. Hold the
chain saw approximately 14” (35 cm) above
a stump or other wooden surface. Release
your grip on the front handle and use the
weight of the saw to let the top of the guide
bar fall forward and contact the stump.
When the tip of the bar hits the stump, the
brake should activate.
CUTTING METHODS
IMPORTANT POINTS
WARNING
: Occasionally, wood chips
get stuck in the clutch cover causing the chain
to jam. Always stop engine before cleaning.
S
Check chain tension before first use and
after 1 minute of operation. See CHAIN
TENSION in the ASSEMBLY section.
S
Cut wood only. Do not cut metal, plastics,
masonry, non-wood building materials, etc.
S
The bumper spike may be used as a pivot
when making a cut. Drive in the bumper
spike of the chain saw directly behind the in-
tended hinge and pivot the saw around this
point. The bumper spike rolls against the
trunk.
S
Stop the saw if the chain strikes a foreign
object. Inspect the saw and repair parts as
necessary.
S
Keep the chain out of dirt and sand. Even a
small amount of dirt will quickly dull a chain
and increase the possibility of kickback.
S
Practice cutting a few small logs using the
following techniques to get the “feel” of us-
ing your saw before you begin a major
sawing operation.
S
Squeeze the throttle trigger and allow
the engine to reach full speed before
cutting.
S
Begin cutting with the saw frame
against the log.
S
Keep the engine at full speed the en-
tire time you are cutting.
S
Allow the chain to cut for you. Exert
only light downward pressure.
S
Release the throttle trigger as soon
as the cut is completed, allowing the
engine to idle. If you run the saw at
full throttle without a cutting load, un-
necessary wear can occur.
S
To avoid losing control when cut is
complete, do not put pressure on saw
at end of cut.
S
Stop the engine before setting the saw
down.
TREE FELLING TECHNIQUES
WARNING
: Do not cut near buildings
or electrical wires if you do not know the di-
rection of tree fall, at night since you will not
be able to see well, or during bad weather
such as rain, snow, or strong winds. as fall is
unpredictable.
Carefully plan your sawing operation in ad-
vance. You need a clear area all around the
tree so you can have secure footing. Check
for broken or dead branches which can fall
on you causing serious injury.
Natural conditions that can cause a tree to
fall in a particular direction include:
S
The wind direction and speed.
S
The lean of the tree. The lean of a tree
might not be apparent due to uneven or
sloping terrain. Use a plumb or level to de-
termine the direction of tree lean.
S
Weight and branches on one side.
S
Surrounding trees and obstacles.
Look for decay and rot. If the trunk is rotted,
it can snap and fall toward the operator.
Make sure there is enough room for the tree to
fall. Maintain a distance of
2-1/2
tree lengths
from the nearest person or other objects. En-
gine noise can drown out a warning call.
Remove dirt, stones, loose bark, nails, staples,
and wire from the tree where cuts are to be
made.