Qe r t, 2a 2b 2c – Florabest Compost Bin / Composter User Manual
Page 8
verder versneld wanneer de afzonderlijke, goed gemeng-
de en vochtige lagen met compoststarters uit de vakhan-
del, organisch mengmest en oude compostgrond worden
bestrooid of door toevoegen van regenwormen. Als alter-
natief kan ook tuingrond, steengruis of algenkalk worden
gebruikt. Vooral in de zomermaanden vermeerderen zich
de micro-organisme sterk, waardoor de plantenresten
snel vergaan.
Verwijder de gebruiksklare compost
•
Controleer de rijpheid van de compost. Open de
schuif om de structuur van de humus te herkennen.
Gebruiksklare compostgrond dient donkerbruin en
korrelig te zijn en moet naar bosgrond ruiken.
•
Zeef de gebruiksklare compostgrond voor gebruik
(niet te fijn).
Deponeer niet verrotte bestanddelen zoals bijv. resten
van takken opnieuw in de compostbereider.
Istruzione di montaggio
Per favore osservate:
Montare il composter nel modo descritto di seguito
e posizionarlo solo su una superficie piana.
Contenuto della fornitura:
4
pezzi laterali con dispositivo di prelievo già montato.
1 coperchio
1 Rete da pavimento
4 picchetti
Scegliere la posizione
La posizione adatta per il composter è a mezz’ombra
di fiori e siepi. Fare sì che il composter abbia il contatto
diretto con la terra del giardino. In questo modo gli
organismi della terra necessari possono lavorare senza
impedimenti. Uno strato di sterpi oppure torba sono
adatti per mantenere l’umidità.
Q
Ancorate i due pezzi della rete tra loro
Inserite il naso di fissaggio (1) nell’incavo (2) e fateli incastrare.
Inserite i 4 picchetti attraverso i fori agli angoli della rete
da pavimento e ancorateli al pavimento.
W
Agganciare le parti laterali tra loro
Nota: Posizionatevi al di fuori del composter, in modo
da poterlo montare più facilmente. Fissare con il piede la
parte sinistra ed inserire i naselli di fissaggio della parte
destra nei incavi della parte sinistra.
2a Nasello di fissaggio (1) & Incavo (2)
2b Inserire il nasello di fissaggio dell’incavo
2c Premere verso il basso
E
Sistemare le quattro parti laterali in modo
rettangolare
Sistemare le quattro parti laterali – assemblati
come in 2 – in modo rettangolare (90°).
Collegate la rete da pavimento con i pezzi laterali
Inserite i pezzi laterali collegati sulla rete da pavimento.
Premeteli un poco verso il basso e fate incastrare i pezzi
laterali.
R
Inserire il coperchio e farlo incastrare
Orientare il coperchio leggermente verso in avanti…
premere ed incastrare
Apporre il coperchio su qualsiasi parte laterale nei punti
di cerniera e farlo incastrare (schema). In caso di
danneggiamento della parte della cerniera, è possibile
usare la parte della cerniera di un'altra parte laterale.
T
Il montaggio è terminato
Il composter è provvisto di un foro per lucchetto (vedi
Fig. 4.1). In caso di necessità serrare il composter con
un lucchetto (il lucchetto non è compreso nella fornitura).
COMPOSTER
Riempire il composter in modo corretto
• iniziare con uno strato di terra
•
poi rifiuti da giardino: possibilmente con qualche
legno e foglia, cioè rifiuti verdi ricchi di azoto
mischiati con rifiuti ricchi di carbonio.
•
i singoli strati non dovrebbero superare circa
15 cm di altezza
•
impedite disturbi olfattivi: per questo è bene
mischiare il materiale di compostaggio nel
composter con una forca da giardino – in questo
modo si fa entrare dell’aria fresca che velocizza il
processo di decomposizione.
•
Materiali che entrano nel composter sono abbastanza
poveri di sostanze nutritive; il loro valore principale
sta nella percentuale di humus; per questo si
consiglia l’arricchimento con sostanze nutritive
(p.es. stallatico).
•
impedire che il composto si asciughi completamente
(specialmente nei mesi estivi), mettendone dell’acqua
di tanto in tanto.
Rifiuti adatti per il compostaggio sono tra l’altro:
• rifiuti da giardino (tagliati in pezzettini)
• erba tagliata e leggermente asciugata
• foglie (possibilmente tritturati)
• Tagli di alberi e siepi (triturati)
• Fondo da caffè, buste da tè, gusci d’uova
• Cenere di legno e fuliggine
Immettere tutti i rifiuti in modo leggero Non premere o
comprimere i rifiuti, in modo che gli organismi nel com-
posto possano lavorare.
Non immettere nel composto:
•
Rifiuti da cucina come carnem pesce, formaggio,
zuppa, grasso, olio, ossa e pane. Questi prodotti
possono creare muffe!
•
si dovrebbe evitare inoltre le bucce di patate
trattate con mezzi chimici.
•
Non immettere mai le bucce di agrumi nel
composto
Consigli per velocizzare la procedura di
compostaggio
Quanto tempo serve per arrivare alla maturità del
composto, dipende dalla composizione del materiale,
dal contenuto di umidità e dalla temperatura. Tagli di
erba, rifiuti di verdura e da giardino, si decompongono in
pochi mesi.
Il processo di decomposizione può essere velocizzato, se
si sparge i singoli strati ben mischiati ed umidi con avviatori
di compostaggio (nel commercio), con concime organico
e terra vecchia da compostaggio oppure se si aggiunge
lombrichi. In alternativa si può usare anche terra da giar-
dino, farina di pietra oppure calcare d’alghe. Specialmente
nei mesi estivi i microrganismi aumentano fortemente e
decompongono velocemente le parti di piante.
Togliere il composto pronto
•
Controllare prima il grado di maturazione del
composto. Aprire il dispositivo di prelievo per
riconoscere la struttura del humus. La terra di
composto dovrebbe essere marrone scuro e
granulosa e odorare di terra di bosco.
•
Setacciare la terra di compostaggio prima dell’uso
(non troppo fine). La parte non decomposta come
p.es. pezzi di rami, vanno messi nuovamente
nel composter.
90
o
90
o
90
o
90
o
Q
E
R
T
2a
2b
2c
1
2
4.1
4.2
W
Manual_de_gb_fr_nl_it_07.indd 1
09.11.2006 14:36:24 Uhr
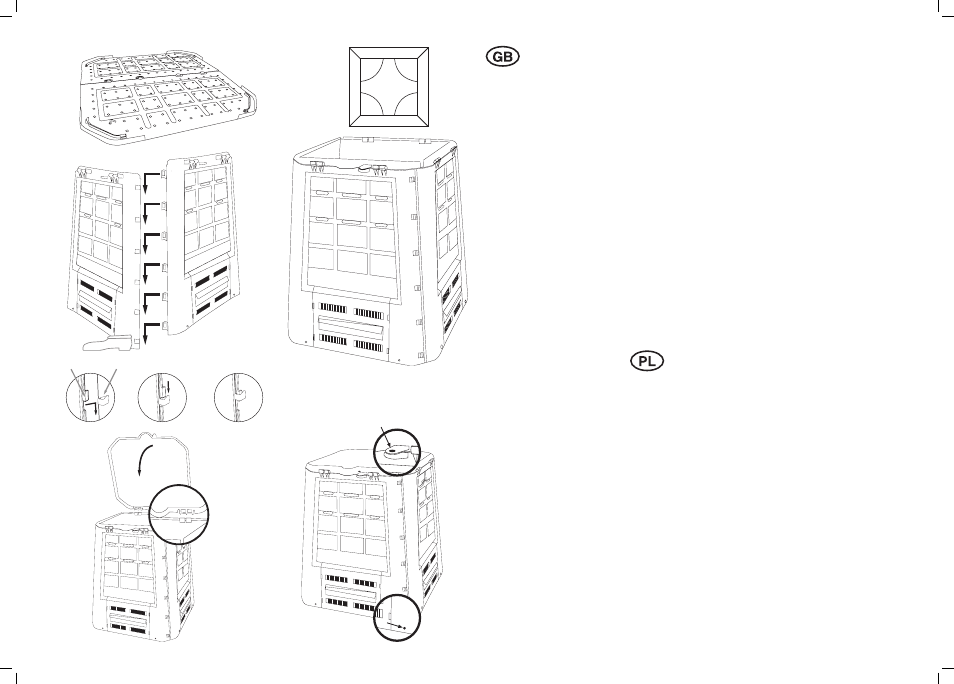
Assembly instructions
Please note:
Assemble your composter in accordance with the following
instructions, placing it on a level supporting surface.
Included components:
4 x sides, each with a prefitted slide opening for removal
1 x lid
1 x bottom screen
4 x ground spikes
Selecting a suitable site
The ideal site for the composter is in the half shade of
flowers or hedges. Ensure that the composter is in direct
contact with garden soil. This will allow essential garden
organisms to work unhindered on your compost. A layer of
coarser stalks, shredded material or grass sods is perfect
for ensuring the correct moisture content is maintained.
1) Anchor the two parts of the bottom screen together
Insert the 4 ground spikes through the holes in the
corners of the bottom screen and anchor them to the
ground.
2) Attaching the sides to one another
Note: You will find it easier to assemble the composter if
you stand outside it. Using your left foot to steady the left
hand side part of each corner, slide the fastening lugs of
the right hand side part into the corresponding slots ofthe
left hand side part.
2a Fastening lug (1) & slot (2)
2b Slide the fastening lug into the slot
2c Press down
3) Squaring up the four sides
Adjust the four sides – once you have slid them together
as instructed in 2 – so that they are at right angles (90°) to
one another.
Connecting the bottom screen to the sides
Set down the connected sides on the bottom screen. Press
them down slightly so that the sides engage.
4)
Putting on and engaging the lid
Angle the lid towards the front, ... Press it down and engage
it. Attach the lid to any side part by the hinge points and
engage it (see sketch). If the hinge part on any side part
gets damaged you can use the hinge part on another side.
5) The assembly is complete
The composter has a hole for a lock (see Fig. 4.1). If
necessary you can lock the composter with a padlock
(padlock not included).
COMPOSTER
It is important to fill your composter correctly
• begin with a layer of earth
• then add garden waste, if possible with intermediate layers
woody material and leaves, i.e. create a mixture of nitrogen-
rich green waste and carbon-rich materials
• the individual layers should not be thicker than 15 cm
• to avoid smells building up, it is helpful to lightly mix
through the composting material in the composter using a
garden fork. This will allow fresh air to be introduced into the
rotting process
• the materials in the composter are relatively poor in
nutrient content but are important for their humus content,
therefore it may be beneficial to enrich the mixture by
adding nutrients, for example farmyard dung
• water the compost from time to time to avoid it drying out
completely, especially in the summer months
Compostable wastes include:
• garden waste (chopped or cut into small pieces)
• cut grass, allowed to dry slightly first
• leaves (in small pieces if possible)
• tree or hedge cuttings (shredded)
• coffee grounds, filters, teabags, eggshells
• wood ashes and soot
Introduce the waste in such a way that it is as loose as
possible. Do not press or pat down the waste to form a sold
mass, otherwise this could prevent the micro-organisms
from working properly on the compost.
Items unsuitable for composting include:
• kitchen wastes containing meat, fish, cheese, soup,
cooking fat, oil, bones or bread. These materials contribute
to the formation of mould.
• materials treated with chemicals, likewise avoid potato
peelings
• never place citrus fruit peel in your compost
Tips for accelerating the composting process
How quickly your composter processes the waste depends
mainly on the mixing of the materials, moisture content and
temperature. Grass cuttings, vegetable and garden waste,
and farmyard dung rot down in a few months.
The rotting process can be further accelerated if you
sprinkle each layer of well mixed and thoroughly damp
material with a compost starter (obtainable from a garden
centre), mixed organic fertilisers and old compost earth or
by adding garden worms. You can also add garden earth,
stone dust or crushed coral. In the summer months in
particular, the num-ber of micro-organisms increases greatly
and this leads to a speedy breakdown of the green waste.
Removing the finished compost
• First test whether the compost is ready. Slide open the
opening so that you can see the structure of the humus.
When the compost is ready it has a dark brown, grainy
appearance and smells like the forest floor.
• Sieve the finished compost before use (not too fine).
Return any materials that are not completely rotted, e.g.
pieces of branch, back into the composter.
Instrukcja montażu
Prosimy pamiętać:
Kompostownik należy zmontować w sposób niżej opisany i
usadowić go wyłącznie na równym podłożu.
Produkt składa się z następujących części:
4 x elementy boczne z zamontowaną klapą do
pobierania kompostu
1 x pokrywa
1 x kratą spodnią
4 x kotwy
Wybrać stanowisko
Korzystną lokalizacją kompostownika jest
miejsce znajdujące się w półcieniu kwiatów
lub żywopłotu. Należy pamiętać, aby kompostownik
miał bezpośredni kontakt z ogrodową
ziemią. Dzięki temu organizmy żyjące w ziemi
potrzebne do procesu kompostowania będą
mieć wolny dostęp do składowanych w nim
odpadów. Do utrzymania wilgoci najlepiej
nadaje się warstwa chrustu, kory lub torfu.
1)
Połączyć ze sobą obie części kraty spodniej
Wsunąć cztery kotwy w otwory znajdujące się
w narożnikach kraty spodniej i zakotwiczyć
w podłożu.
2)
Połączyć ze sobą elementy boczne
Wskazówka: ustawić się na zewnątrz
kompostownika, dzięki temu można będzie go
łatwiej zmontować. Lewą stopą unieruchomić
lewy element boczny i wsunąć noski mocujące
prawej części bocznej do rowków znajdujących
się w części lewej.
2a Nosek mocujący (1) & rowek (2)
2b Wsunąć nosek mocujący do rowka
2c Docisnąć elementy
3)
Wszystkie cztery boki ustawić pod kątem
prostym
Wszystkie cztery elementy boczne złączone w sposób opisany
w pkt. 2 należy teraz ustawić względem siebie pod kątem
prostym (90°).
Połączyć kratę spodnią ze ścianami bocznymi.
Nasadzić połączone ściany boczne na kratę spodnią. Docisnąć
w dół do momentu ich zazębienia.
4)
Przyłożyć i docisnąć pokrywę tak, aby się ona wyraźnie
zazębiła
Pokrywę ustawić lekko pod kątem w kierunku do przodu, i
docisnąć w dół aż do jej słyszalnego zazębienia się.
Przyłożyć pokrywę do dowolnego elementu bocznego w
punktach, w których znajdują się zawiasy i docisnąć ją aż do jej
zazębienia się (patrz szkic). W przypadku uszkodzenia części
zawiasu możemy użyć zawiasu innego elementu bocznego
5)
Montaż jest zakończony
Kompostownik posiada otwór zamkowy (patrz ilustracja 4.1).
W razie potrzeby kompostownik można zamknąć przy pomocy
kłódki (kłódka nie jest zawarta w wyposażeniu).
KOMPOSTOWNIK
Prawidłowe napełnianie kompostownika
•
należy zacząć od warstwy ziemi
•
następnie odpady ogrodowe; o ile to możliwe poprzedzielane
warstwami drewna i liści, odpadki zielone o dużej zawartości
azotu zmieszane z odpadkami o dużej zawartości węgla
•
poszczególne warstwy nie powinny przekraczać grubości 15 cm
•
unikajmy nadmiernego tworzenia się nieprzyjemnego
zapachu; pomocne w tym celu będzie lekkie przemieszanie
kompostowanego materiału widłami – dzięki doprowadzeniu
świeżego powietrza proces rozpadu ulegnie przyspieszeniu
•
Materiał dostający się do kompostownika jest relatywnie
ubogi w substancje odżywcze, jego główna wartość kryje
się w zawartości humusu, dlatego korzystne jest dodatkowe
nawożenie (np. obornikiem)
•
unikajmy całkowitego wysychania kompostu (szczególnie w
miesiącach letnich), od czasu do czasu nawadniając go.
Odpady nadające się do kompostowania to m in.:
•
odpady ogrodowe (rozdrobnione)
•
skoszona, lekko wysuszona trawa
•
liście (w miarę możliwości rozdrobnione)
•
ścinki po pielęgnacji drzew i żywopłotów (rozdrobnione)
•
fusy z kawy wraz z papierowymi wkładami filtrującymi, herbata
ekspresowa w saszetkach, skorupki jajek
•
popiół drzewny
Wrzucane odpady powinny być w miarę luźne. Nigdy mocno
nie ugniatać odpadów, aby umożliwić pracę organizmom
przerabiającym masę organiczną.
Do kompostownika nie należy wrzucać m in.:
•
odpadów kuchennych takich jak resztki mięsa, ryb, serów,
zup, tłuszczu ze smażenia, oleju, kości i chleba - produkty te
przyczyniają się do powstawania pleśni!
•
należy także unikać łupin kartoflanych traktowanych środkami
chemicznymi
•
w żadnym wypadku nie wrzucać do kompostownika skórek
po cytrusach
Wskazówki dla przyspieszenia procesu kompostowania
Szybkość procesu powstawania dojrzałego kompostu zależy
w dużej mierze od składu zgromadzonego w kompostowniku
materiału, jego wilgotności i temperatury. Ścięta trawa, odpady
owocowe i warzywne, obornik rozkładają się w ciągu kilku
miesięcy.
Proces rozkładu można przyspieszyć dzięki mieszaniu warstw
kompostowanego materiału, dobremu napowietrzeniu i
dodawaniu starterów dostępnych w sklepach specjalistycznych,
nawozów organicznych i starej ziemi kompostowej bądź też
dżdżownic. Alternatywnie można użyć także ziemi ogrodowej,
mączki kamiennej lub wapna glonowego. Mikroorganizmy
biorące udział w procesie kompostowania rozmnażają się
szczególnie intensywnie w okresie lata powodując szybki
rozkład odpadów roślinnych.