Qe r t, 2a 2b 2c – Florabest Compost Bin / Composter User Manual
Page 13
verder versneld wanneer de afzonderlijke, goed gemeng-
de en vochtige lagen met compoststarters uit de vakhan-
del, organisch mengmest en oude compostgrond worden
bestrooid of door toevoegen van regenwormen. Als alter-
natief kan ook tuingrond, steengruis of algenkalk worden
gebruikt. Vooral in de zomermaanden vermeerderen zich
de micro-organisme sterk, waardoor de plantenresten
snel vergaan.
Verwijder de gebruiksklare compost
•
Controleer de rijpheid van de compost. Open de
schuif om de structuur van de humus te herkennen.
Gebruiksklare compostgrond dient donkerbruin en
korrelig te zijn en moet naar bosgrond ruiken.
•
Zeef de gebruiksklare compostgrond voor gebruik
(niet te fijn).
Deponeer niet verrotte bestanddelen zoals bijv. resten
van takken opnieuw in de compostbereider.
Istruzione di montaggio
Per favore osservate:
Montare il composter nel modo descritto di seguito
e posizionarlo solo su una superficie piana.
Contenuto della fornitura:
4
pezzi laterali con dispositivo di prelievo già montato.
1 coperchio
1 Rete da pavimento
4 picchetti
Scegliere la posizione
La posizione adatta per il composter è a mezz’ombra
di fiori e siepi. Fare sì che il composter abbia il contatto
diretto con la terra del giardino. In questo modo gli
organismi della terra necessari possono lavorare senza
impedimenti. Uno strato di sterpi oppure torba sono
adatti per mantenere l’umidità.
Q
Ancorate i due pezzi della rete tra loro
Inserite il naso di fissaggio (1) nell’incavo (2) e fateli incastrare.
Inserite i 4 picchetti attraverso i fori agli angoli della rete
da pavimento e ancorateli al pavimento.
W
Agganciare le parti laterali tra loro
Nota: Posizionatevi al di fuori del composter, in modo
da poterlo montare più facilmente. Fissare con il piede la
parte sinistra ed inserire i naselli di fissaggio della parte
destra nei incavi della parte sinistra.
2a Nasello di fissaggio (1) & Incavo (2)
2b Inserire il nasello di fissaggio dell’incavo
2c Premere verso il basso
E
Sistemare le quattro parti laterali in modo
rettangolare
Sistemare le quattro parti laterali – assemblati
come in 2 – in modo rettangolare (90°).
Collegate la rete da pavimento con i pezzi laterali
Inserite i pezzi laterali collegati sulla rete da pavimento.
Premeteli un poco verso il basso e fate incastrare i pezzi
laterali.
R
Inserire il coperchio e farlo incastrare
Orientare il coperchio leggermente verso in avanti…
premere ed incastrare
Apporre il coperchio su qualsiasi parte laterale nei punti
di cerniera e farlo incastrare (schema). In caso di
danneggiamento della parte della cerniera, è possibile
usare la parte della cerniera di un'altra parte laterale.
T
Il montaggio è terminato
Il composter è provvisto di un foro per lucchetto (vedi
Fig. 4.1). In caso di necessità serrare il composter con
un lucchetto (il lucchetto non è compreso nella fornitura).
COMPOSTER
Riempire il composter in modo corretto
• iniziare con uno strato di terra
•
poi rifiuti da giardino: possibilmente con qualche
legno e foglia, cioè rifiuti verdi ricchi di azoto
mischiati con rifiuti ricchi di carbonio.
•
i singoli strati non dovrebbero superare circa
15 cm di altezza
•
impedite disturbi olfattivi: per questo è bene
mischiare il materiale di compostaggio nel
composter con una forca da giardino – in questo
modo si fa entrare dell’aria fresca che velocizza il
processo di decomposizione.
•
Materiali che entrano nel composter sono abbastanza
poveri di sostanze nutritive; il loro valore principale
sta nella percentuale di humus; per questo si
consiglia l’arricchimento con sostanze nutritive
(p.es. stallatico).
•
impedire che il composto si asciughi completamente
(specialmente nei mesi estivi), mettendone dell’acqua
di tanto in tanto.
Rifiuti adatti per il compostaggio sono tra l’altro:
• rifiuti da giardino (tagliati in pezzettini)
• erba tagliata e leggermente asciugata
• foglie (possibilmente tritturati)
• Tagli di alberi e siepi (triturati)
• Fondo da caffè, buste da tè, gusci d’uova
• Cenere di legno e fuliggine
Immettere tutti i rifiuti in modo leggero Non premere o
comprimere i rifiuti, in modo che gli organismi nel com-
posto possano lavorare.
Non immettere nel composto:
•
Rifiuti da cucina come carnem pesce, formaggio,
zuppa, grasso, olio, ossa e pane. Questi prodotti
possono creare muffe!
•
si dovrebbe evitare inoltre le bucce di patate
trattate con mezzi chimici.
•
Non immettere mai le bucce di agrumi nel
composto
Consigli per velocizzare la procedura di
compostaggio
Quanto tempo serve per arrivare alla maturità del
composto, dipende dalla composizione del materiale,
dal contenuto di umidità e dalla temperatura. Tagli di
erba, rifiuti di verdura e da giardino, si decompongono in
pochi mesi.
Il processo di decomposizione può essere velocizzato, se
si sparge i singoli strati ben mischiati ed umidi con avviatori
di compostaggio (nel commercio), con concime organico
e terra vecchia da compostaggio oppure se si aggiunge
lombrichi. In alternativa si può usare anche terra da giar-
dino, farina di pietra oppure calcare d’alghe. Specialmente
nei mesi estivi i microrganismi aumentano fortemente e
decompongono velocemente le parti di piante.
Togliere il composto pronto
•
Controllare prima il grado di maturazione del
composto. Aprire il dispositivo di prelievo per
riconoscere la struttura del humus. La terra di
composto dovrebbe essere marrone scuro e
granulosa e odorare di terra di bosco.
•
Setacciare la terra di compostaggio prima dell’uso
(non troppo fine). La parte non decomposta come
p.es. pezzi di rami, vanno messi nuovamente
nel composter.
90
o
90
o
90
o
90
o
Q
E
R
T
2a
2b
2c
1
2
4.1
4.2
W
Manual_de_gb_fr_nl_it_07.indd 1
09.11.2006 14:36:24 Uhr
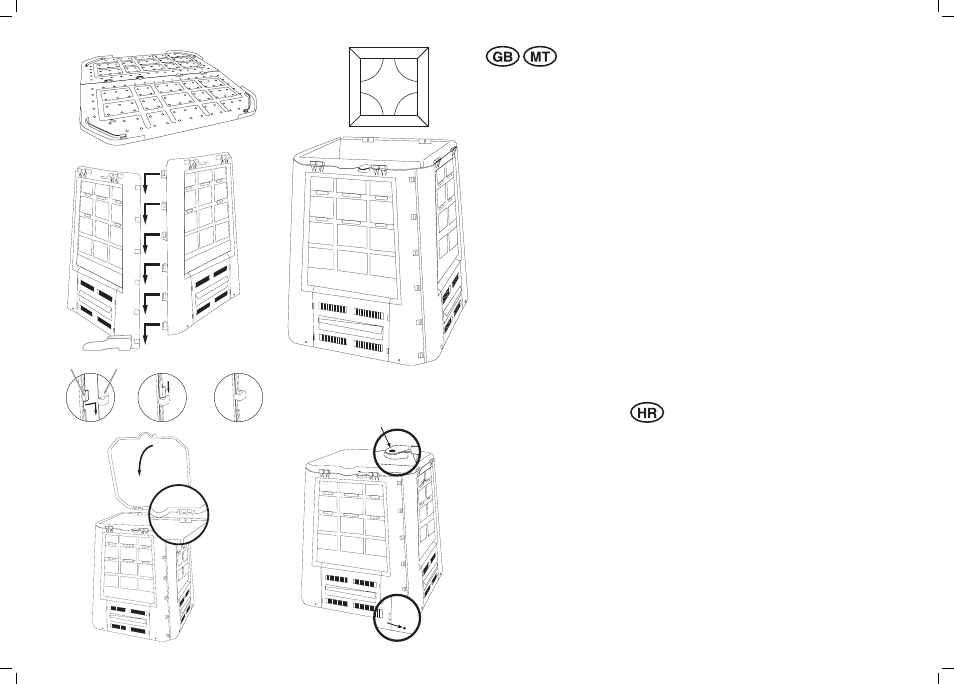
Assembly instructions
Please note:
Assemble your composter in accordance with the
following instructions, placing it on a level supporting
surface.
Included components:
4 x sides, each with a prefitted slide opening for
removal
1 x lid
1 x bottom screen
4 x ground spikes
Selecting a suitable site
The ideal site for the composter is in the half shade
of flowers or hedges. Ensure that the composter is in
direct contact with garden soil. This will allow essential
garden organisms to work unhindered on your
compost. A layer of coarser stalks, shredded material
or grass sods is perfect for ensuring the correct
moisture content is maintained.
1) Anchor the two parts of the bottom screen together
Push the fastening nose (1) into the slot (2) until it
engages. Insert the 4 ground spikes through the holes
in the corners of the bottom screen and anchor them to
the ground.
2) Attaching the sides to one another
Note: You will find it easier to assemble the composter
if you stand outside it. Using your left foot to steady the
left hand side part of each corner, slide the fastening
lugs of the right hand side part into the corresponding
slots ofthe left hand side part.
2a Fastening lug (1) & slot (2)
2b Slide the fastening lug into the slot
2c Press down
3) Squaring up the four sides
Adjust the four sides – once you have slid them
together as instructed in 2 – so that they are at right
angles (90°) to one another.
Connecting the bottom screen to the sides
Set down the connected sides on the bottom screen.
Press them down slightly so that the sides engage.
4) Putting on and engaging the lid
Angle the lid towards the front, ... Press it down and
engage it Attach the lid to any side part by the hinge
points and engage it (see sketch). If the hinge part on
any side part gets damaged you can use the hinge part
on another side.
5) The assembly is complete
The composter has a hole for a lock (see Fig. 4.1).
If necessary you can lock the composter with a padlock
(padlock not included).
COMPOSTER
It is important to fill your composter correctly
• begin with a layer of earth
• then add garden waste, if possible with intermediate
layers woody material and leaves, i.e. create a mixture
of nitrogen-rich green waste and carbon-rich materials
• the individual layers should not be thicker than 15 cm
• to avoid smells building up, it is helpful to lightly mix
through the composting material in the composter
using a garden fork. This will allow fresh air to be
introduced into the rotting process
• the materials in the composter are relatively poor in
nutrient content but are important for their humus
content, therefore it may be beneficial to enrich the
mixture by adding nutrients, for example farmyard
dung
• water the compost from time to time to avoid it drying
out completely, especially in the summer months
Compostable wastes include:
• garden waste (chopped or cut into small pieces)
• cut grass, allowed to dry slightly first
• leaves (in small pieces if possible)
• tree or hedge cuttings (shredded)
• coffee grounds, filters, teabags, eggshells
• wood ashes and soot
Introduce the waste in such a way that it is as loose as
possible. Do not press or pat down the waste to form
a sold mass, otherwise this could prevent the micro-
organisms from working properly on the compost.
Items unsuitable for composting include:
• kitchen wastes containing meat, fish, cheese, soup,
cooking fat, oil, bones or bread. These materials
contribute to the formation of mould.
• materials treated with chemicals, likewise avoid
potato peelings
• never place citrus fruit peel in your compost
Tips for accelerating the composting process
How quickly your composter processes the waste
depends mainly on the mixing of the materials,
moisture content and temperature. Grass cuttings,
vegetable and garden waste, and farmyard dung rot
down in a few months. The rotting process can be
further accelerated if you sprinkle each layer of well
mixed and thoroughly damp material with a compost
starter (obtainable from a garden centre), mixed organic
fertilisers and old compost earth or by adding garden
worms. You can also add garden earth, stone dust or
crushed coral. In the summer months in particular, the
num-ber of micro-organisms increases greatly and this
leads to a speedy breakdown of the green waste.
Removing the finished compost
• First test whether the compost is ready. Slide open
the opening so that you can see the structure of the
humus. When the compost is ready it has a dark
brown, grainy appearance and smells like the forest
floor.
• Sieve the finished compost before use (not too fine).
Return any materials that are not completely rotted,
e.g. pieces of branch, back into the composter.
Upute za montažu
Molimo Vas obratite pažnju:
Sklopite spremnik za kompost prema opisanim koracima i
postavite ga na ravnu podlogu.
Sadržaj dostave:
4 x bočna dijela sa pripremljenim utorima za ubacivanje
otpada
1 x poklopac
1 x podna mreža
4 x motke
Odaberite mjesto
Najpogodnije mjesto spremnika za kompost je u polusjeni
cvijeća i živice. Vodite računa da spremnik za kompost
ima izravan kontakt sa vrtnom zemljom. Na taj način mogu
organizmi iz zemlje nesmetano raditi. Za održavanje vlage
najpogodniji je sloj suhih grančica, usitnjenog otpada i
treseta.
1)
Međusobno pričvrstite oba dijela podne mreže
Progurajte sve četiri motke kroz rupe u kutu podne mreže i
pričvrstite je u zemlju.
2)
Međusobno pričvrstite bočne dijelove
Napomena: Postavite se s vanjske strane spremnika
za kompost, jer se na taj način lakše sklopi. Uz pomoć
lijeve noge učvrstite lijevu stranu i ugurajte klinove za
učvršćivanje desne strane u utore lijeve strane.
2a klin za učvršćivanje (1) i utor (2)
2b ugurati klin za učvršćivanje u utor
2c pritisnuti
3)
Poravnajte stranice pod pravim kutom
Poravnajte sva četiri zajedno spojena bočna dijela pod
pravim kutom (90°).
Povežite podnu mrežu sa bočnim dijelovima
Stavite povezane bočne dijelove na podnu mrežu. Pritisnite
ih malo dolje i pustite ih da se zaglave.
4)
Stavite poklopac i pustite ga da se zaglavi
Poklopac lagano nagnuti prema naprijed, ... pritisnuti i
zaglaviti
Stavite poklopac na željenu stranicu na pante i pustite ga
da se zaglavi (vidi skicu). U slučaju oštećenja panta na
nekoj stranici, može se koristiti pant neke druge stranice.
5)
Sklapanje je završeno
Spremnik za kompost raspolaže pripremom za lokot (vidi
sliku 4.1). Po potrebi zaključajte spremnik za kompost
lokotom (lokot nije sadržan u pošiljci).
SPREMNIK ZA KOMPOST
Pravilno napunite spremnik za kompost
•
počnite sa redom zemlje
•
zatim otpaci iz vrta; po mogućnosti granje i lišće, tj.,
dušikom bogati zeleni otpad sa bogatom smjesom ugljika
•
pojedini slojevi ne bi smjeli prelaziti visinu od 15 cm
•
sprječavanje mirisa; to možemo spriječiti tako da
kompost koji se nalazi u spremniku lagano promiješate
vilama – na taj način dovodimo svježi zrak koji pospješuje
proces truljenja
•
tvari, koje dolaze u spremnik za kompost su relativno
slabe hranjivim tvarima, stoga njihova glavna vrijednost
leži u količini humusa, zato je potrebno dodatno
obogaćivanje hranjivim
tvarima (na primjer stajsko gnojivo)
•
spriječite potpuno isušivanje komposta (naročito u
ljetnim mjesecima), tako da kompost s vremena na vrijeme
namočite
Pogodni otpaci za kompost su:
•
otpaci iz dvorišta (usitnjeno ili rezano na male komade)
•
košena, lagano sušena trava
•
lišće (po mogućnosti usitnjeno)
•
odrezano granje drveća ili živice (usitnjeno)
•
talog kave sa filtar vrećicom, vrećica od čaja, ljuska od
jajeta
•
pepeo i čađa
Ubacite sve otpatke što laganije.
Nikada nemojte jako pritiskati ili nabijati otpatke, da bi
organizmi u kompostu mogli djelovati.
Što ne spada u kompost:
•
otpaci iz kuhinje, kao ostaci mesa, ribe, sira, masti za
prženje, ulje kosti i kruh. Ti proizvodi pridonose stvaranju
plijesni!
•
kemijski tretirana kora krumpira treba se također
izbjegavati
•
kore citrusa ni u kom slučaju ne spadaju u kompost
Savjeti za ubrzavanje procesa kompostiranja
Koliko brzo kompost sazrije uvelike ovisi o sastavu
materijala, njenom sadržaju vlage i temperaturi. Košena
trava, otpaci iz vrta i dvorišta, gnoj istrule za nekoliko
mjeseci. Proces truljenja ćemo ubrzati ako u pojedine
dobro izmiješane i navlažene slojeve dodamo sredstava
za pospješivanje kompostiranja, organsku smjesu
gnojiva ili dodatkom kišnih glista. Alternativno se može
upotrebljavati i vrtna zemlja, kameno brašno ili vapnenac.
U ljetnim mjesecima se mikroorganizmi naročito jako brzo
razmnožavaju te na taj način djeluju na brzo raspadanje
biljnih dijelova.
Uzmite gotov kompost
•
Najprije provjerite stupanj zrelosti. Otvorite poklopac da
bi vidjeli strukturu humusa. Gotova kompostirana zemlja bi
trebala biti tamnosmeđe boje, zrnata i mirisati na šumsko
tlo.
•
Prosijajte gotovu kompostiranu zemlju prije upotrebe (ne
prefino). Nemojte ponovno stavljati istrunule dijelove u
spremnik za kompost kao na primjer granje.